
In the dynamic world of digital marketing, data is the compass that guides our decisions.
Every click, every view, and every interaction is a piece of a larger puzzle, revealing insights about our audience’s behavior, preferences, and journey.
This is where CPV One for campaign analytics steps in. It’s not just about numbers and graphs; it’s about understanding the story behind those numbers and leveraging that understanding to drive better marketing outcomes.
Understanding Campaign Analytics
At its core, campaign analytics systematically examines digital marketing campaign data. It’s the process of collecting, measuring, analyzing, and interpreting this data to understand and optimize the performance of your marketing efforts.
But why is it so crucial?
Imagine setting sail on a vast ocean without a compass or map. That’s what marketing without analytics feels like. You might have a general direction, but you’re largely navigating in the dark, relying on intuition rather than concrete data.
Campaign analytics provides that much-needed compass and map, illuminating the path to better marketing strategies.
The significance of campaign analytics cannot be overstated. Here’s why:
- Informed Decision Making: With accurate data at your fingertips, you can make decisions based on what’s working and what’s not. No more guesswork; every move is calculated and informed.
- Optimize Budget Allocation: By understanding which campaigns are yielding the best results, you can allocate your budget more efficiently, ensuring that every dollar spent is driving maximum value.
- Enhanced Customer Understanding: Analytics provides insights into your audience’s behavior, preferences, and pain points. This knowledge allows you to tailor your campaigns to resonate more deeply with your target audience.
- Predictive Analysis: With historical data and trends, you can predict future outcomes, helping you stay one step ahead of the competition.
Now, let’s talk about ROI (Return on Investment).
It’s a term that every marketer is intimately familiar with. ROI is the measure of the profitability of a campaign, calculated by dividing the net profit from the campaign by the cost of the campaign.
So, how does analytics influence this?
Simply put, the insights derived from campaign analytics enable marketers to optimize their campaigns for better results. Whether it’s tweaking ad copy, adjusting targeting parameters, or reallocating the budget, every decision driven by analytics can lead to improved ROI. It’s about ensuring that you get the best possible return for every dollar spent.
In the world of digital marketing, data is power. And campaign analytics is the key to unlocking that power, guiding marketers towards more impactful and profitable campaigns.
Why CPV One for Campaign Analytics?
CPV One is more than just another tracking tool for those new to the scene. It’s a comprehensive platform designed specifically for marketers who understand the value of data-driven decisions.
Whether you’re an affiliate marketer, an entrepreneur, or a digital agency, CPV One for campaign analytics offers a suite of features that help you track your campaigns and analyze them in-depth.
It’s like having a magnifying glass that brings into focus the finer details of your campaigns, allowing you to optimize, iterate, and improve.
In the subsequent sections, we’ll dive deeper into the world of CPV One for Campaign Analytics guiding you through its features and showcasing how it can be a game-changer for your digital marketing endeavors.
In the vast sea of tracking tools and analytics platforms, CPV One emerges as a beacon for marketers.
It’s like having a magnifying glass that brings into focus the finer details of your campaigns, allowing you to optimize, iterate, and improve.
But what makes it stand out? Let’s delve into the unique features and benefits of using CPV One for campaign analytics.
Features of CPV One :
- Multi-Channel Tracking: Whether it’s PPC, social media, or email campaigns, CPVLab offers comprehensive tracking across various channels.
- Real-Time Reporting: Get instant insights with real-time data analytics, allowing for swift decision-making.
- User-Friendly Interface: A clean, intuitive dashboard ensures even beginners can navigate and understand their campaign data with ease.
- Advanced Segmentation: Dive deep into your audience segments, understanding behaviors and preferences across different demographics.
- Integrated A/B Testing: Test multiple variations of your campaigns to determine what resonates best with your audience.
- Cookie-less Tracking: In an age where privacy is paramount, CPV One ensures accurate tracking even without relying on cookies.
Benefits of Using CPV One :
- Enhanced Decision Making: With detailed insights at your fingertips, make informed decisions that drive better campaign outcomes.
- Optimized Budgeting: Understand where your money is yielding the best results and allocate resources more efficiently.
- Seamless Integration:CPV One integrates effortlessly with various traffic sources and affiliate networks, streamlining your tracking process.
- Improved ROI: With better tracking and insights, optimize your campaigns for maximum return on investment.
CPV One vs. Other Tracking Solutions:
While numerous tracking solutions are available, CPV One for Campaign Analytics distinguishes itself in several ways.
- Unlike many platforms that offer surface-level insights, CPV One delves deeper, providing granular data that can be pivotal for campaign optimization.
- Its user-centric design ensures that even those new to campaign analytics can harness its power without a steep learning curve.
- Moreover, its commitment to privacy with features like cookie-less tracking showcases a forward-thinking approach, aligning with the evolving digital landscape.
In conclusion, while there are many tools in the market, CPV One‘s comprehensive features, user-friendly design, and commitment to accurate tracking make it a top choice for marketers seeking to elevate their campaign analytics game.
Getting Started with CPV One
Thinking about starting with CPV One?
You’re in for a treat! I’m here to guide you step-by-step so you can make the most of it.
Setting Up Your Account:
First things first, let’s get you settled in!
Did you know you can try out CPV One for campaign analysis for 14 days without spending a dime or even sharing your credit card info? Yep, it’s true! Dive in, explore, and see if it’s the right fit for you.
Oh, and a little heads-up: This tracking software has a self-hosting and cloud-based version.
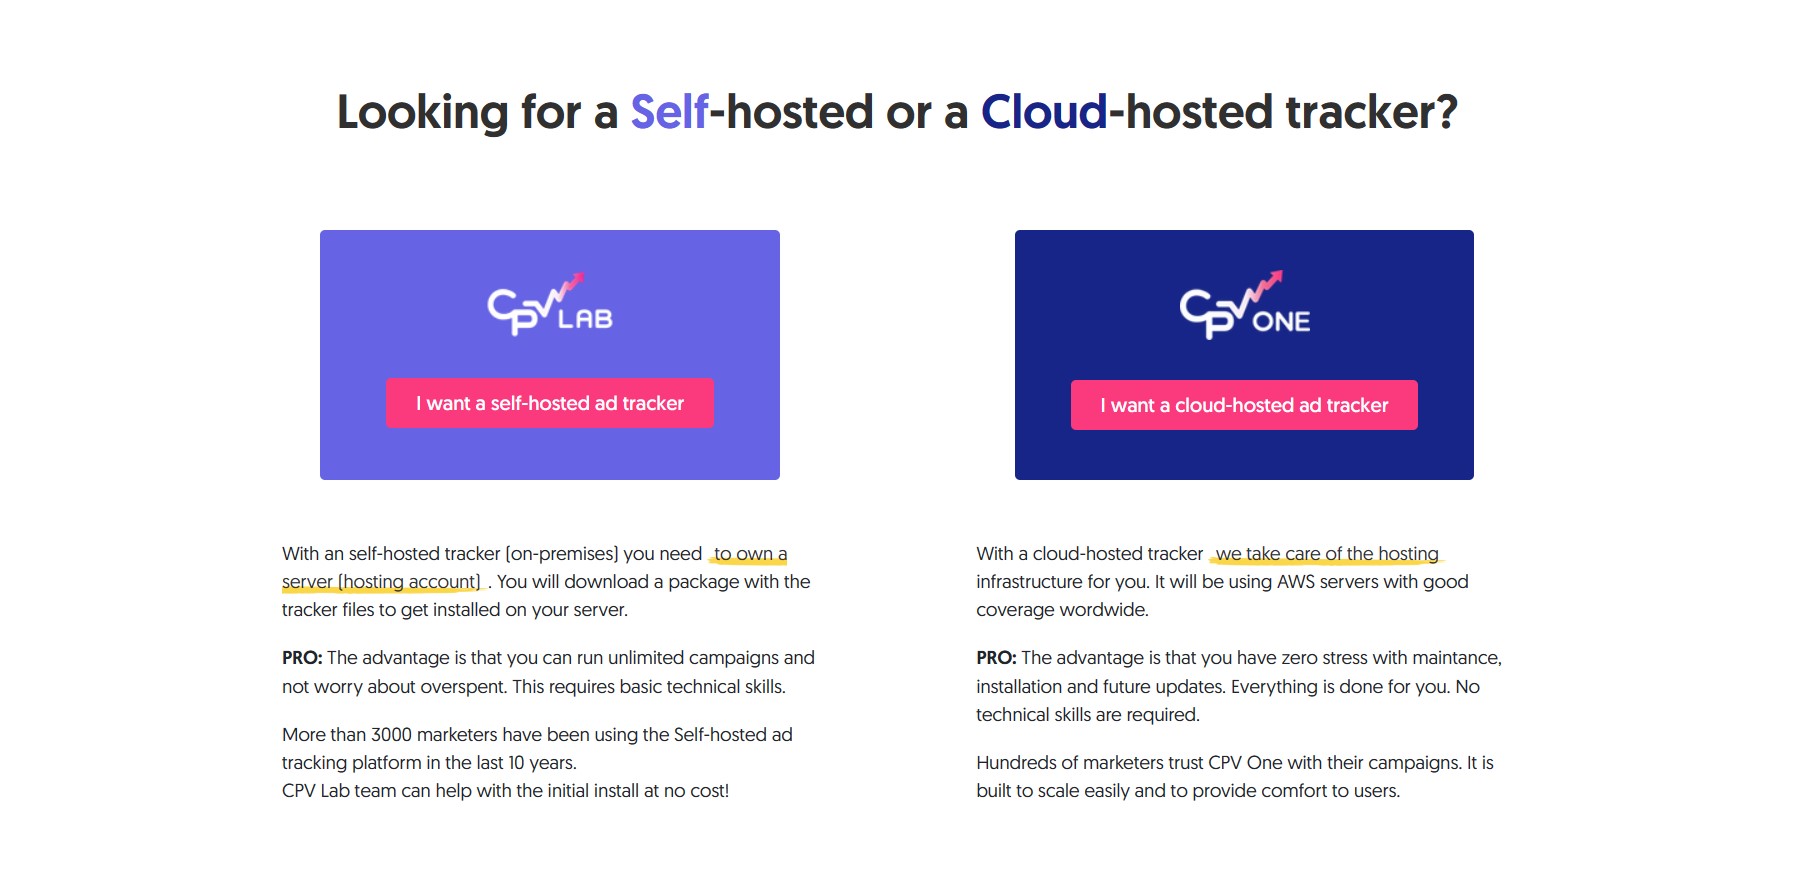
Cpvlab.pro platform starts in self-hosting mode. For a smoother ride, flip it over to cloud-based before you begin.
CPV One platform starts with a cloud-based mode.
So you can start from both platforms 🙂 I would recommend you to start with a cloud-based mode so you don’t have to worry about managing hosting servers.
Just between us, I started with the monthly plan to really get a feel for everything it offers. Maybe you’d like to do the same?
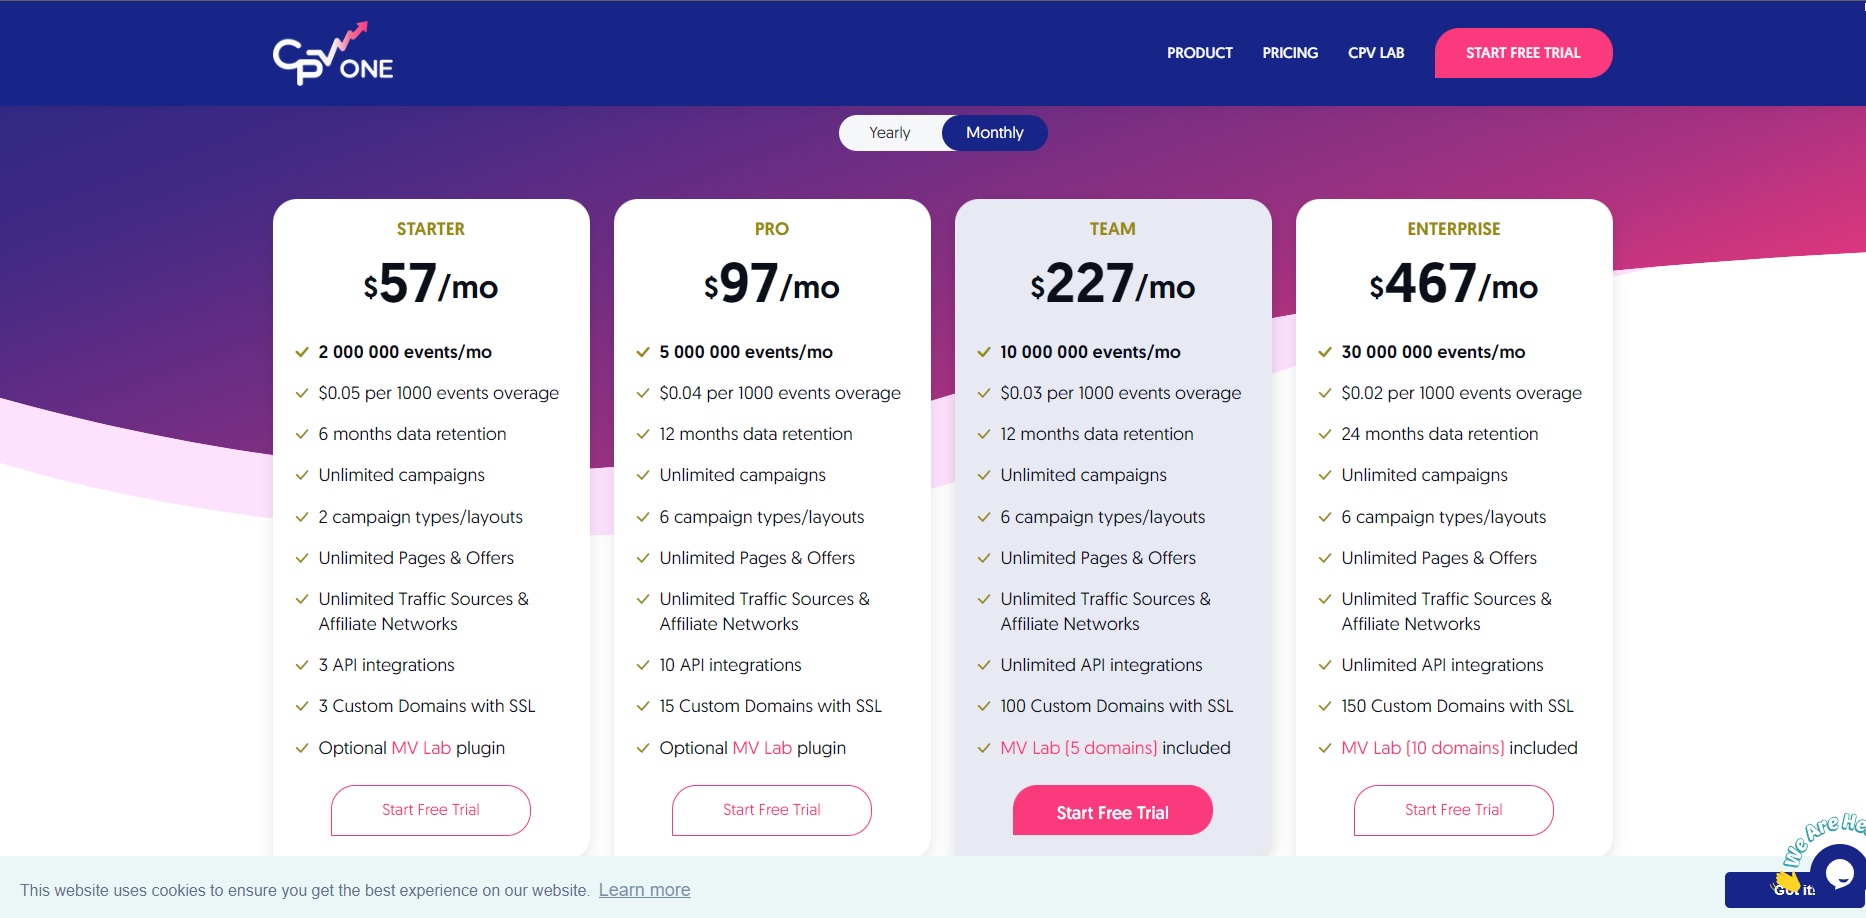
For just $57 a month, you gain the power to track everything. Make decisions rooted in real, actionable data. Say goodbye to wasting funds on traffic sources that don’t deliver, promoting landing pages that fall flat, or chasing misleading engagements.
Ready to embark on this journey?
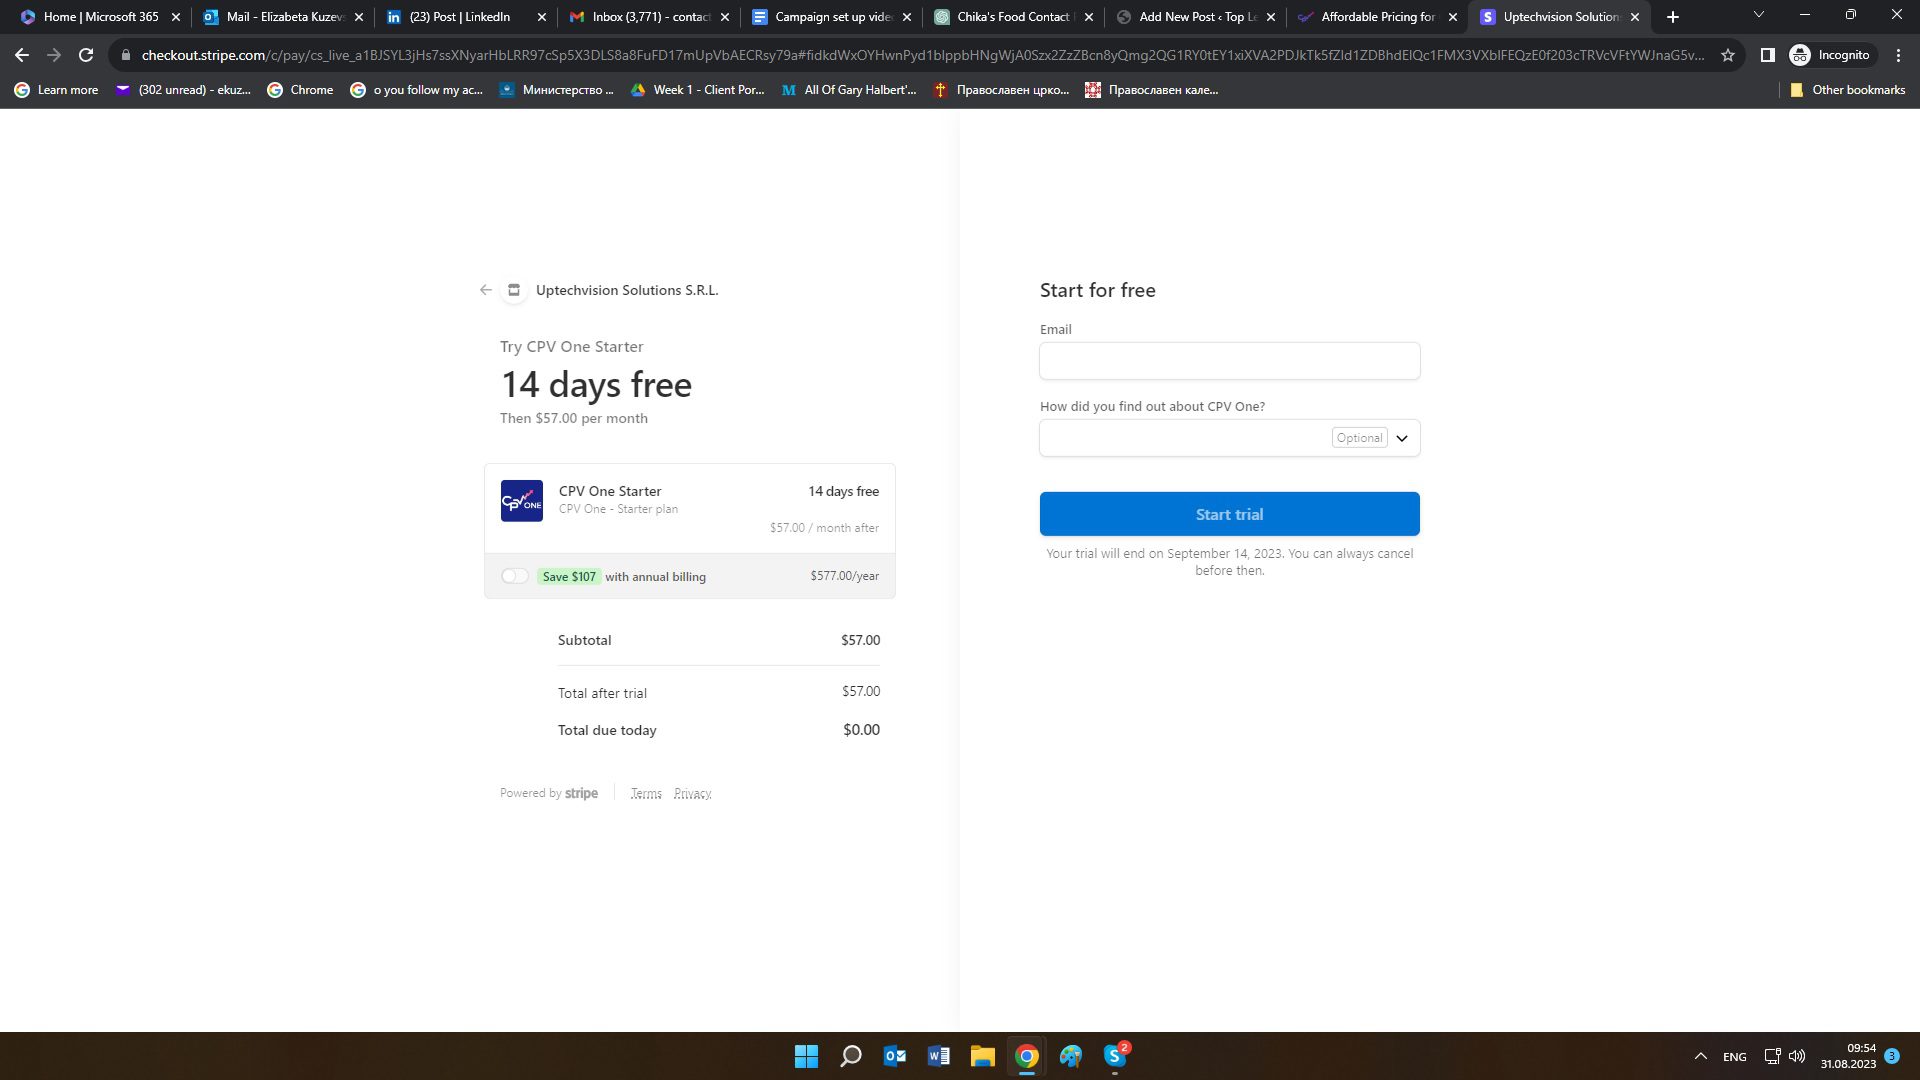
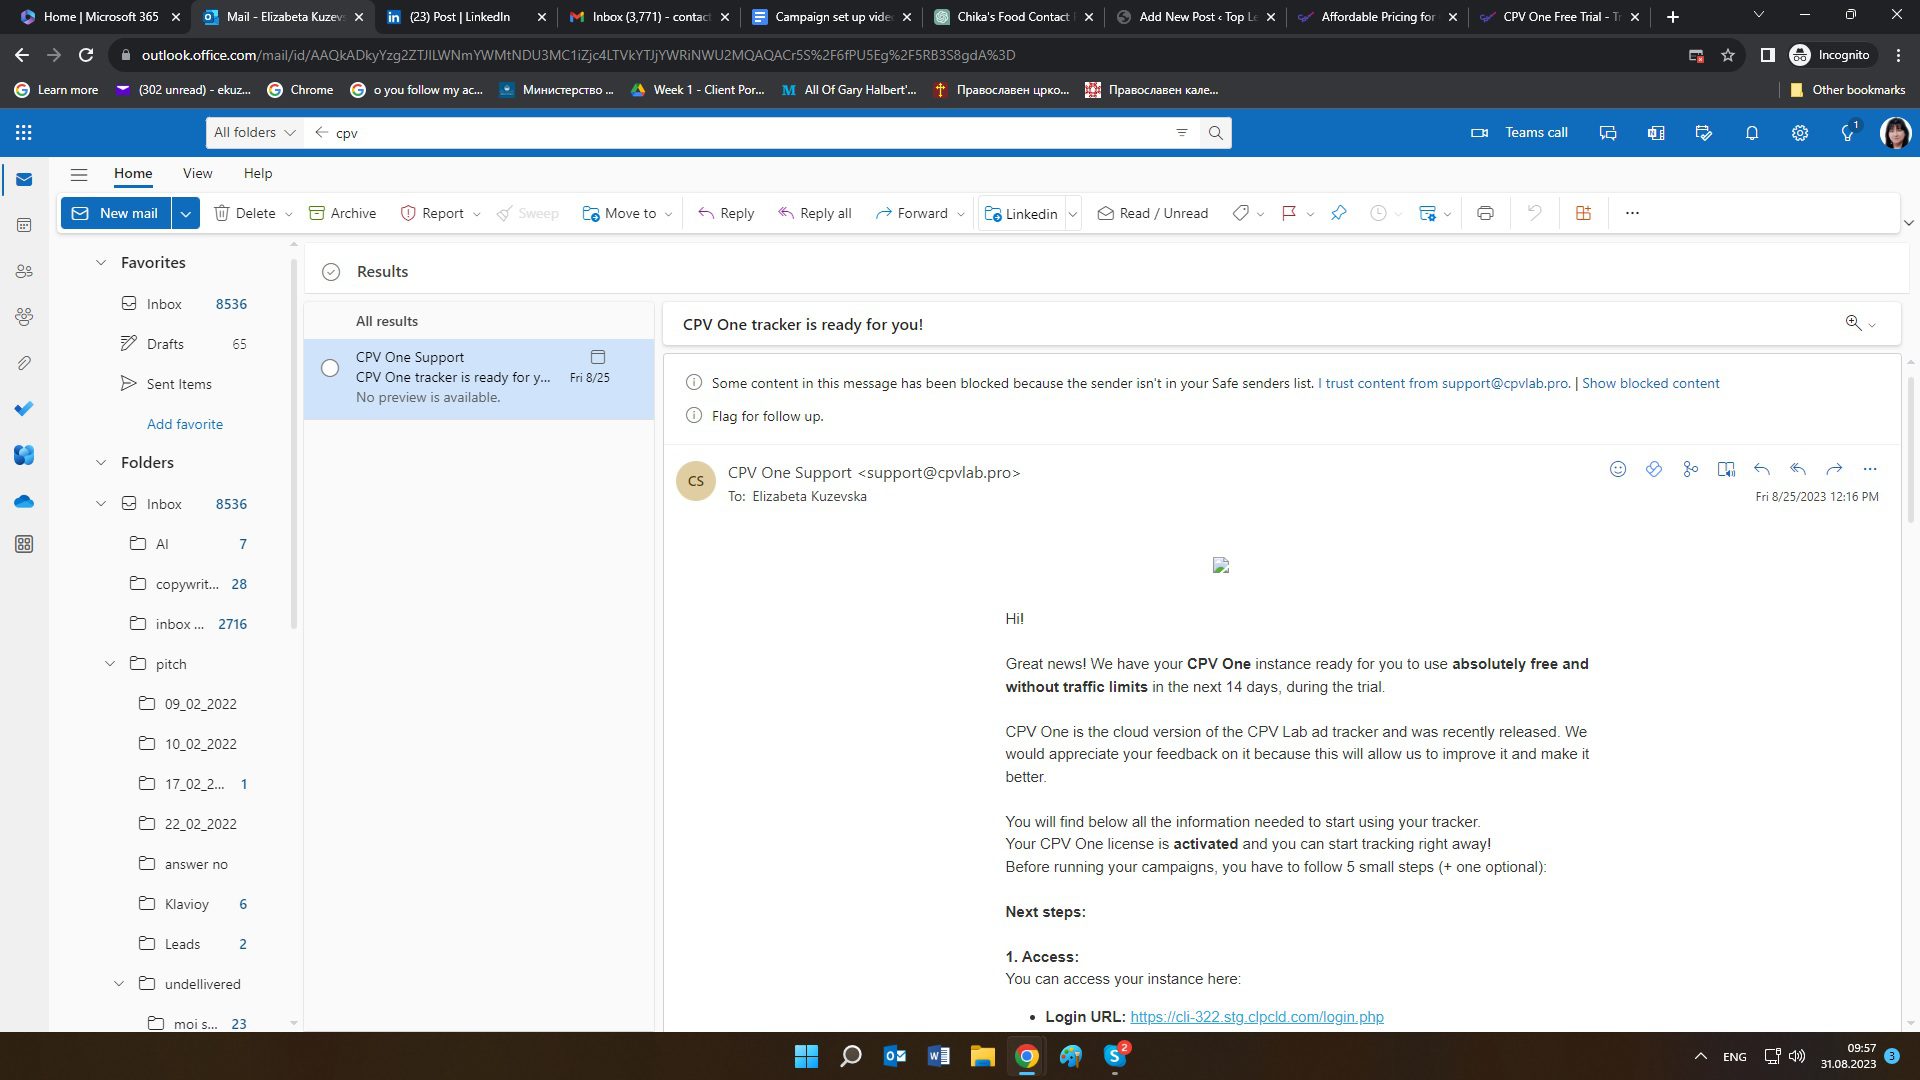
Once you’ve set up your account, watch your inbox. An email will be waiting for you with a direct login link and your credentials.
Dashboard Overview:
The CPV One dashboard is your command center, providing a bird’s-eye view of your campaigns and their performance. Here’s a quick tour:
Navigation Panel: Located on the left side, this panel gives you quick access to various sections like campaigns, reports, and settings.
As you spend more time on the dashboard, you’ll discover more features and customization options that make tracking and analyzing your campaigns a breeze. Remember, the key is to explore and experiment until you find the setup that works best for you.

- Support & Resources: Access tutorials, FAQs, and customer support directly from these links, ensuring you have all the help you need.
- Documentation
- Youtube CPV One channel
- Facebook private group
Setting Up Your First Campaign with CPV One
Embarking on your first campaign with CPV One? It’s an exciting journey, and we’re here to guide you every step of the way. Let’s break down the process to ensure your campaign is set up for success.
a. Campaign Type Selection: Before diving into the details, it’s crucial to select the right type of campaign that aligns with your marketing goals.
Understanding Campaign Types in CPV One:
CPV One for Campaign Analytics offers a variety of campaign types tailored to different marketing strategies.
Whether you’re looking to track a simple PPC campaign, delve into affiliate marketing, or monitor a multi-step sales funnel, there’s a campaign type designed for you.
Familiarize yourself with each option and choose the one that best fits your objectives.
Setting up your first campaign might seem daunting, but with CPV One’s intuitive interface and these guidelines, you’ll be on your way to tracking and optimizing your marketing efforts in no time!
Let’s Start! 🙂
Today, we’ll initiate tracking for both direct links and landing pages. As we begin our journey with the program, we will start with a quick setup.
I’d like you to understand when this option comes into play.
It’s ideal for times when we’re promoting a landing page that eventually redirects someone to our own product link or an affiliate offer. A landing page becomes our best friend when aiming to promote our product or affiliate links.
Many page builders are out there, so you can pick what feels right for you. But if you’re watching the budget, Prosperity Marketing System is a great choice. It lets you create and host up to 20 landing pages. And a cool trick? Design them using Canva’s free account, then put them in the Prosperity Marketing System page builder with your offer link.
Easy, right?
Creating a Landing Page to track your campaign
Now, when adding an image, link, or tracking link in Prosperity Marketing System, here’s the step-by-step.
- First, create an image on Canva with dimensions. 1000×600 px.

2. Upload it to WordPress.
If you don’t have a website, go to https://www.securebannerhosting.com/ and open a free account.
Upload the image in the Secure Your Banners member area. You have five free banner hosting with a free account.

3. Create the landing page
Now, go to the Prosperity Marketing System and choose to create an HTML squeeze page.
You can host 20 pages.
4. Give a name to the page.
5. Add the affiliate link
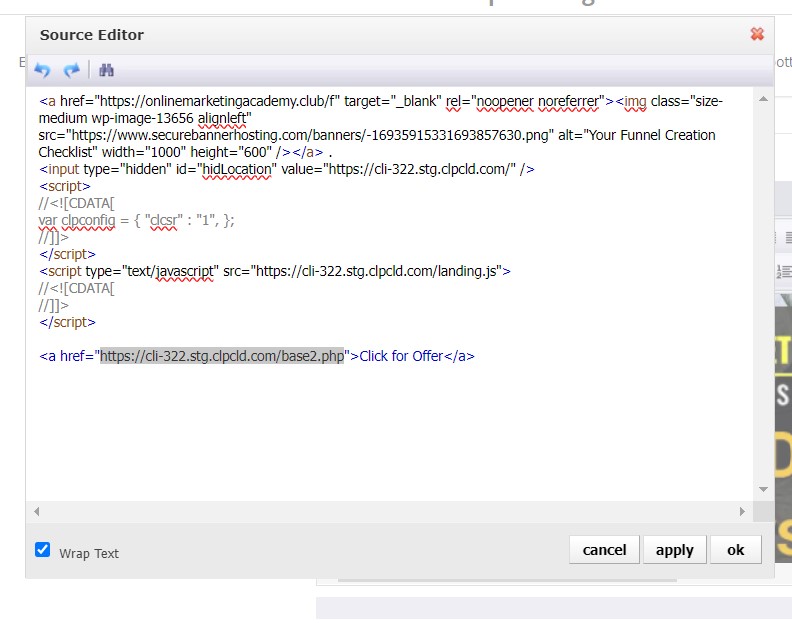
Now, add your affiliate link (or the link and image link) in this code:
<a href="https://onlinemarketingacademy.club/" target="_blank" rel="noopener noreferrer"><img class="size-medium wp-image-13656 alignleft" src="https://www.securebannerhosting.com/banners/-16935915331693857630.png" alt="Your Funnel Creation Checklist" width="1000" height="600" /></a> 6. Put the code in the HTML version of the page builder.

7. Click ok and apply and save.
8. Get the Landing Page URL
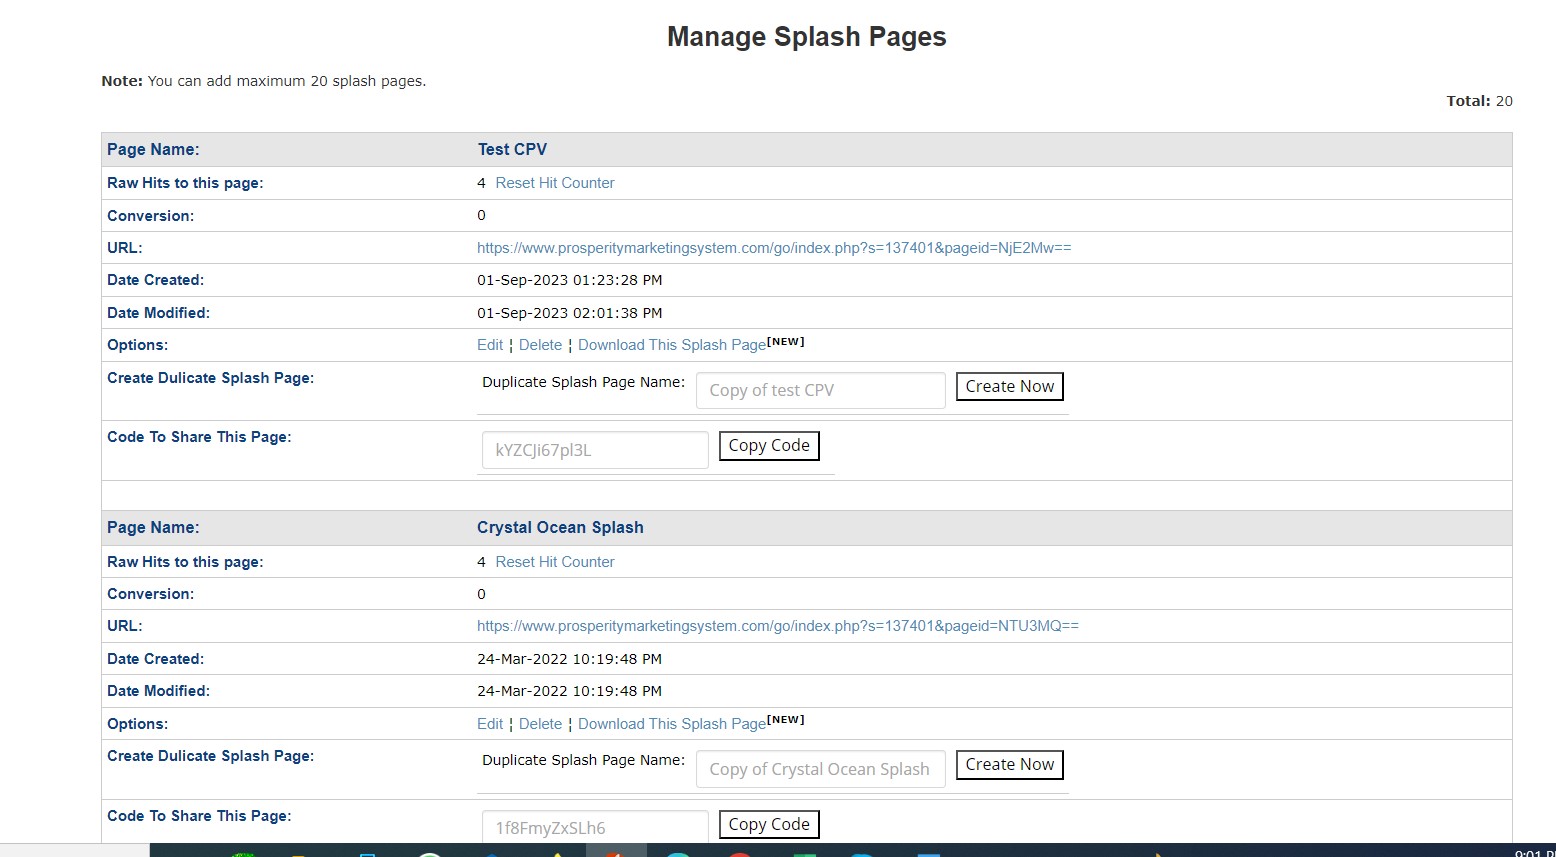
Go to the Manage Splash Pages and find the landing page URL.
In our case, is https://www.prosperitymarketingsystem.com/go/index.php?s=137401&pageid=NjE2Mw==
Another way to create a Landing page
Here is the article Super Simple Landing Pages
This article explains creating pages with Photoshop or Canva and Seedprod’s WordPress plugin.
Adding landing Page and Offer or Affiliate Link in the CPV One dashboard
Before we set any tracking, we need to put a landing page and affiliate or offer link in the system.
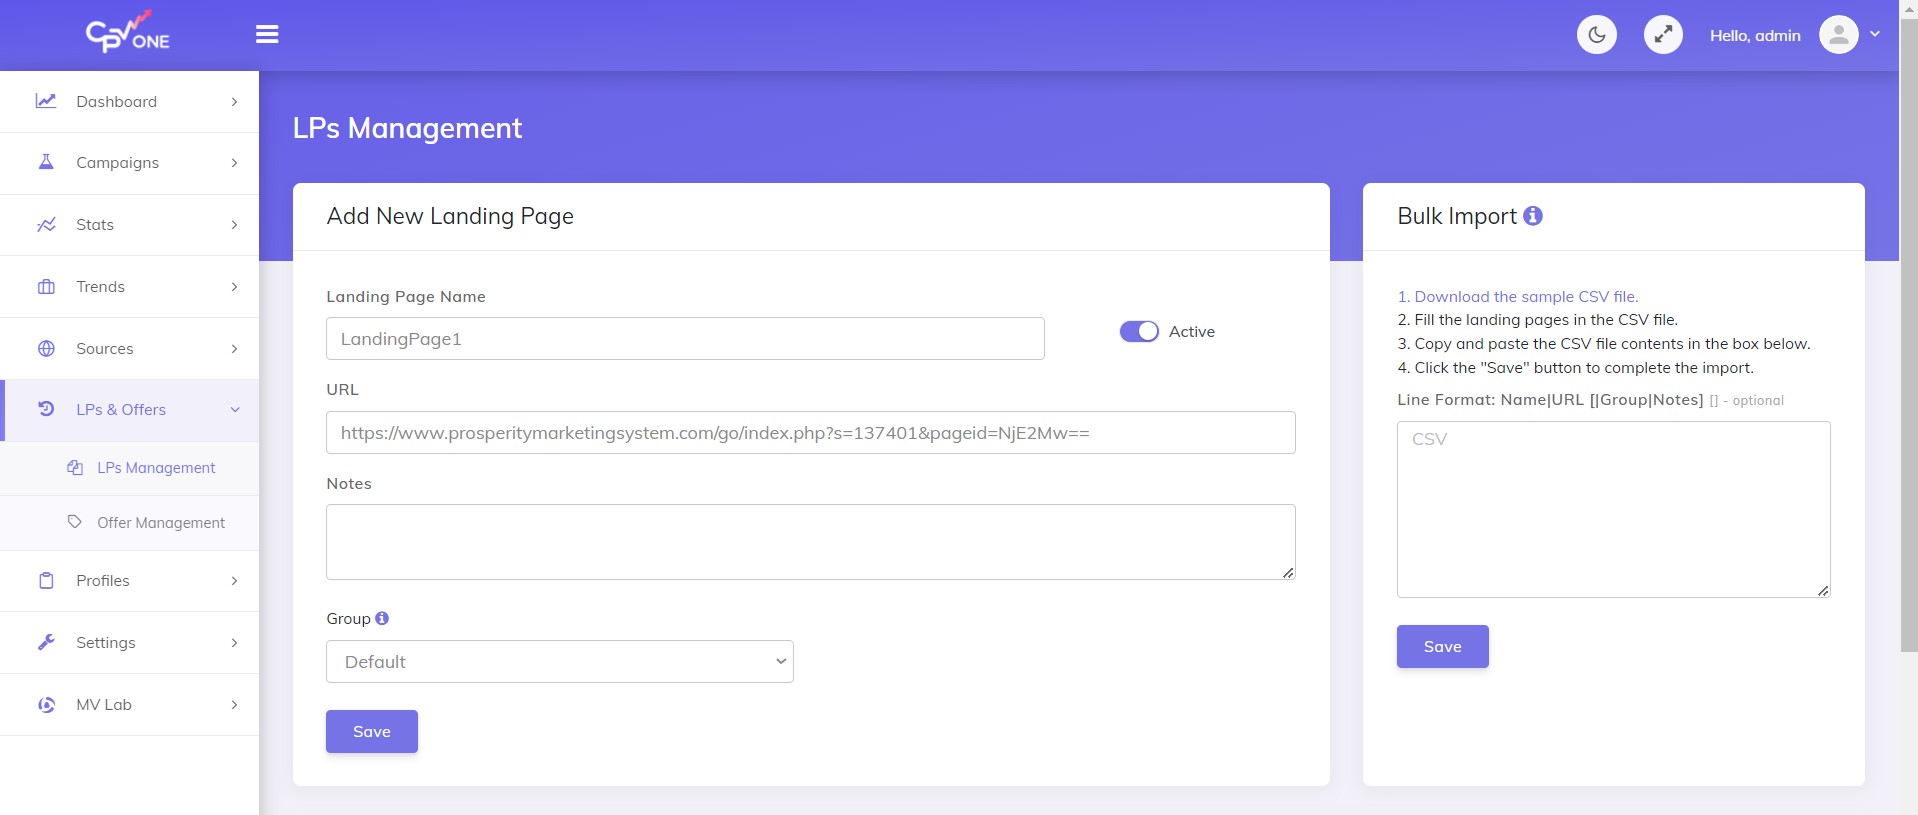
- Go to LPs & Offers.
We will add a landing page in the LPs Management. These are the landing pages where your campaign will send the traffic.
You can use multiple landing pages in your campaign to split test.
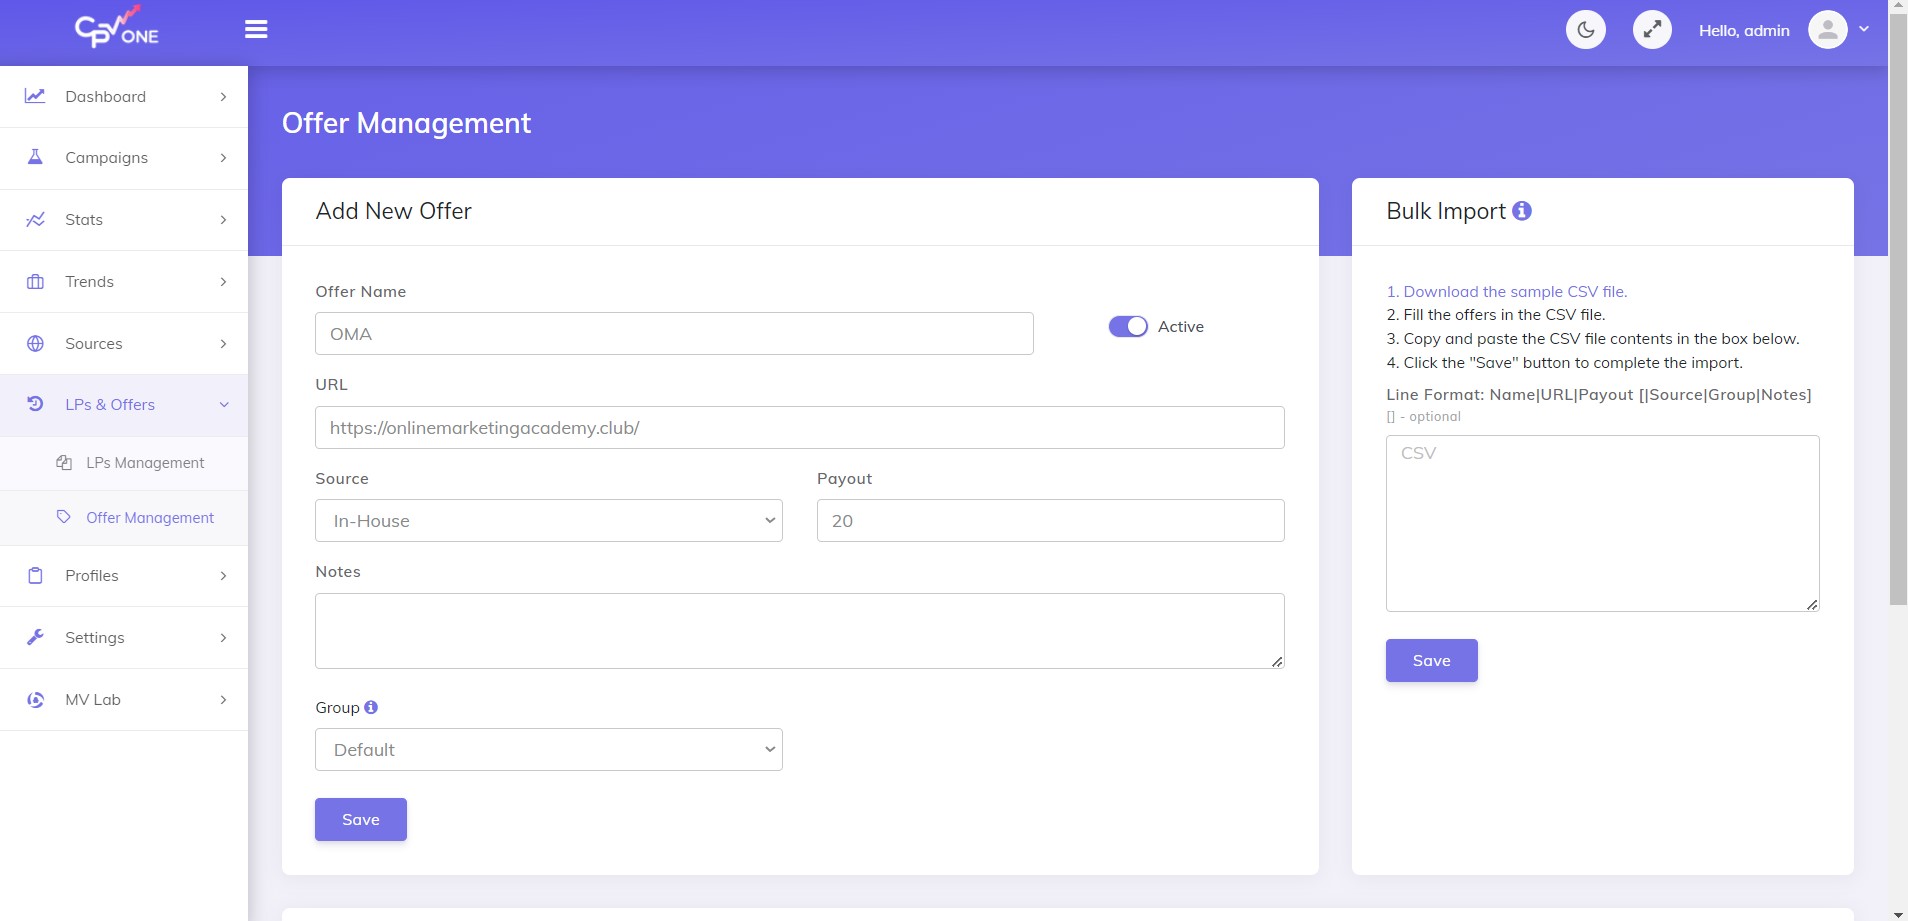
2. Add your offer links
Next we will add our affiliate link or offer in the Offer Management.
For learning purposes, I put my website link here. I don’t promote any affiliate link in this offer, so I put In-House source.
If you use paid traffic, you must set the affiliate network first and choose that network for your offer in the offer management.
Payout is the amount you will get with the sale or affiliate commission you earn. I put 20 as a placeholder.
Set up our tracking campaign with CPV One
Now we are ready, and we can set up our tracking campaign.
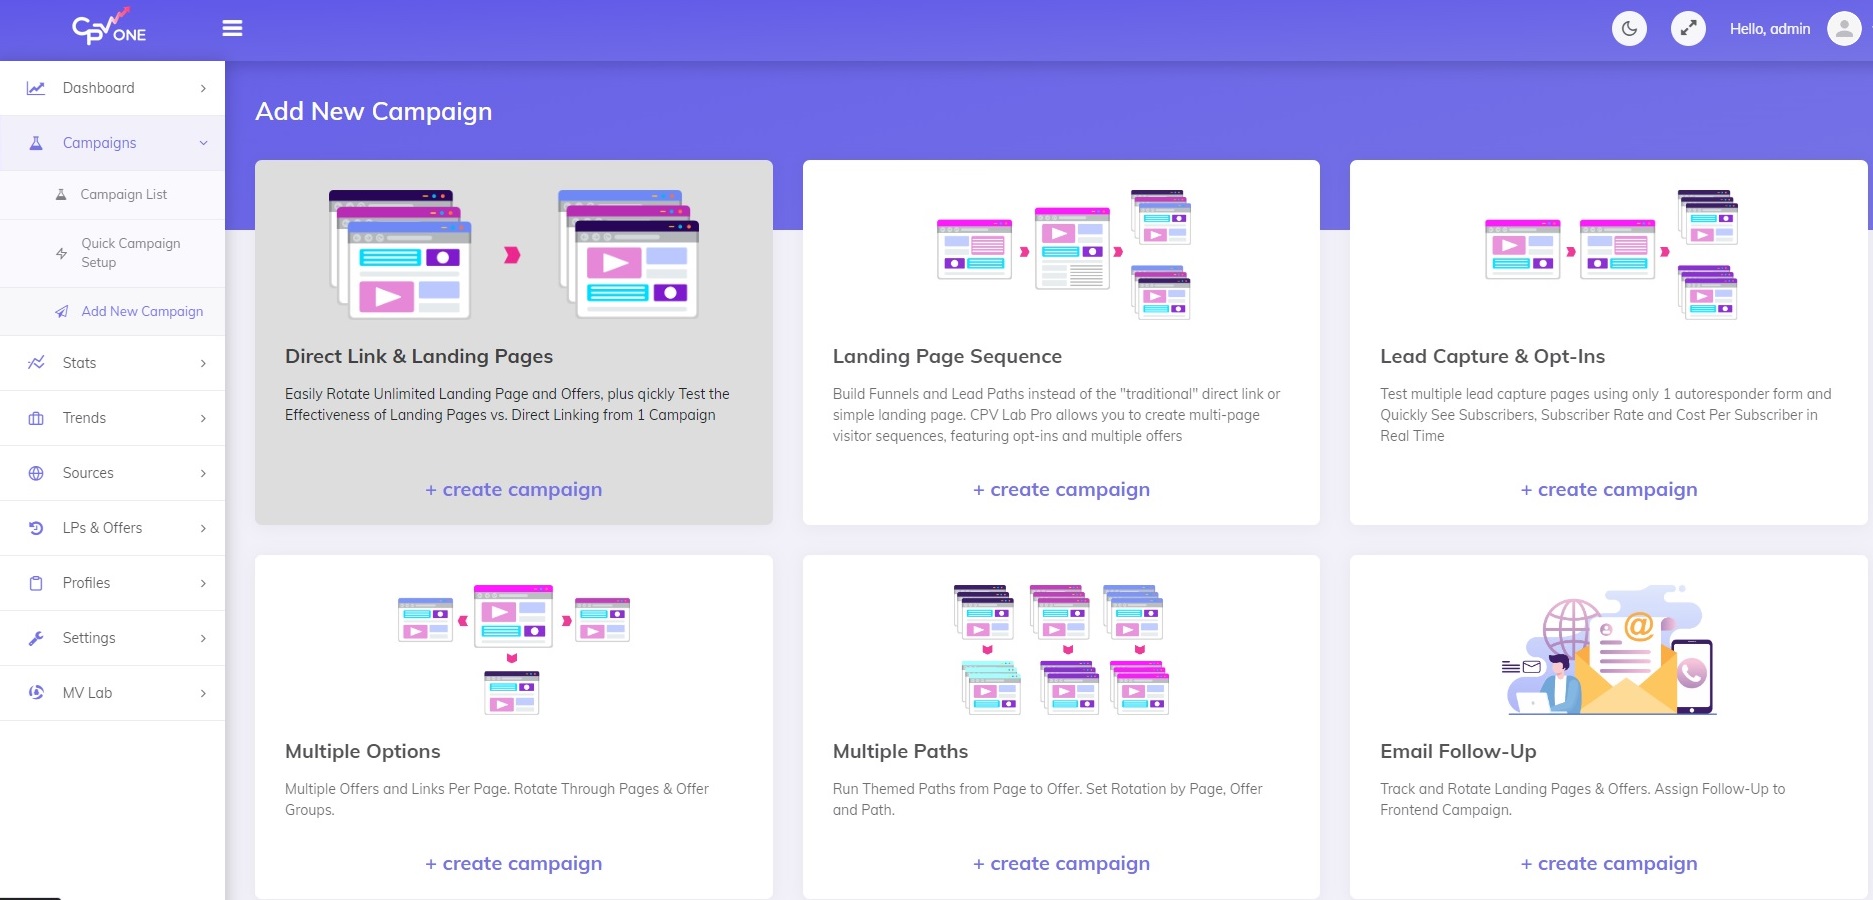
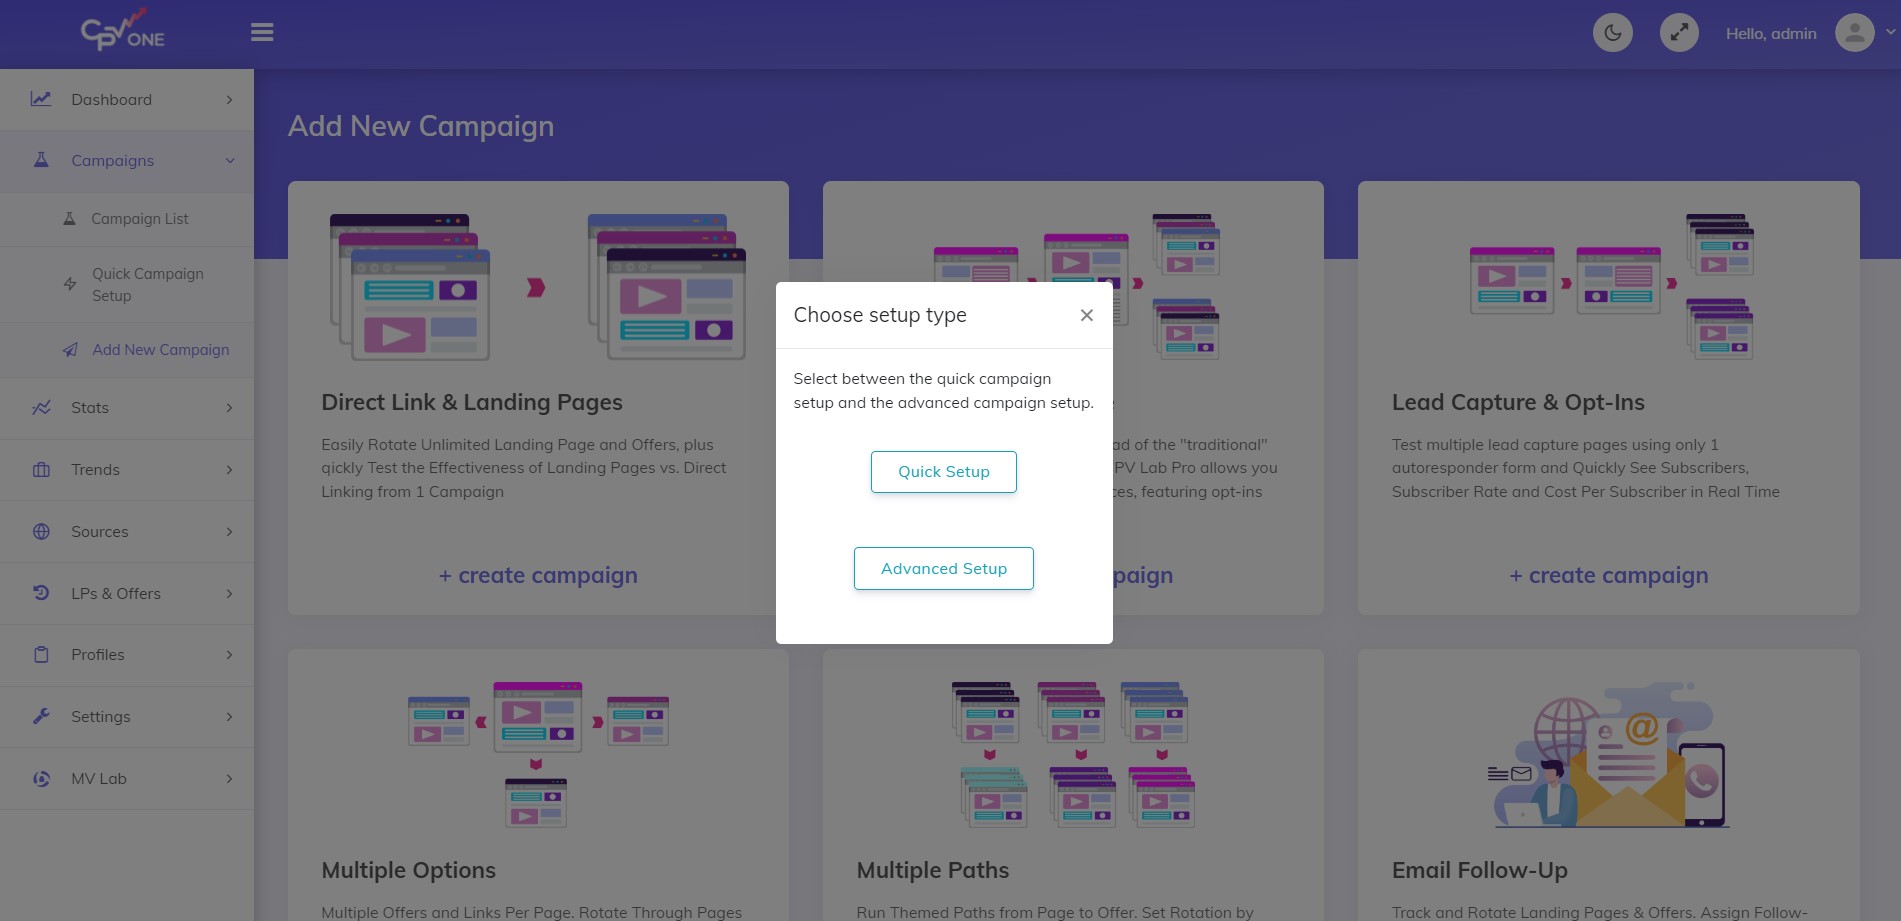
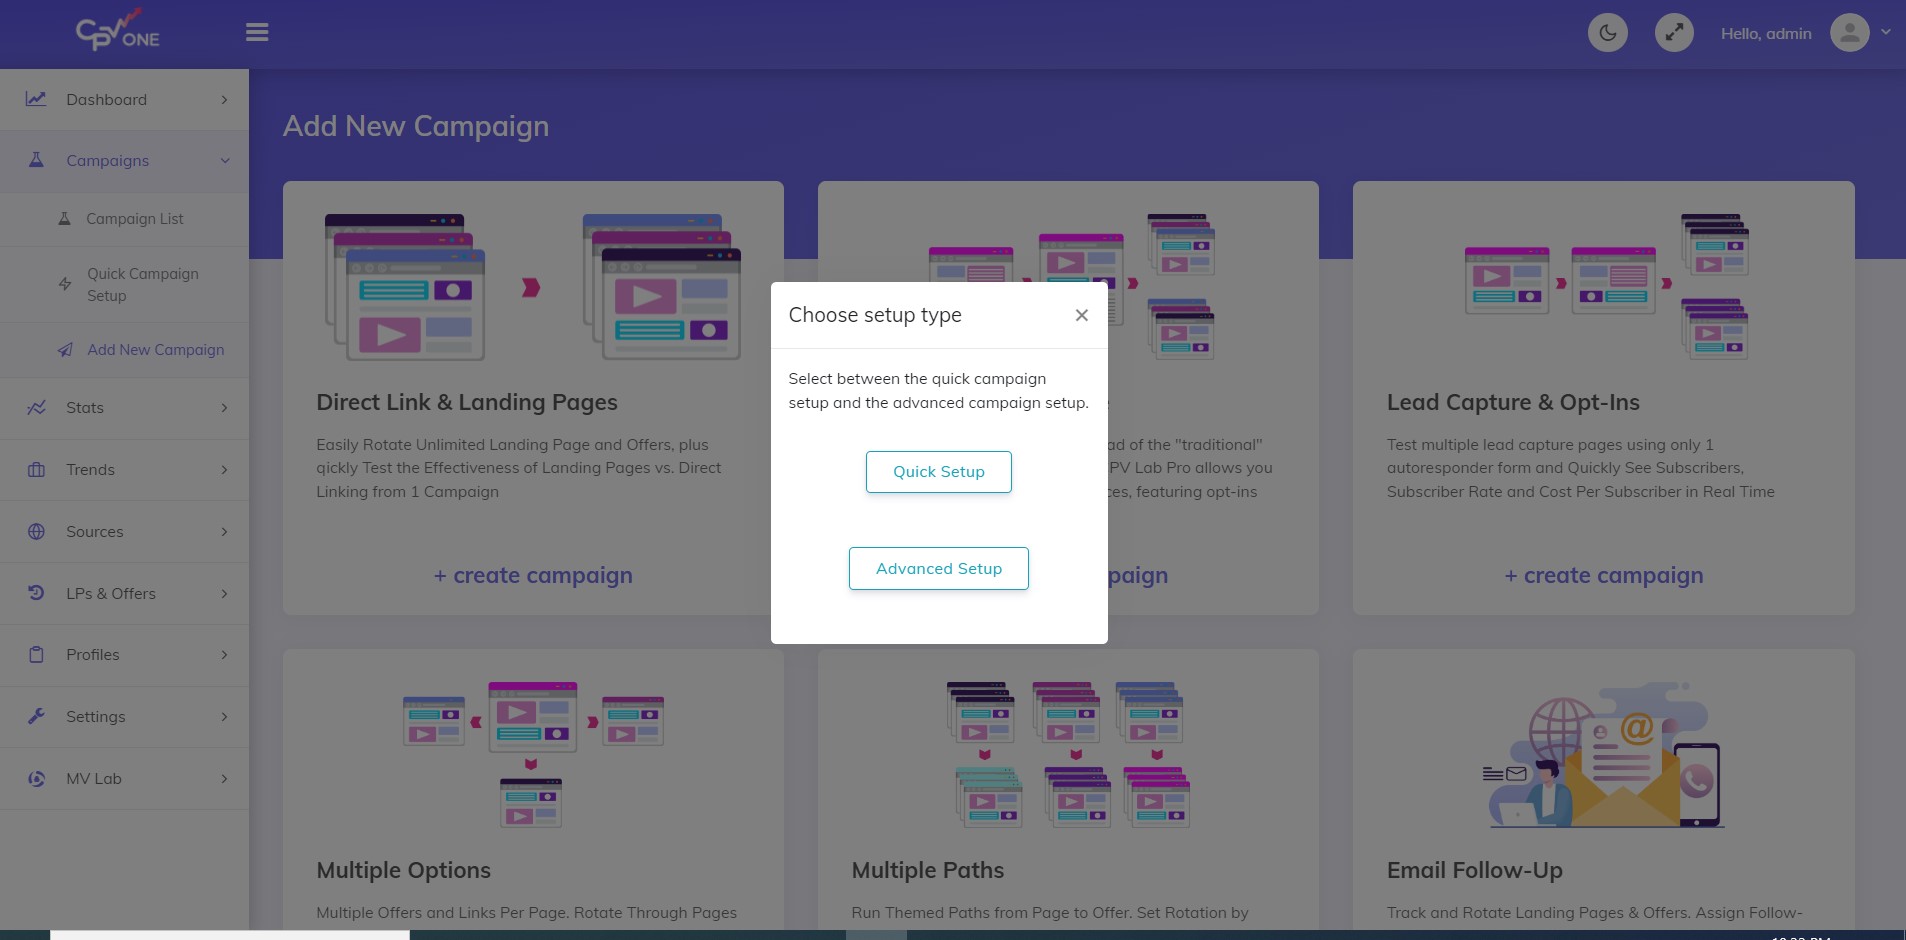
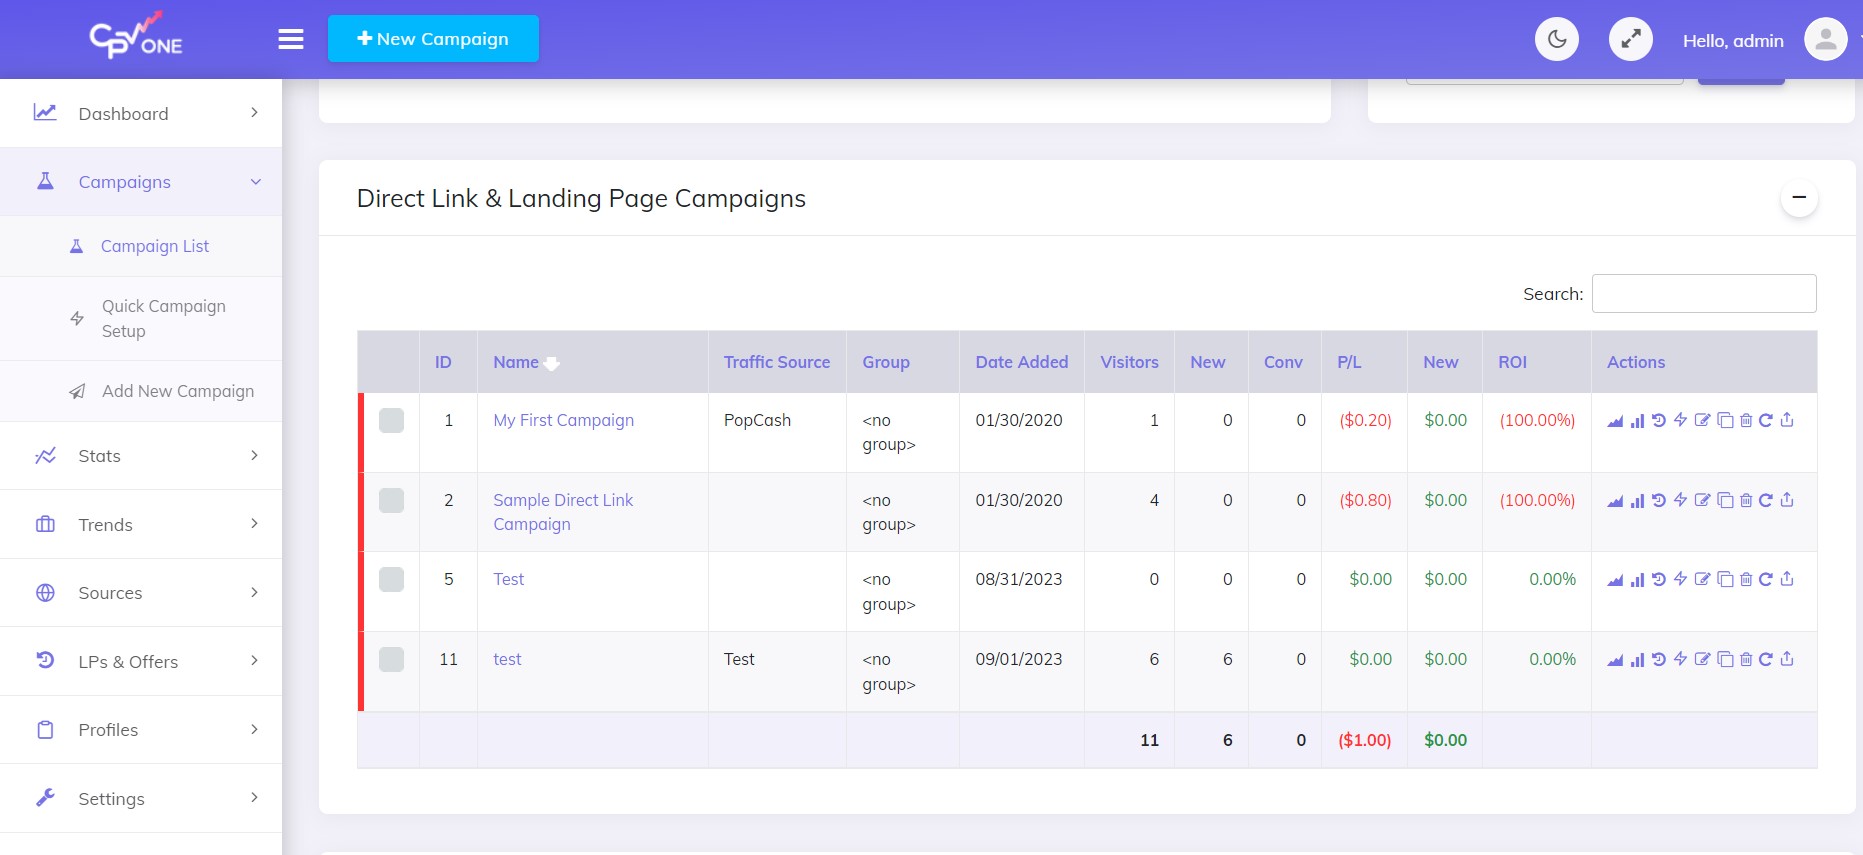
Go to Dashboard -> New campaign -> Direct Link & Landing Pages and choose Quick Setup (advanced mode offers more customizable fields).
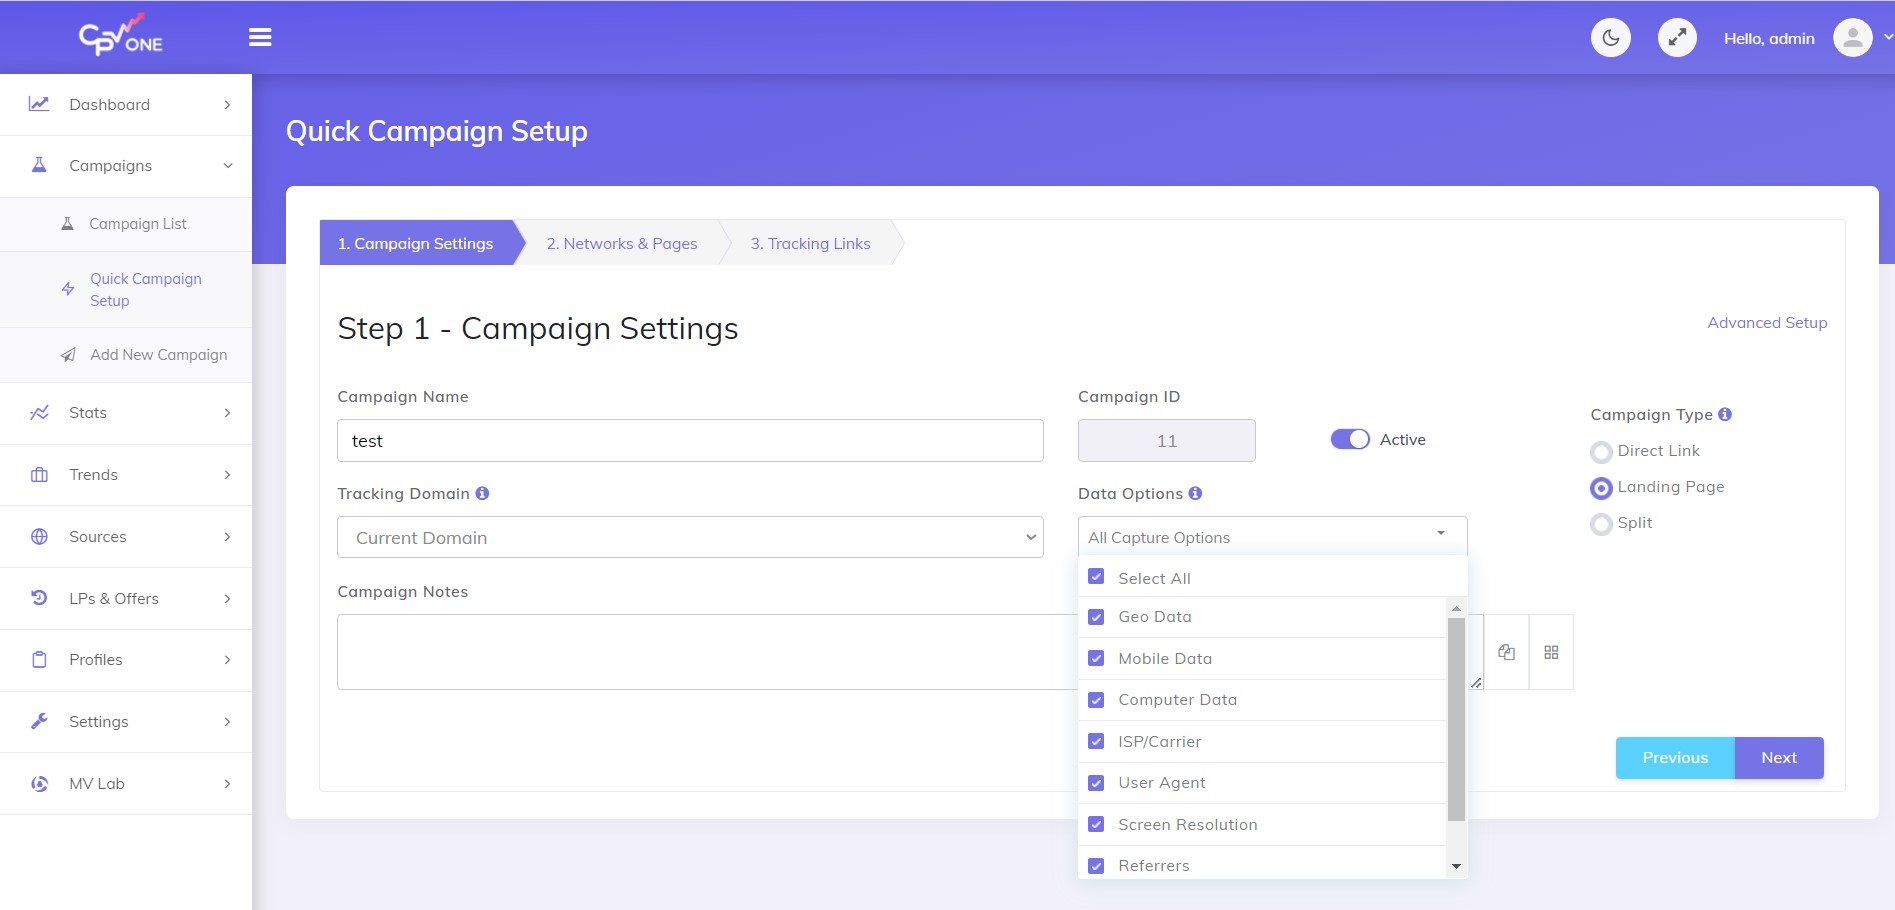
Step 1
- Campaign Name – Put the name of your campaign for your reference
- Tracking domain – This is the domain used for your tracking links.
- it can be your domain
- or it can be a custom tracking domain
- For CPV One, it is better to use a custom tracking domain as the tracker domain is a generally used one (you get a subdomain).
- Check this article, which explains in depth How to set up Namecheap domain in CPV One for your tracking campaign
- Data Options – select what data options you want to capture for your campaign. By default, all are selected
- Campaign Notes – Record your changes to remember what to improve next time you make changes to the campaign
- Campaign Type – You can choose between a landing page, a direct link, or both with the split option.
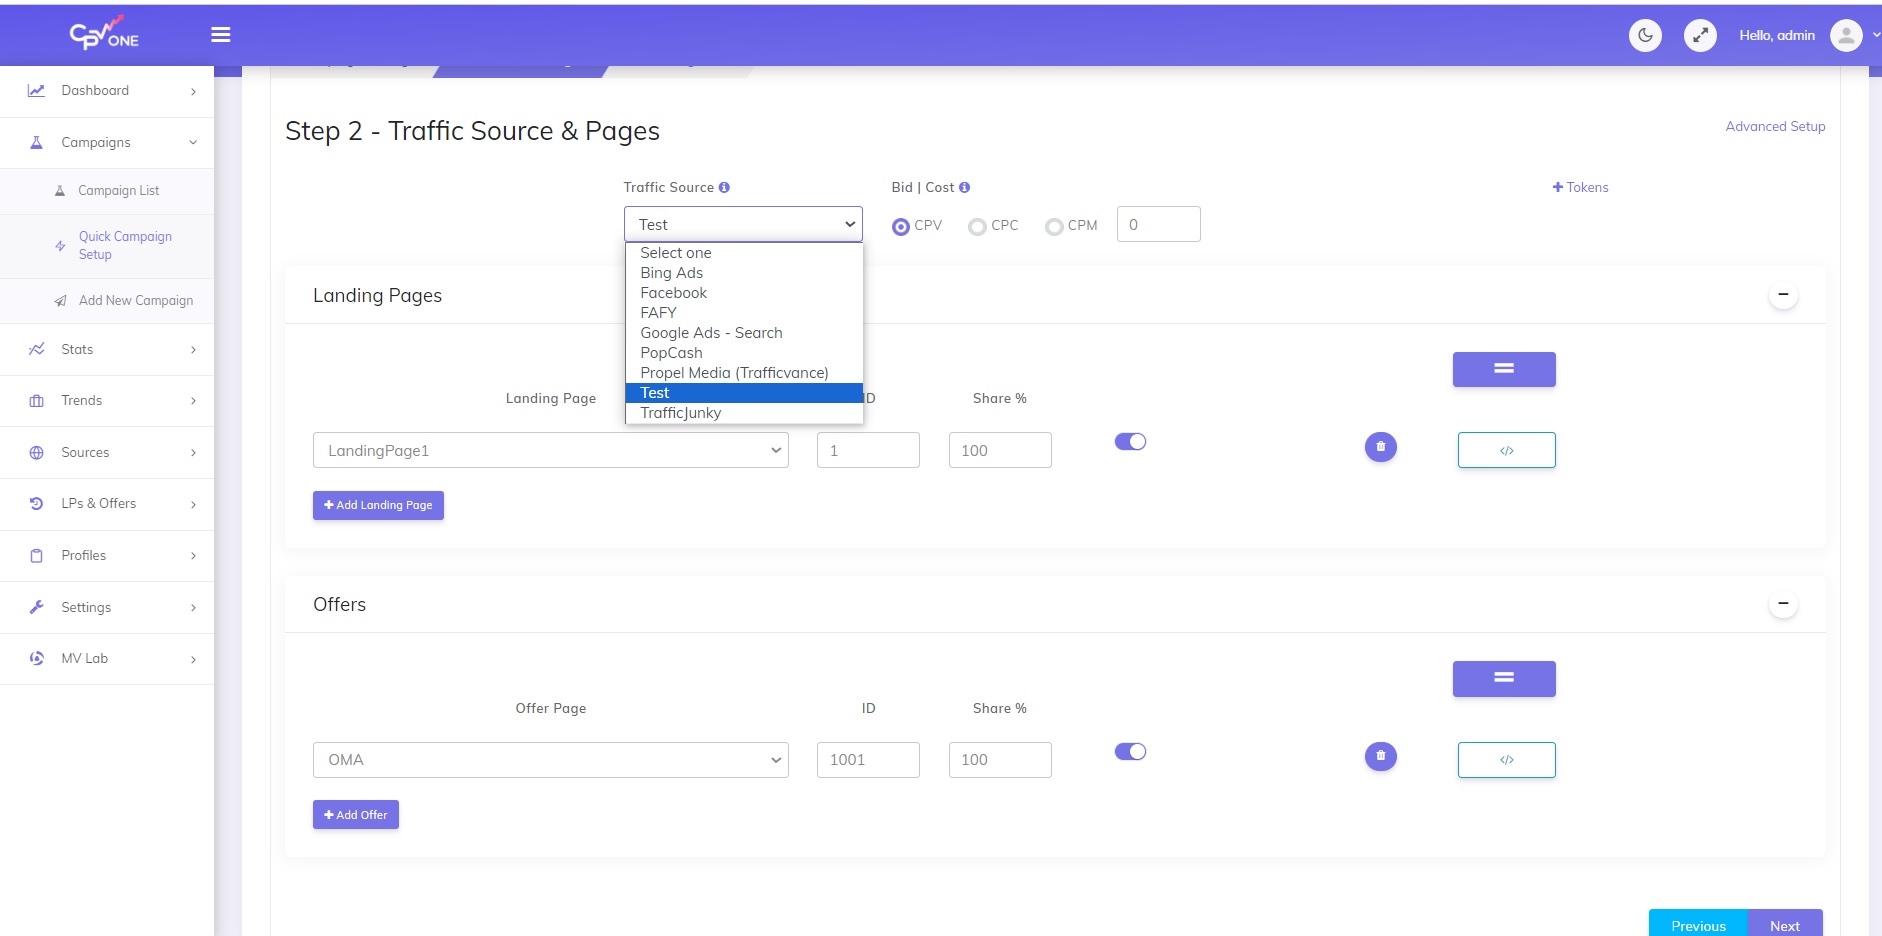
Step 2
- Traffic Source – Select from the list of traffic sources available. If you need to add another traffic source, just go to the Sources -> Traffic Sources and import it from the catalog.
We put In-House as a traffic source.
You can choose between CPV, CPC, or CPM if you use paid traffic.
Here is the difference between them
CPV (Cost Per View)
- What is it? CPV refers to the cost you pay when your ad is viewed. It’s commonly used in video advertising, especially on platforms like YouTube.
- When to use it? Choose CPV if you’re running video campaigns and want to increase brand awareness. It’s especially useful if your primary goal is to get your video content seen by as many people as possible, rather than driving a specific action like a click or a purchase.
CPC (Cost Per Click)
- What is it? CPC stands for the cost you pay each time someone clicks on your ad. It doesn’t matter how many times your ad is shown; you’re only charged when someone actually clicks on it.
- When to use it? Opt for CPC when you want to drive specific actions on your website or landing page, such as sign-ups, downloads, or purchases. It’s ideal for campaigns where the click-through is vital, like driving traffic to a product page or collecting email sign-ups.
CPM (Cost Per Mille/Thousand Impressions)
- What is it? With CPM, you’re paying for every 1,000 impressions (or views) of your ad, regardless of any actions taken. The “M” in CPM stands for “Mille,” which is Latin for thousand.
- When to use it? CPM is the way to go when your main goal is brand awareness. If you want as many people as possible to see your ad, but aren’t necessarily concerned about them taking a specific action, then CPM is your best bet. It’s often used for display campaigns where visibility is the primary objective.
In Summary:
- Use CPV for video campaigns aimed at boosting brand visibility.
- Use CPC when you want to drive specific actions and can directly benefit from each click.
- Use CPM when broad exposure and brand awareness are your main goals.
Remember, the best pricing model often depends on your campaign goals, budget, and the specific platform you’re advertising on. Always remember your objectives when choosing between CPV, CPC, or CPM.
- Landing Pages – select from the list of predefined landing pages. In our case, it is LandingPage1 ( the page we put in LPs Management)
- Make sure that the total share is 100%
- If you use multiple landing pages, you can split the shares as you wish
- Offers – select from the list of predefined offers. In our case, it is OMA ( the page we put in Offer Management)
- Make sure to have the sum of shares to be 100%
- If you use multiple offers, you can split the shares as you wish
- Previous/Next buttons – when clicking these buttons the changes are saved. You can go to the previous or to the next step.
Step 3
- Campaign URL – The campaign URL you will place at the traffic source; This is your tracking link.
- Other Links
- Code to be added in the landing pages
- Links for the offers in the landing page
- Tracking Pixels – different tracking pixels: image, iframe, script pixels and Postback URLs; This are used on the offer pages.
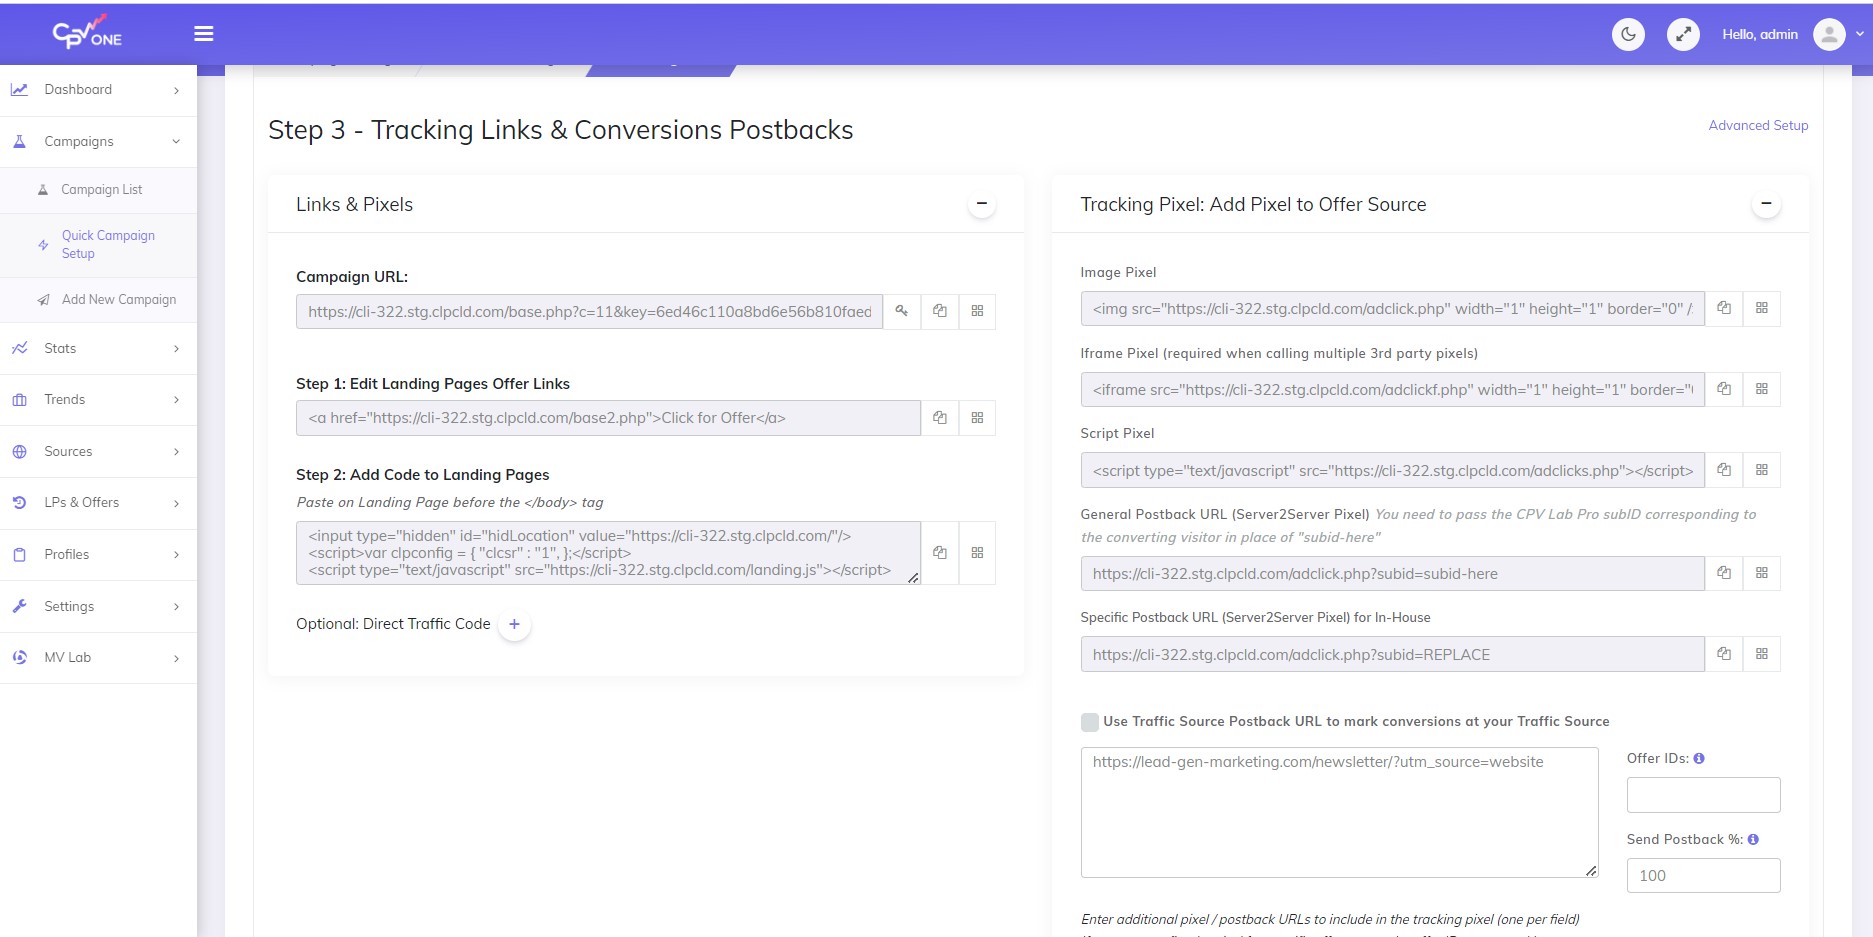
In step 3, we got tracking links and codes for our landing page in step1 and step 2
We need to put them on the landing page.
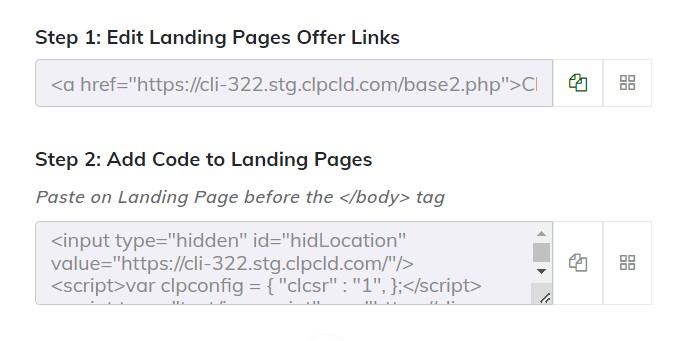
Add Code to Landing Pages
We will go to Manage Splash pages, find our page, and click edit. Then you will go to <> sign (HTML) , add the code from Step 2 and click Save.
To be sure that everything is ok, check if the code is added.
Then, we will replace the link of the offer in the HTML code we put when we created landing page with the link from Step1.
In the image below, I put the whole link from Step1 at the bottom to see what I mean.
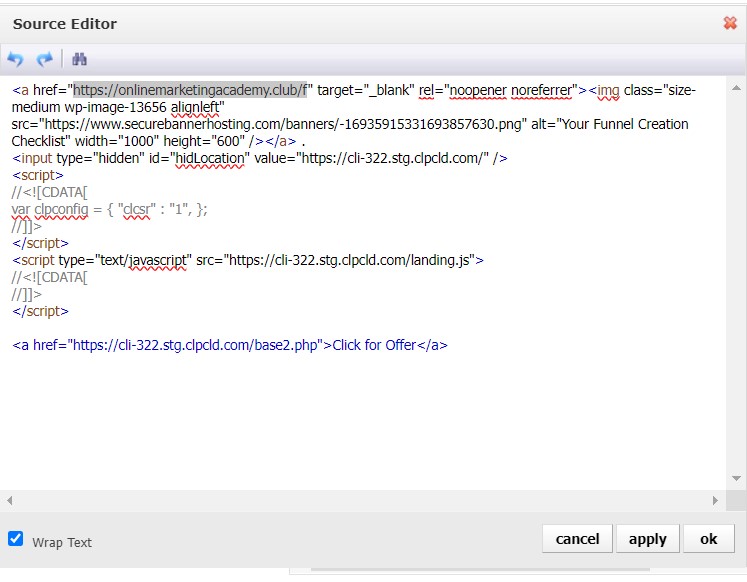
And your HTML code in the landing page will contain links from Step1 and Step2
Here is how your HTML code should look like.
Note: I deleted the step 1 code from the end of the page after changing the link. I put the whole link only to show you which part you need to put in the code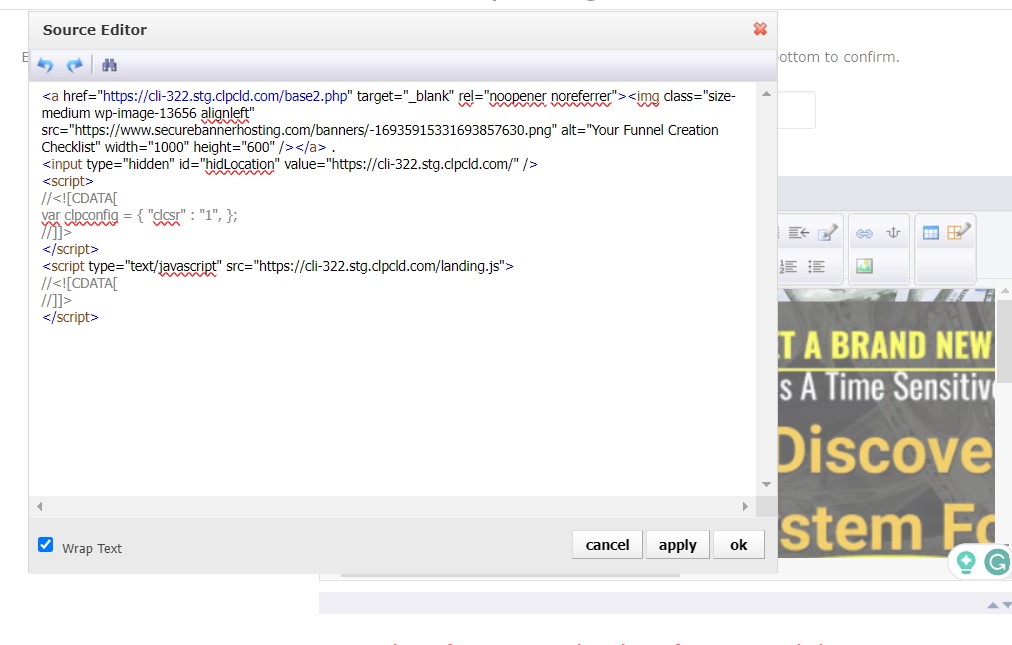
In the end, you will click the landing page link several times to see if everything is set and working as it should be.
As you can see, I did some testing and have six visitors on the page.
Now, you can use CPV One to track your for Campaign Analytics. You will have all the information at hand to make data-driven decisions
If you created a page using the Super Simple Landing Pages article, by using WordPress, check how to add tracking links in this case.
After this, the magic with CPV One for Campaign Analytics begins.
You can track any metric you can imagine. You can do deep analytics and make data-driven decisions. IT is amazing what this tracking software offers.
Congratulations!
You have set your first tracking campaign! 🎉
Conclusion
Navigating digital marketing without the right tools is like sailing uncharted waters without a compass. But with CPV One, you’re not just equipped with a compass; you have an entire GPS at your disposal. From understanding the nuances of campaign analytics to diving deep into granular data, this platform empowers you to make informed, data-driven decisions that can significantly elevate your marketing game.
The step-by-step guide above is a testament to CPV One‘s user-friendly interface and comprehensive features. Whether you’re a seasoned performance marketer or just starting, the platform is designed to cater to your needs, ensuring you’re always on top of your campaigns.
But don’t just take my word for it. Experience the magic of CPV One firsthand. Dive into that 14-day free trial and explore its myriad features. In this digital age, where every click and interaction counts, ensure you’re making the most of every opportunity. With CPV One, you’re not just tracking; you’re optimizing, iterating, and constantly improving.
So, are you ready to transform your digital marketing journey? Join CPV One today and steer your campaigns toward unparalleled success. The future of data-driven marketing awaits you!
Author: Elizabeta Kuzevska
Elizabeta is a certified Digital marketer with 15+ years of experience and she creates educational content for CPV Lab and CPV One, helping affiliate marketers and media buyers navigate the ever-changing performance marketing landscape. She is also Co-Founder of Revenue Experts AI, building AI Revenue Intelligence Systems powered by 100+ specialized agents. Her methodology integrates multi-agent architectures with human expertise to transform how B2B companies generate revenue.
- Tools used in this article:
- Setting Tracking Campaign: CPV One
- Creating a Landing Page: Prosperity Marketing System
Super Simple Landing Pages - Image hosting if you don’t have a blog: Secure Your Banners