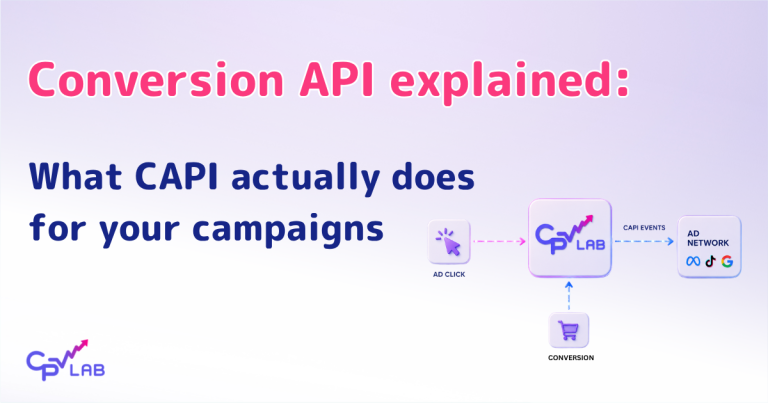
In affiliate marketing, every detail can make a difference in your tracking campaign.
One critical aspect often overlooked is the use of a personal domain for tracking affiliate links.
It may seem like a minor detail initially, but owning your own domain imparts a myriad of benefits that go well beyond mere aesthetics.
Let’s examine these crucial advantages that guarantee your audience will not only see but also click on and trust your affiliate offerings.
Having your own domain when tracking affiliate links is important for several reasons:
- Credibility and trust: Visitors are likelier to click on a trustworthy and professional link. A link that’s clearly tied to your domain can increase user confidence compared to a random and long affiliate link.
- Branding: With your own domain, you can customize the affiliate link to match your brand’s message and style. This helps to create consistency and recognition across all of your marketing efforts.
- Tracking and analytics: Owning your domain gives you complete control over tracking cookies and other analytics tools. This can give you more in-depth insights into your traffic and audience behavior.
- Search Engine Optimization (SEO): Using your domain can potentially improve your SEO. Search engines tend to favor links that come from trusted, reputable domains. Plus, a neat and clean URL is more likely to be shared, increasing your backlinks.
- Control and flexibility: If, for any reason, you decide to change affiliate programs or a product you’re promoting is no longer available, you can easily update your affiliate link in your affiliate tracking software without needing to change the links in all your marketing materials.
- Avoids Blocking: Some ad and spam blockers can block affiliate links, but by using your own domain, you can bypass this issue and ensure your audience sees all your affiliate offers. This reliability in link delivery can be a positive aspect of your application to CPA networks.
So, investing in a personalized domain doesn’t just make your affiliate links look more professional. It also gives you invaluable marketing and analytical insights.
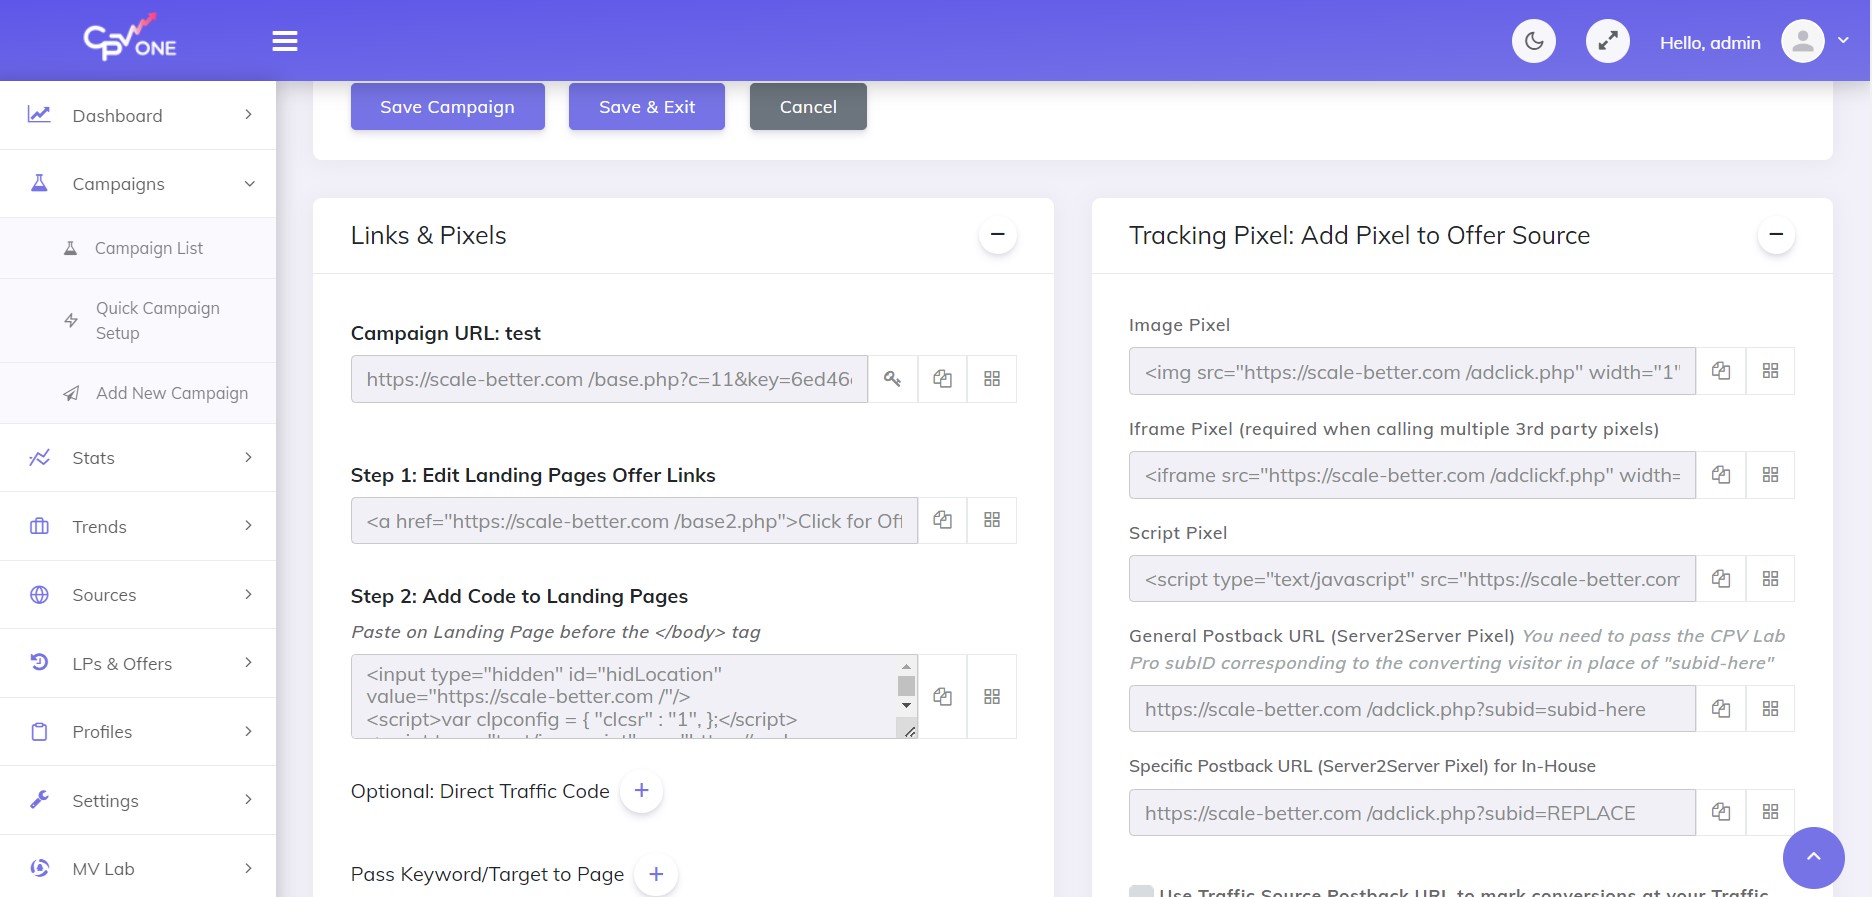
To effectively track affiliate links with your own domain, you’ll need to employ a reliable affiliate link-tracking platform, such as CPV One. This powerful software allows affiliate marketers to track, test, and optimize their marketing campaigns, all under their own domain name.
In this article, I’ll walk you through the step-by-step process of setting up your domain name from Namecheap in CPV One, as well as the steps for creating your own campaign.
Setting up domain name from Namecheap in CPV One for your tracking campaign
Step 1. Purchase your domain
The first step is to purchase a domain from Namecheap.
Choose a name that aligns with your business and makes sense for your audience.
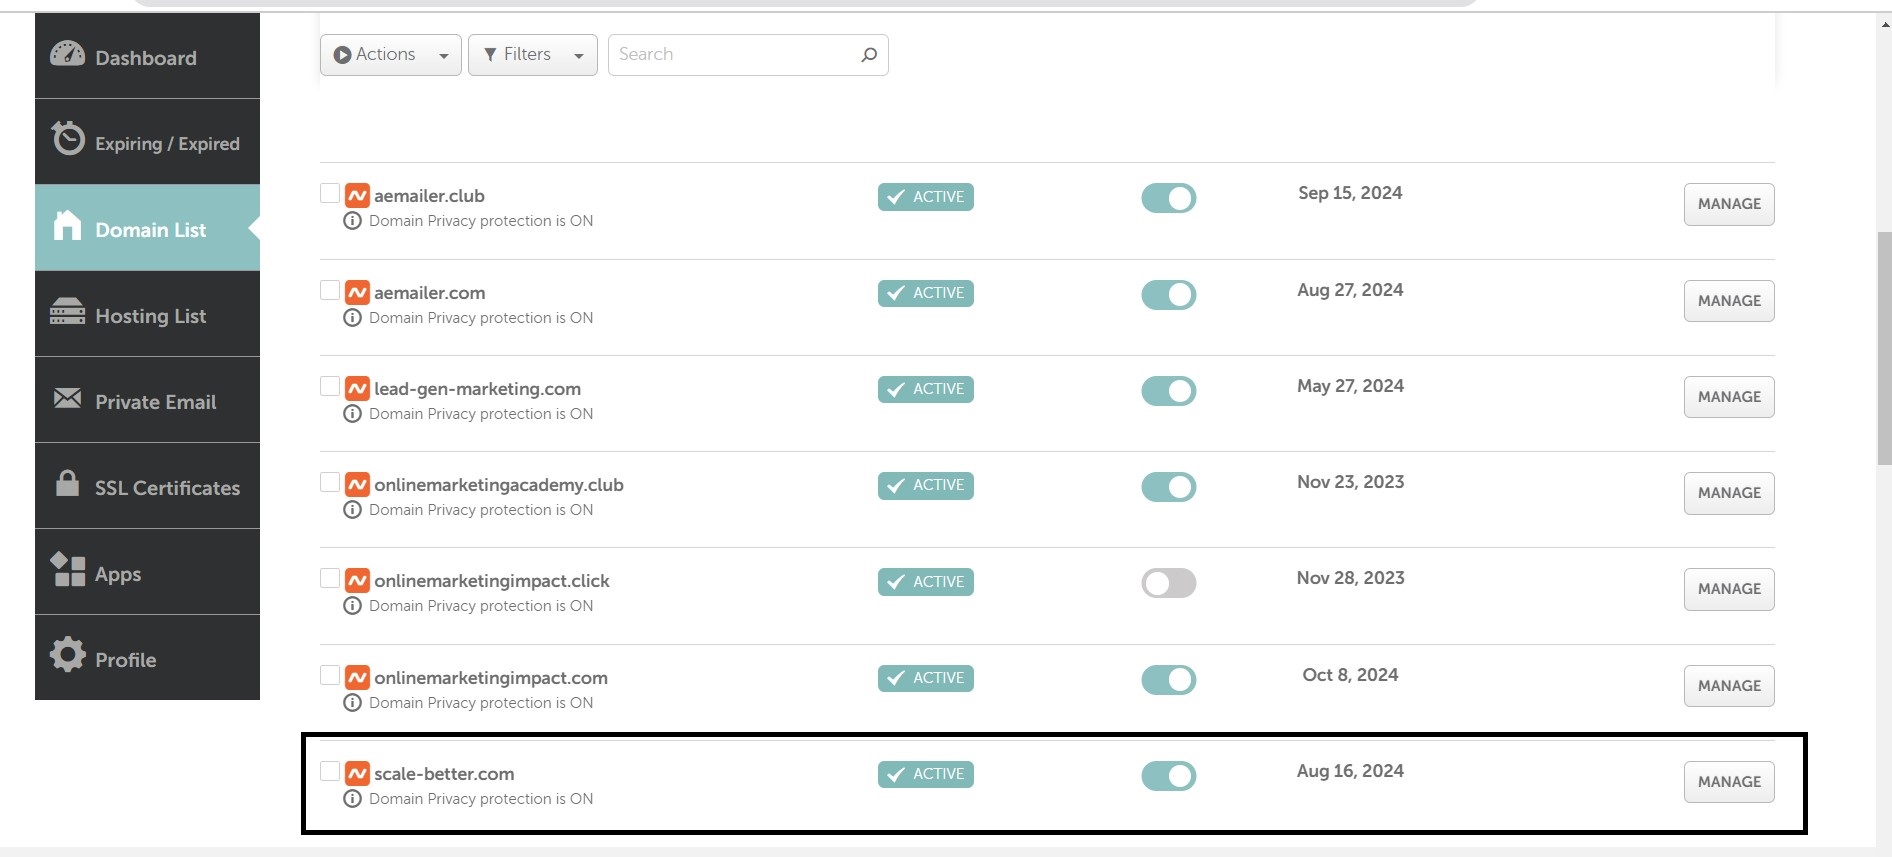
After buying it, go into your domain list and choose the domain you want to connect with CPV One.
For this article, we will use the domain name I bought before, www.scale-better.com
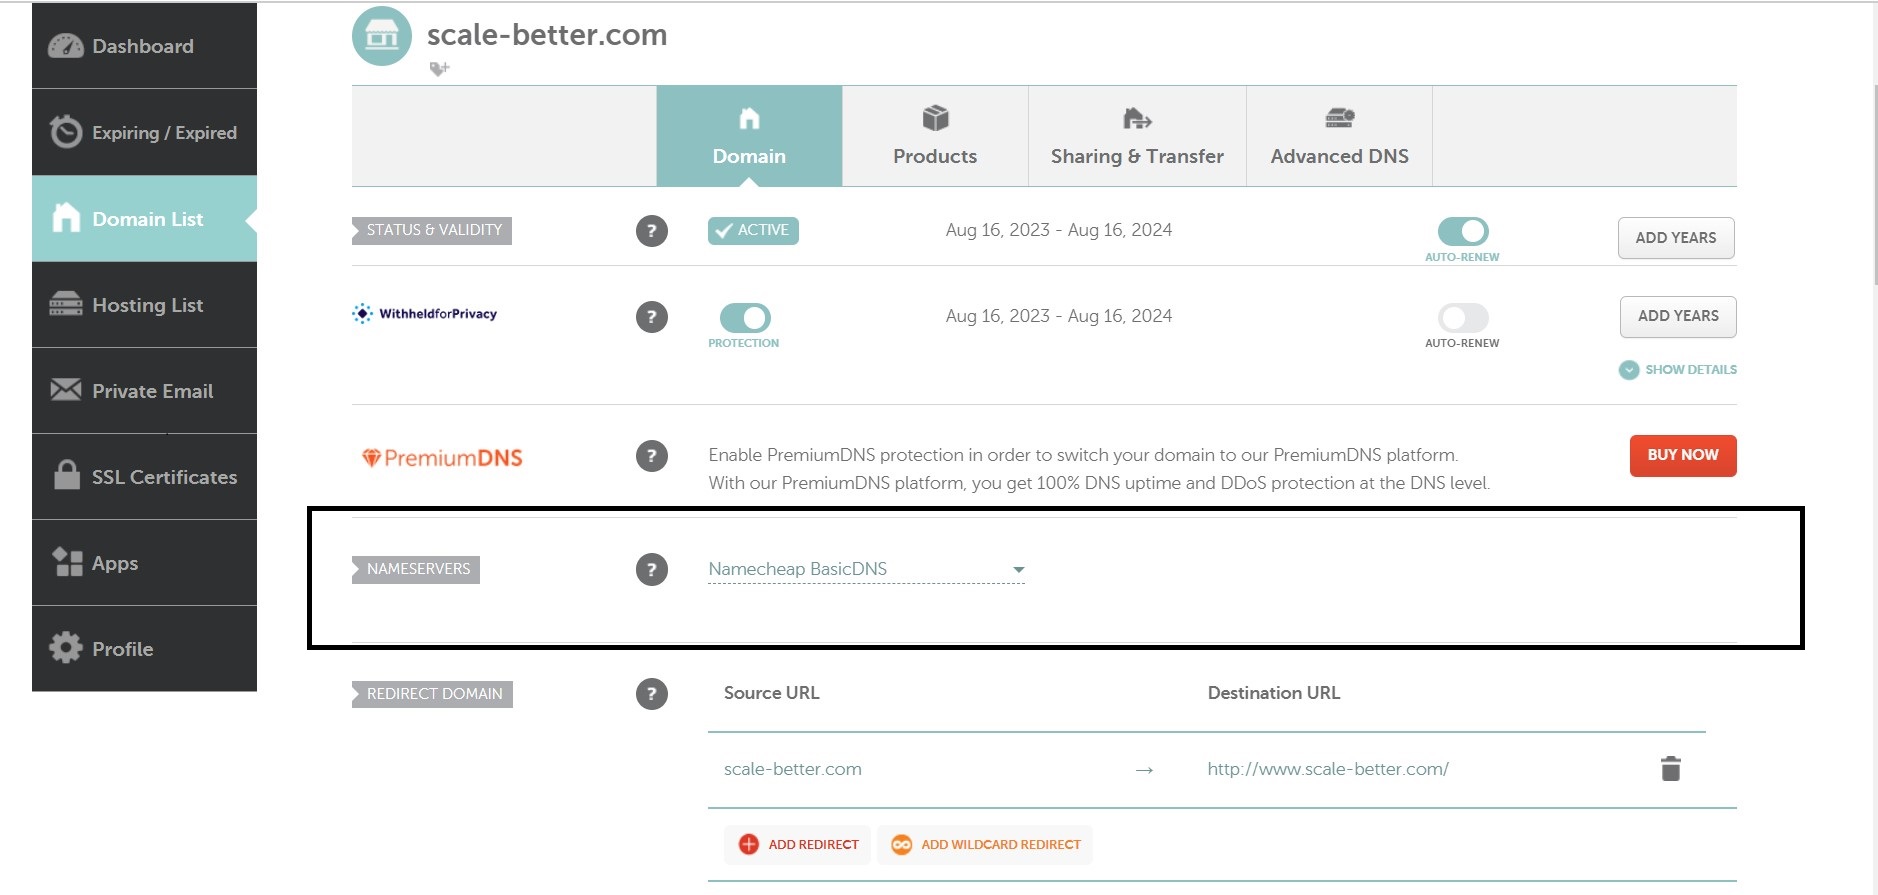
Step2. Set DNS Settings
After purchasing your domain, navigate to your DNS settings page on Namecheap.
Click on MANAGE and set the Nameservers to Namechiep BasicDNS.
Step 3: Change the advanced DNS settings to those provided by CPV One
Here you can find all the details in setting up the custom domain with CPV One.
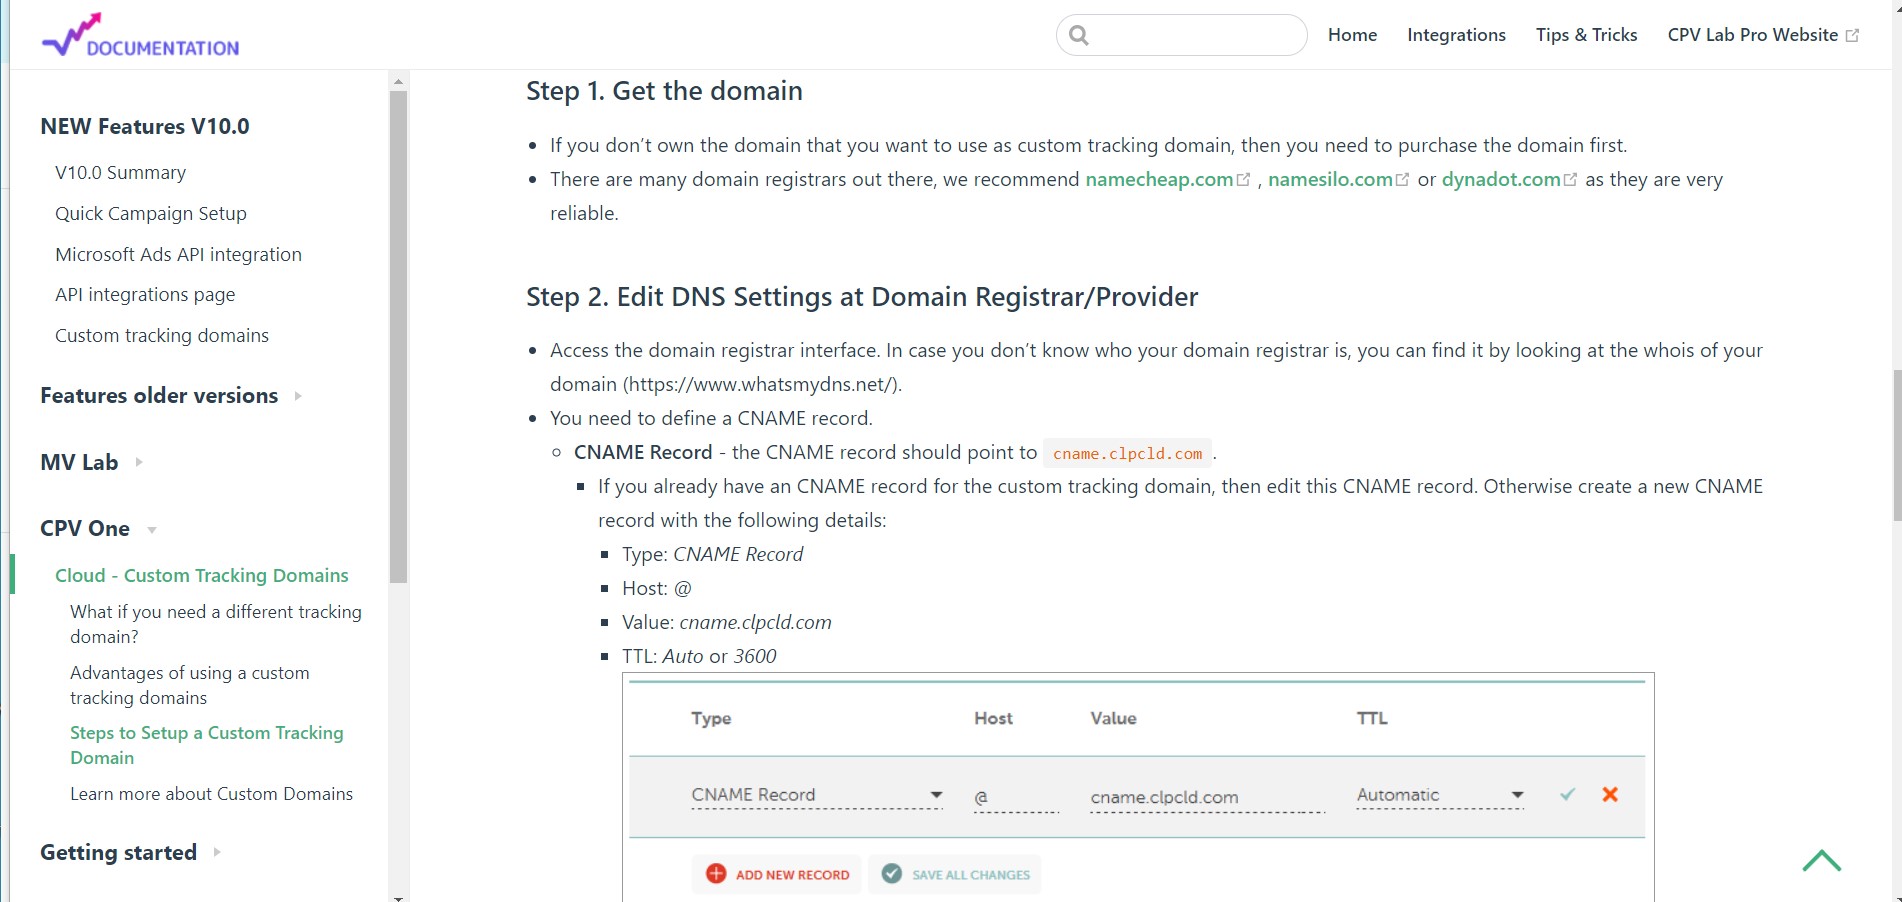
You need to define a CNAME record.
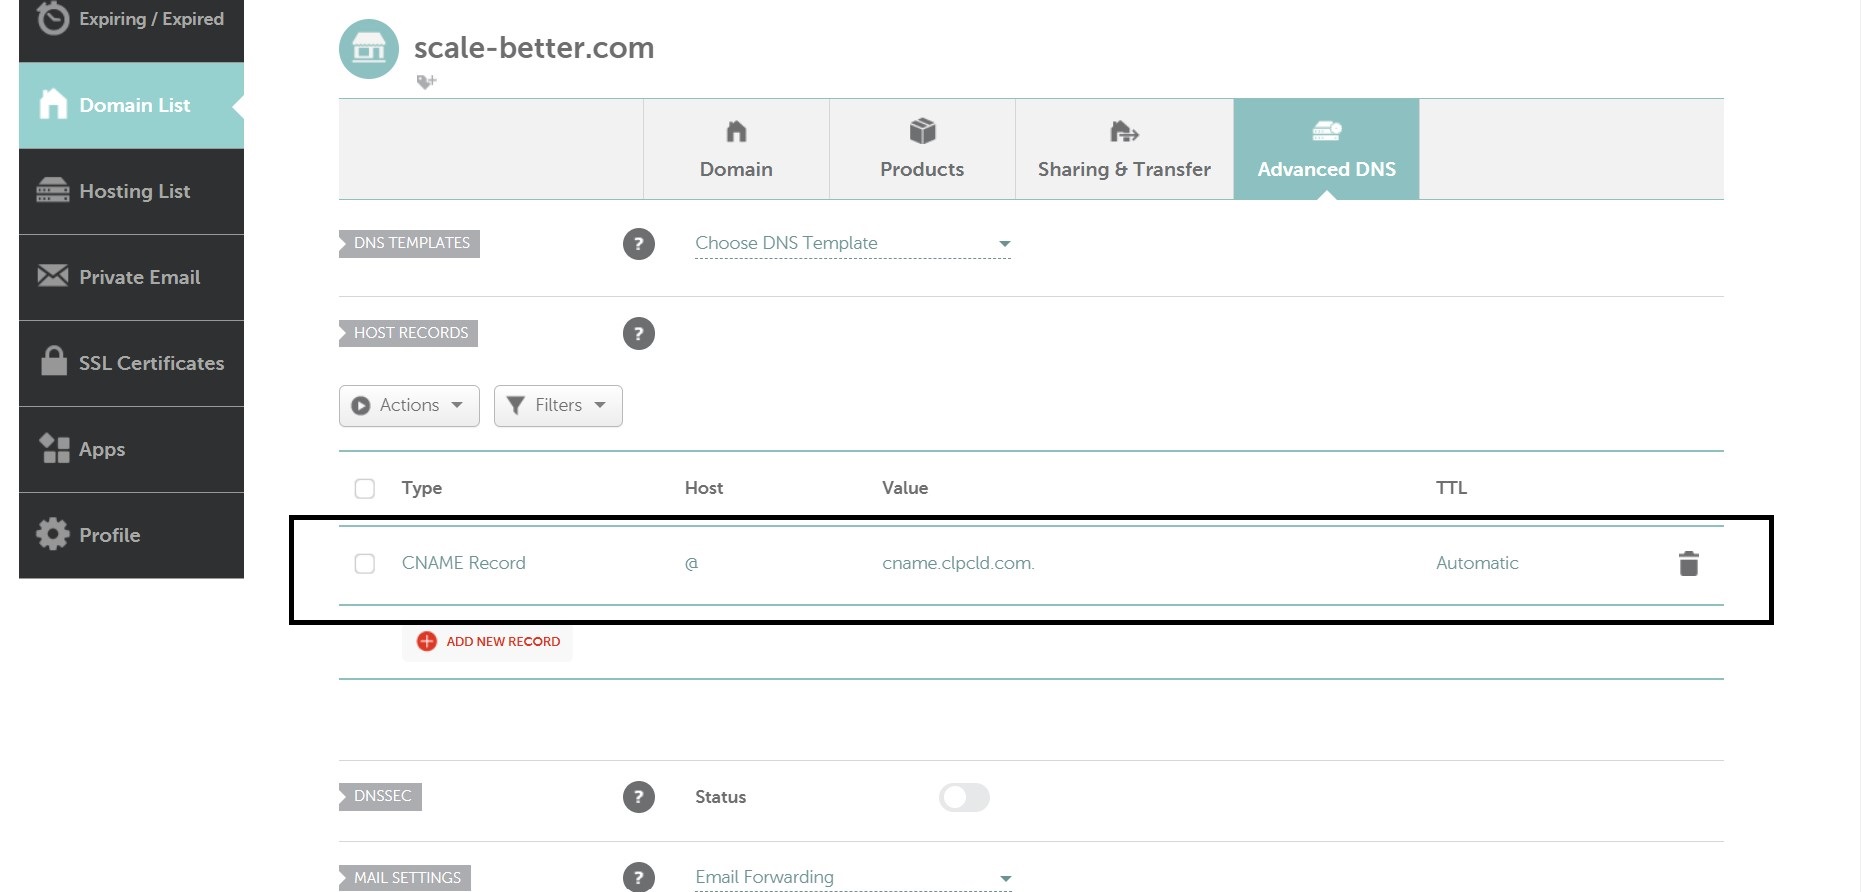
When you open Advanced DNS, you will get this data from the image below:

They will be deleted by themself after you add a CNAME Record with
- CNAME Record – the CNAME record should point to
cname.clpcld.com.- If you already have an CNAME record for the custom tracking domain, then edit this CNAME record. Otherwise create a new CNAME record with the following details:
- Type: CNAME Record
- Host: @ (or something like go, start, track if you will not use the entire domain for tracking)
- Value: cname.clpcld.com
- TTL: Auto or 3600
- If you already have an CNAME record for the custom tracking domain, then edit this CNAME record. Otherwise create a new CNAME record with the following details:
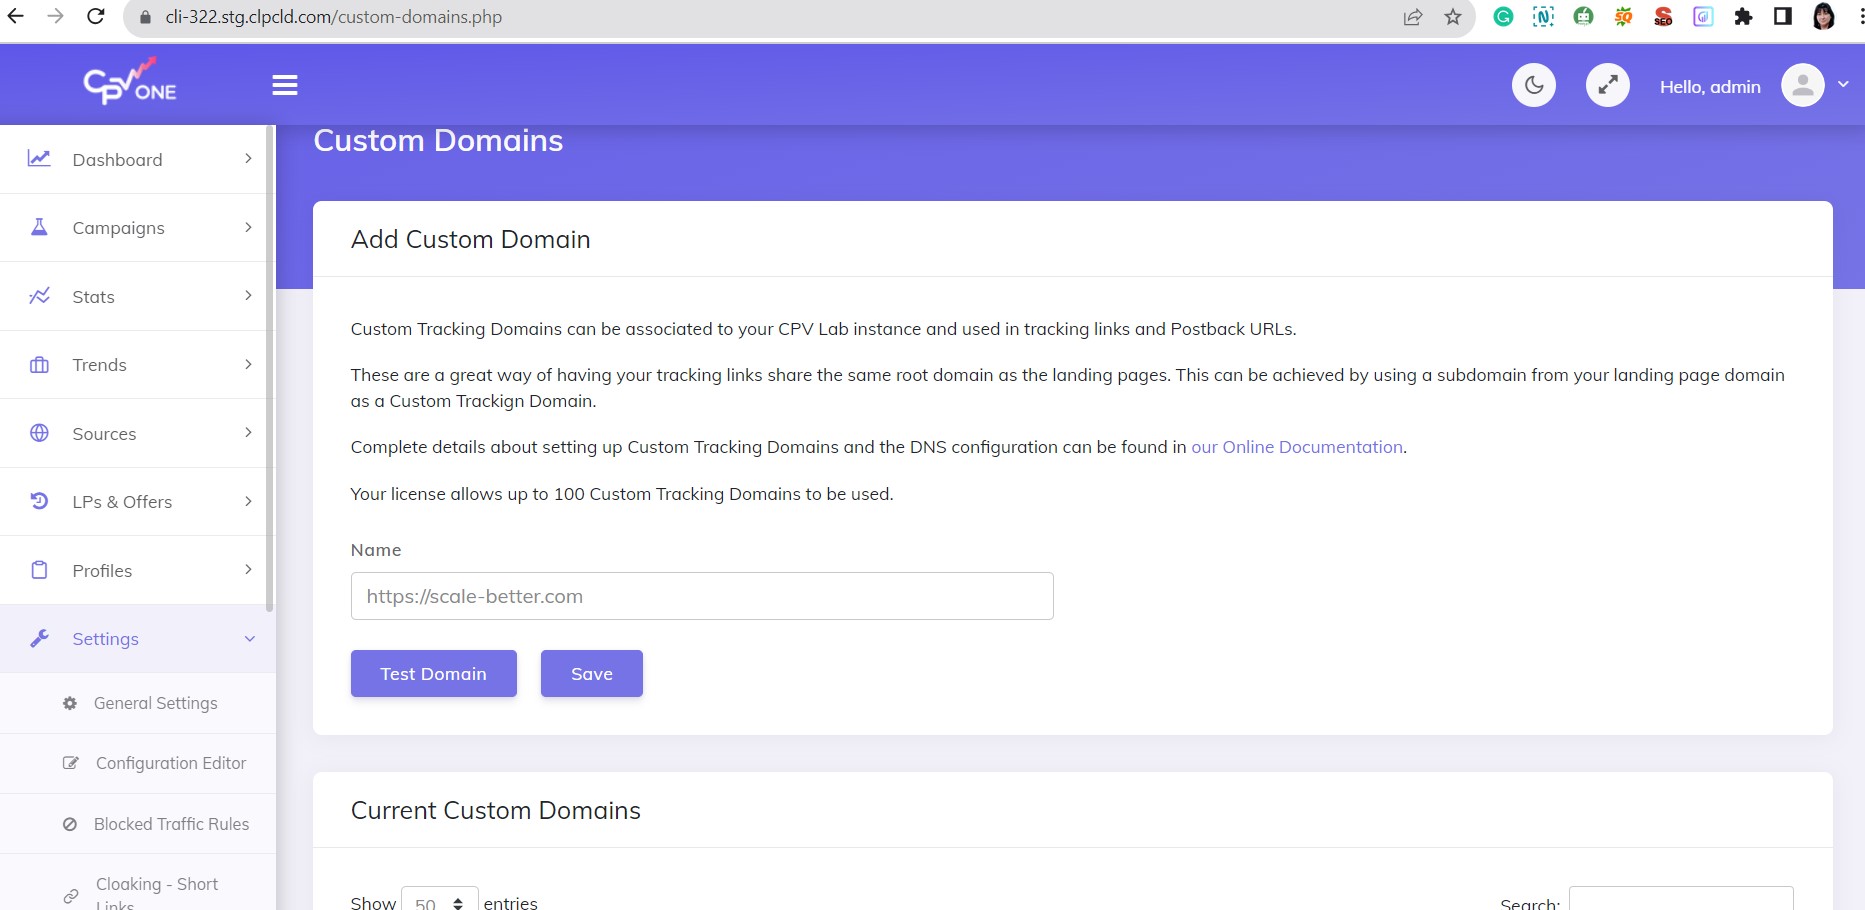
Add Domain to CPV One: Once your DNS is updated, log into your CPV One account.
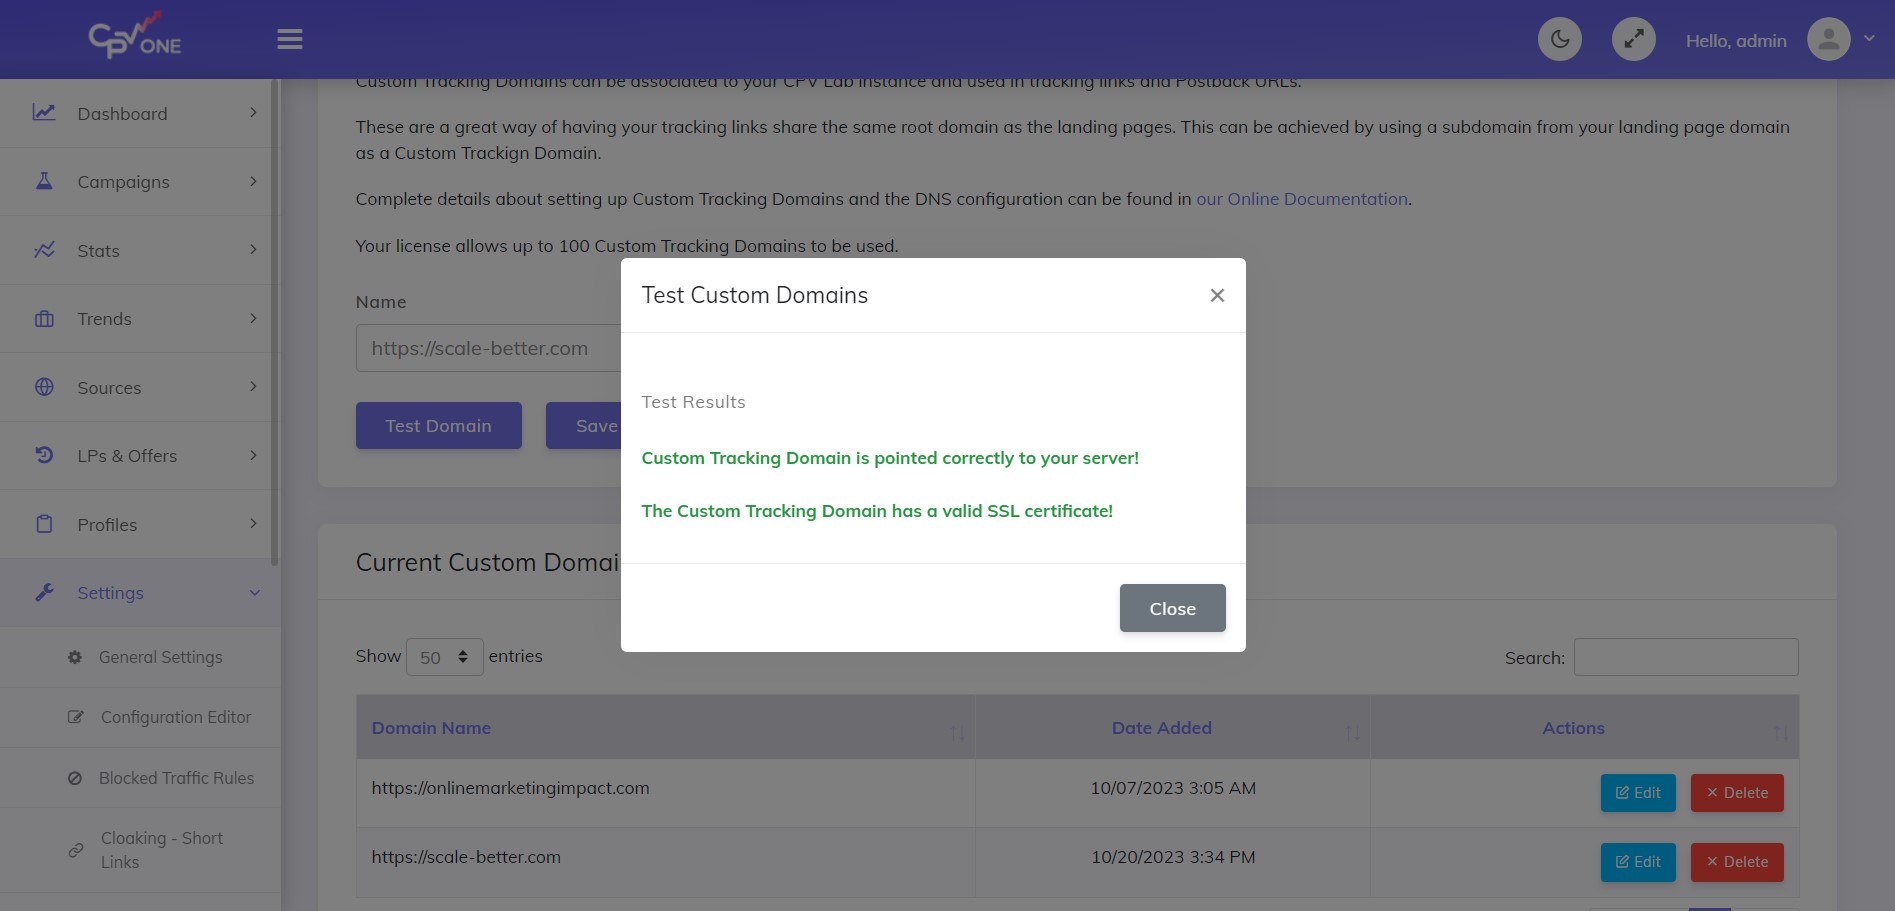
Head to “settings -> custom domains” and add your new Namecheap domain with HTTPS in front.
In our case, it will be https://scale-better.com
When you click on the save domain at the beginning you will get this message:
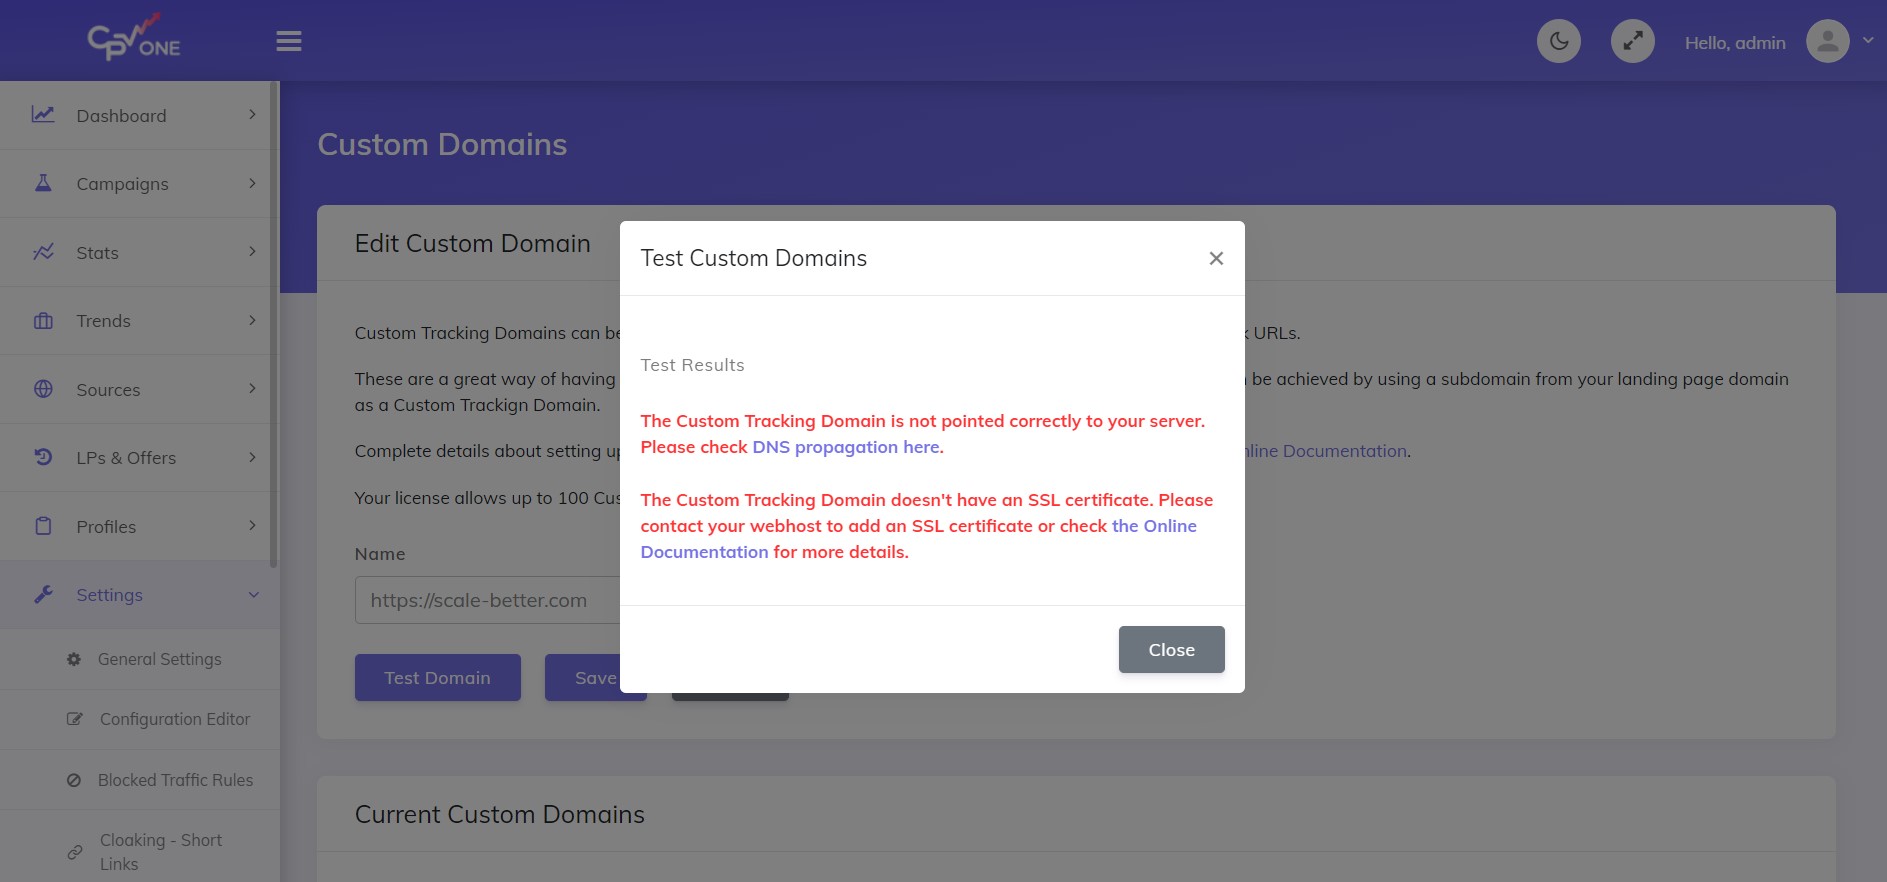
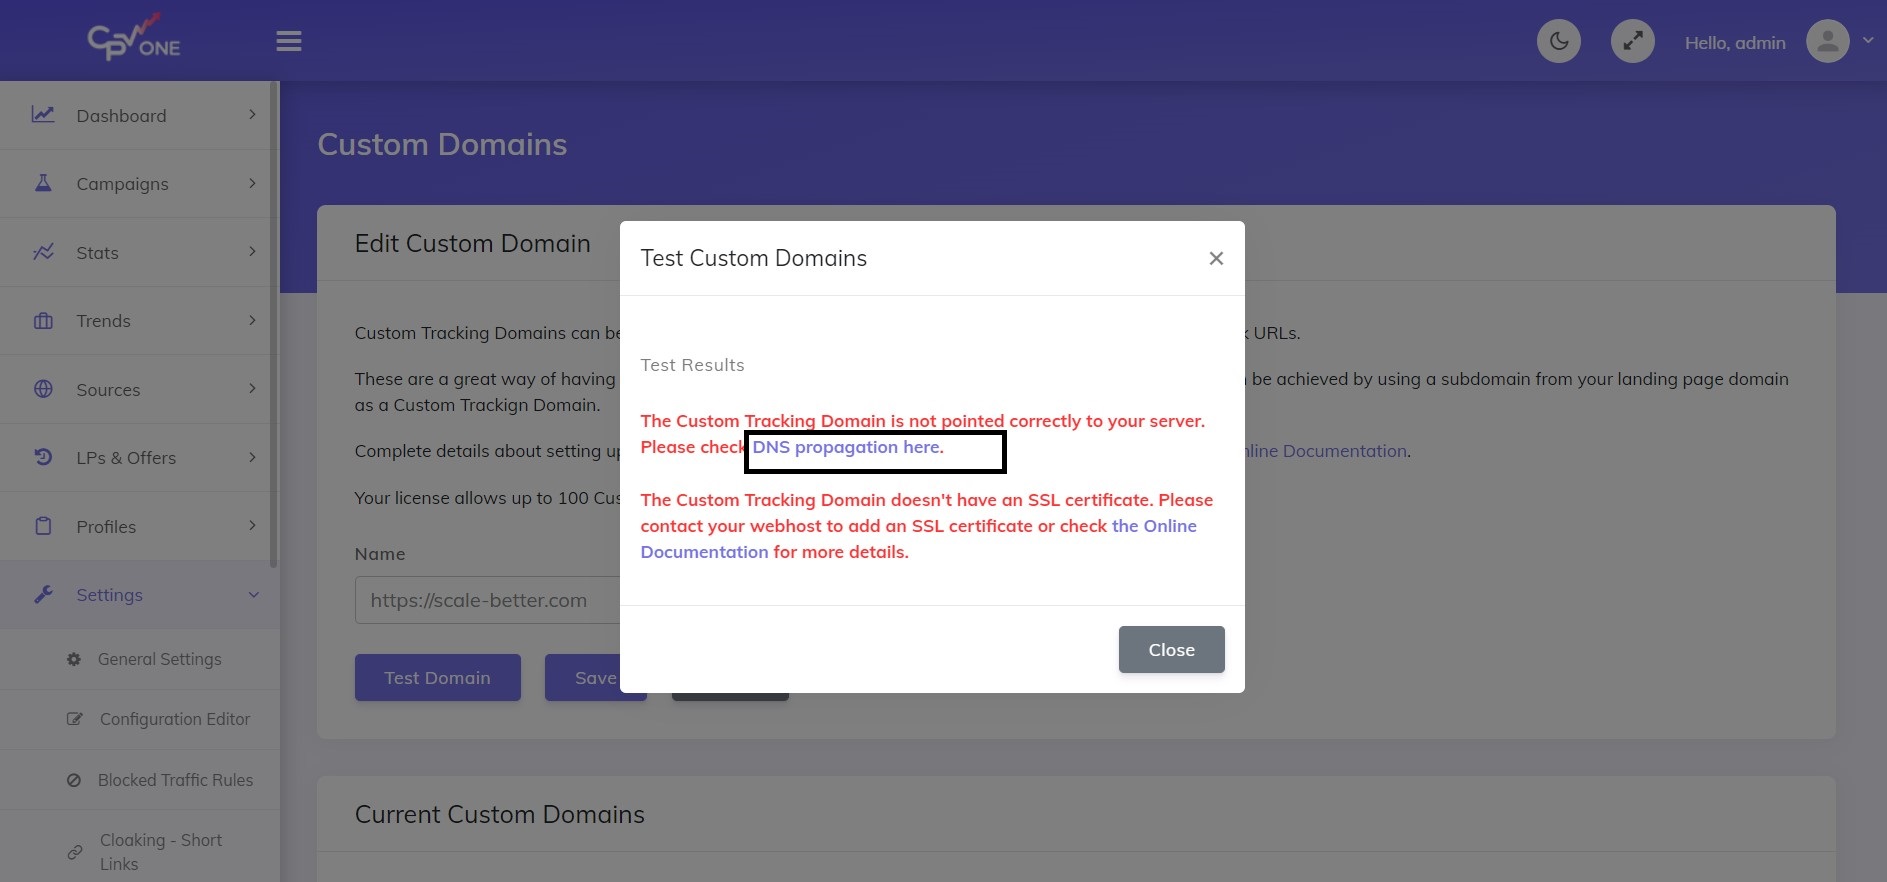
Click on the DNS Propagation here:
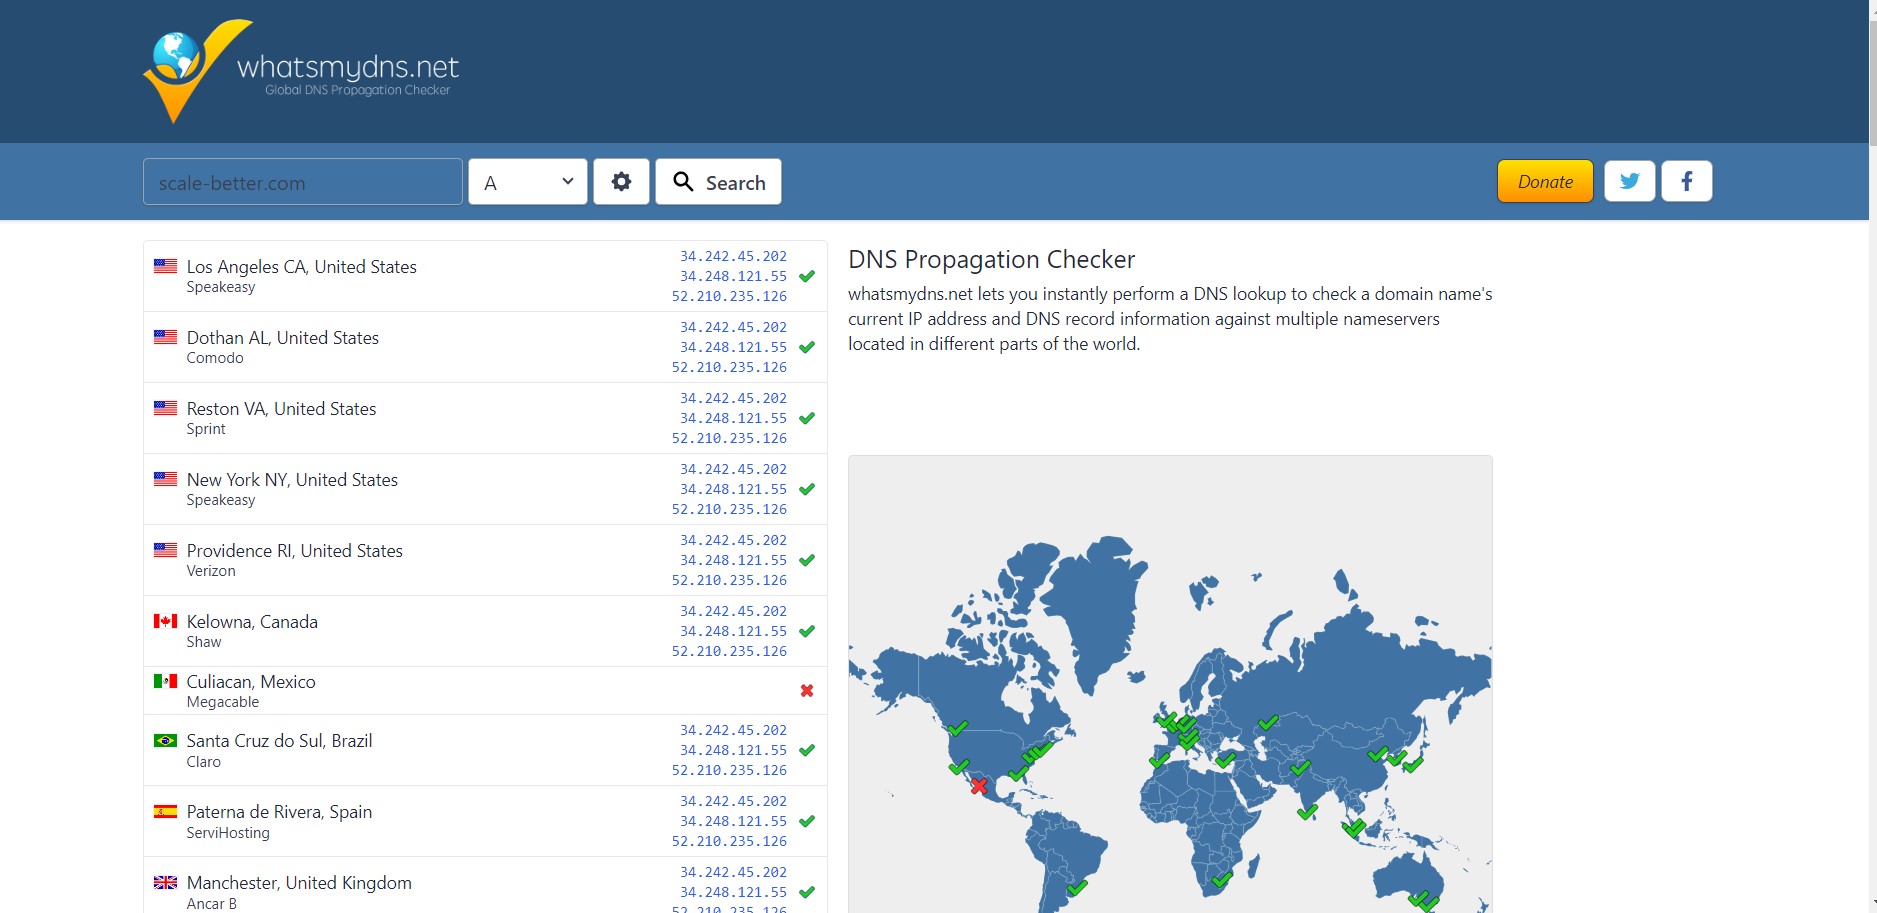
In the beginning, all data will be marked with a red X.
By the time they change in the green checklist.
After 30 minutes, I had this situation.
You can see if there are red Xs on the map on the left side too.
Finally, all servers had green checklists after maybe 40 minutes
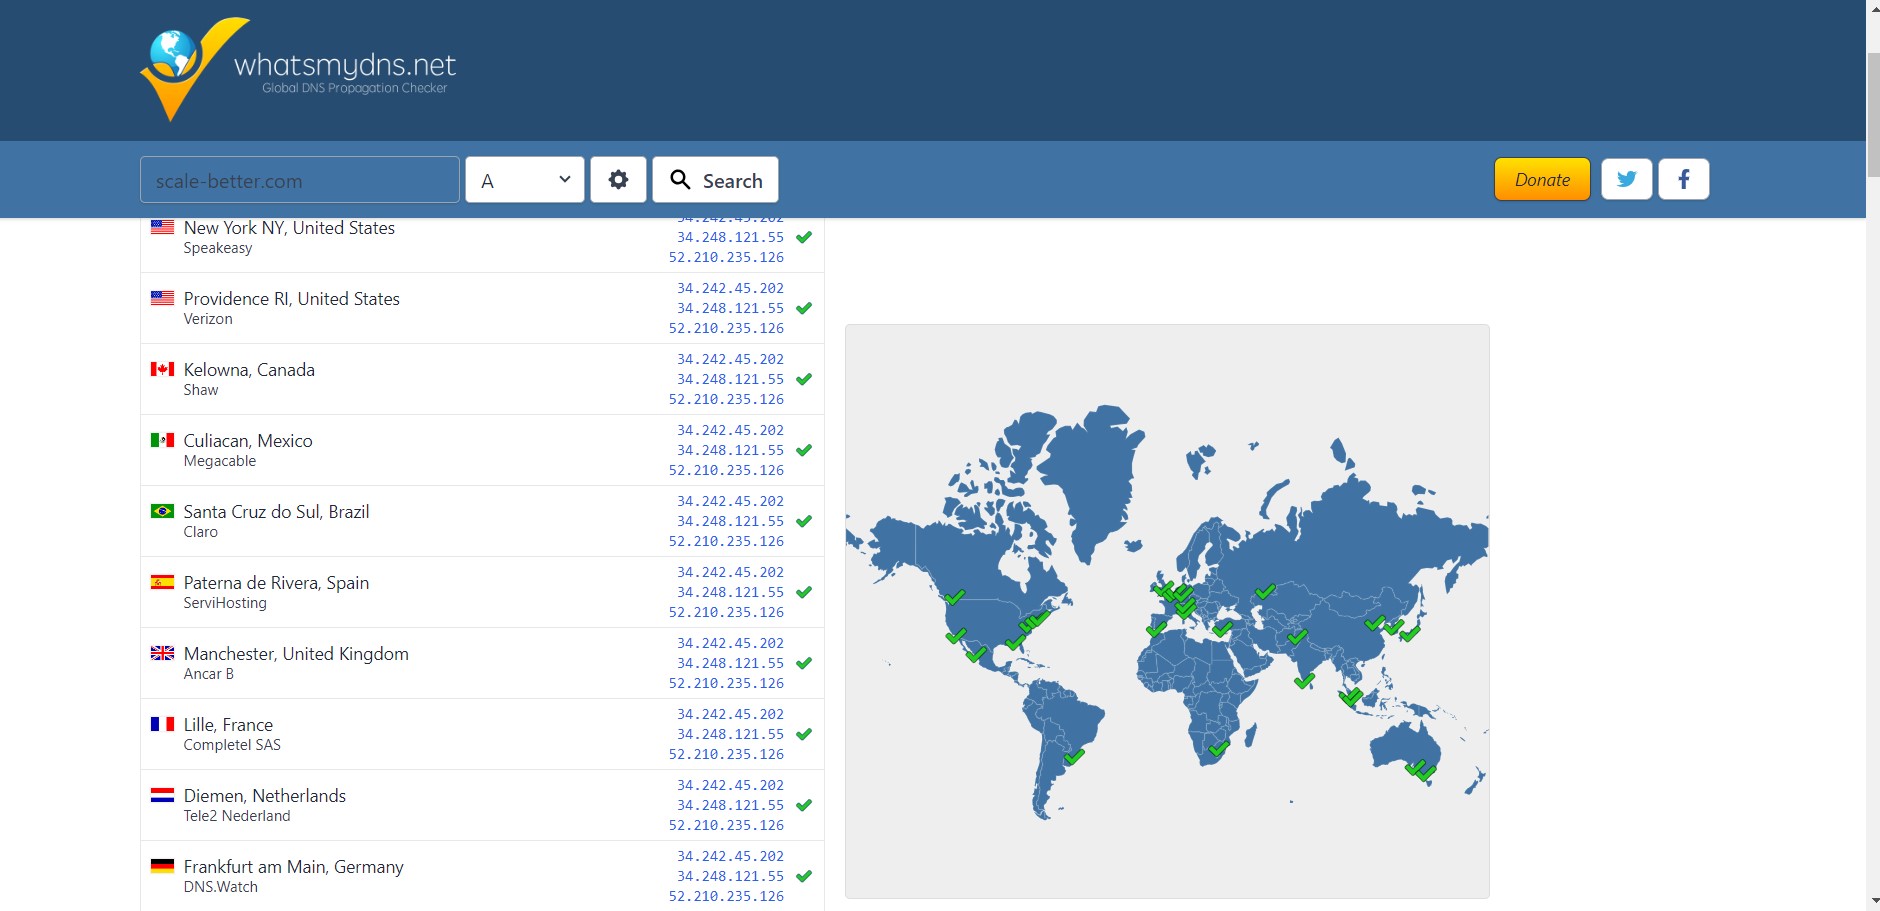
and CPVOne verified that the domain is set up correctly.
Create your first campaign with your domain
Check our Guide to Create Landing Page Tracking Campaign,
There I explained step-by-step how to create a Landing Page Tracking campaign with CPV One.
I used the tracker domain when creating tracking links in this article.
There is no reason to duplicate the article, so in this tutorial we will cover only the part about using custom domain settings in the campaign.
Everything else is the same.
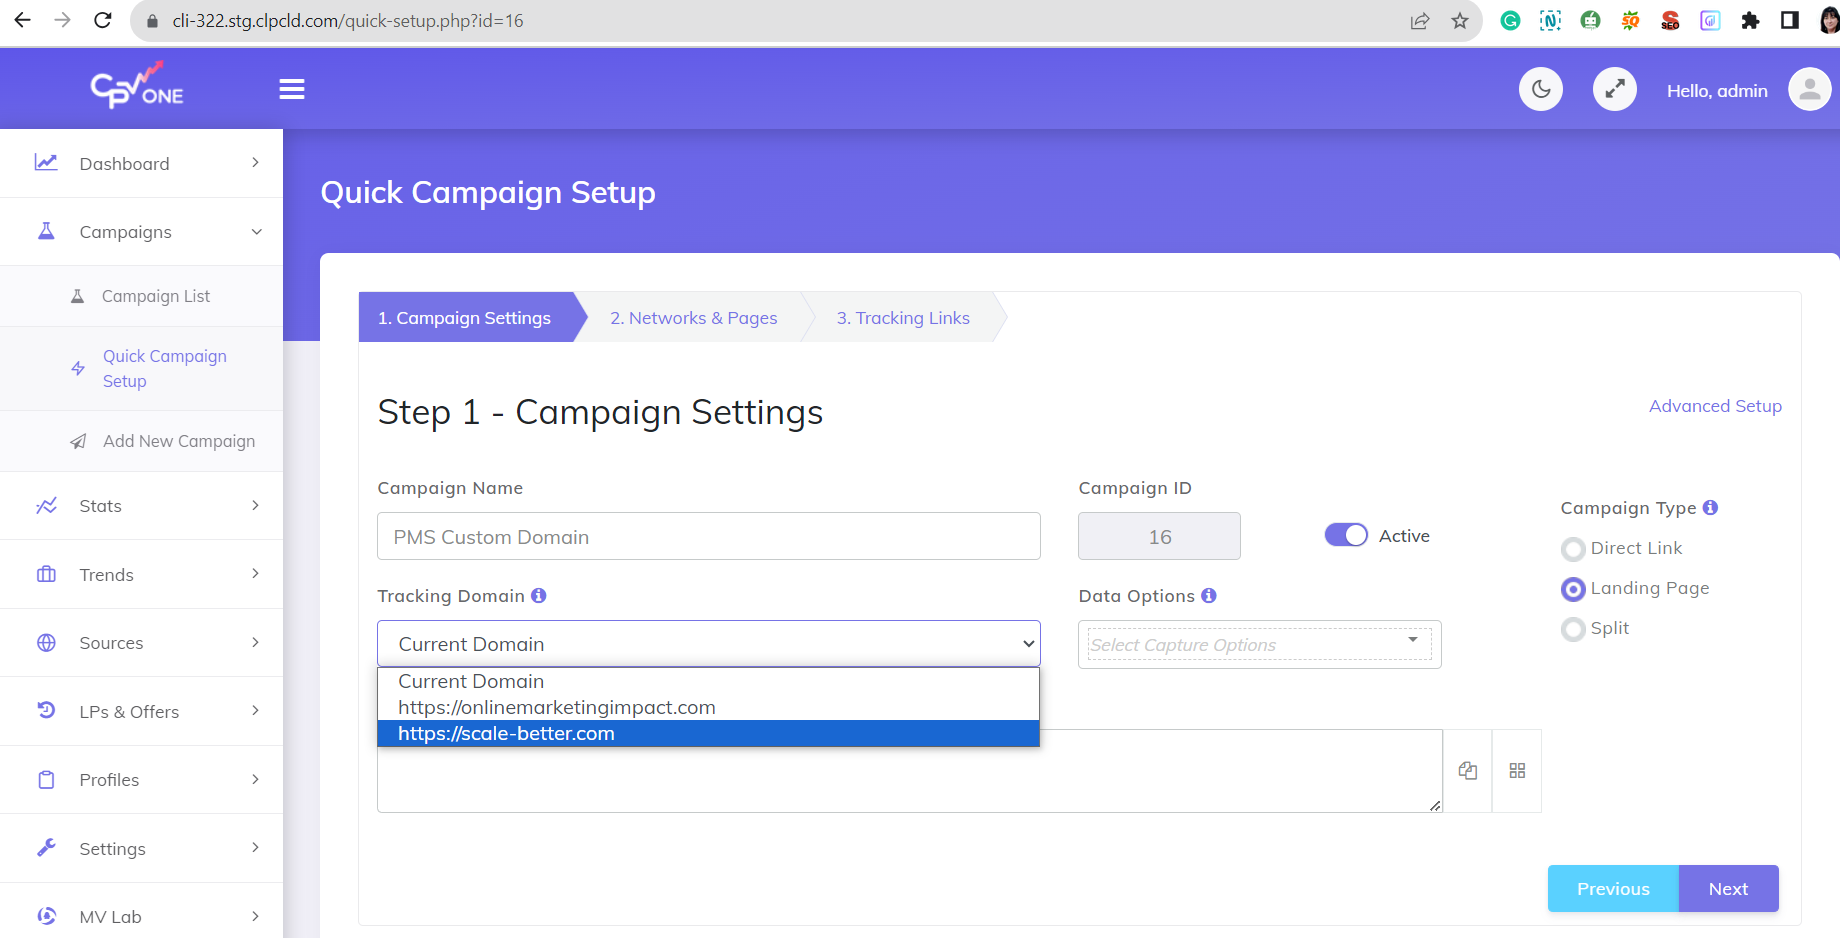
If you create a new campaign In Step 1 – Campaign Settings, you will choose your domain.
You can add a new domain for every big campaign or use one domain for all campaigns. It is your choice.
According to your plan, you can add up to 100 domains.
I don’t need to create a new campaign to change the domain name, so I only edited the one I had.
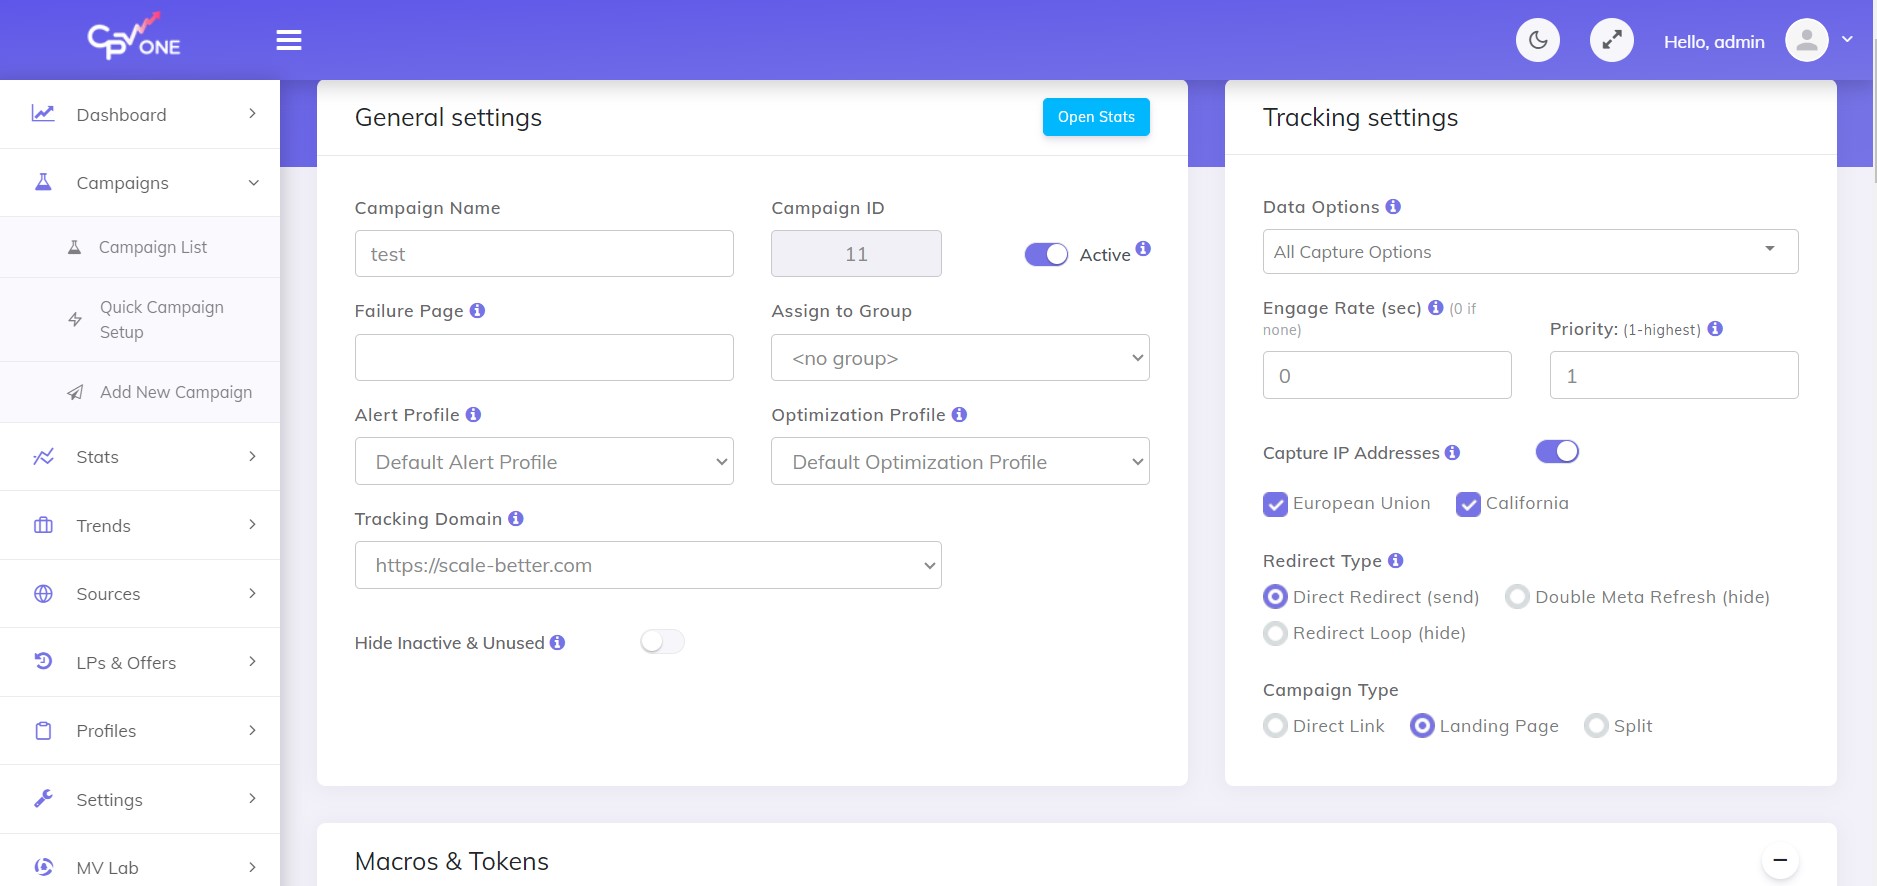
Everything else remains the same. You don’t need to create any redirects to your domain.
You will put your landing page and your offer link as they are on the CPV One platform
I left the same landing page
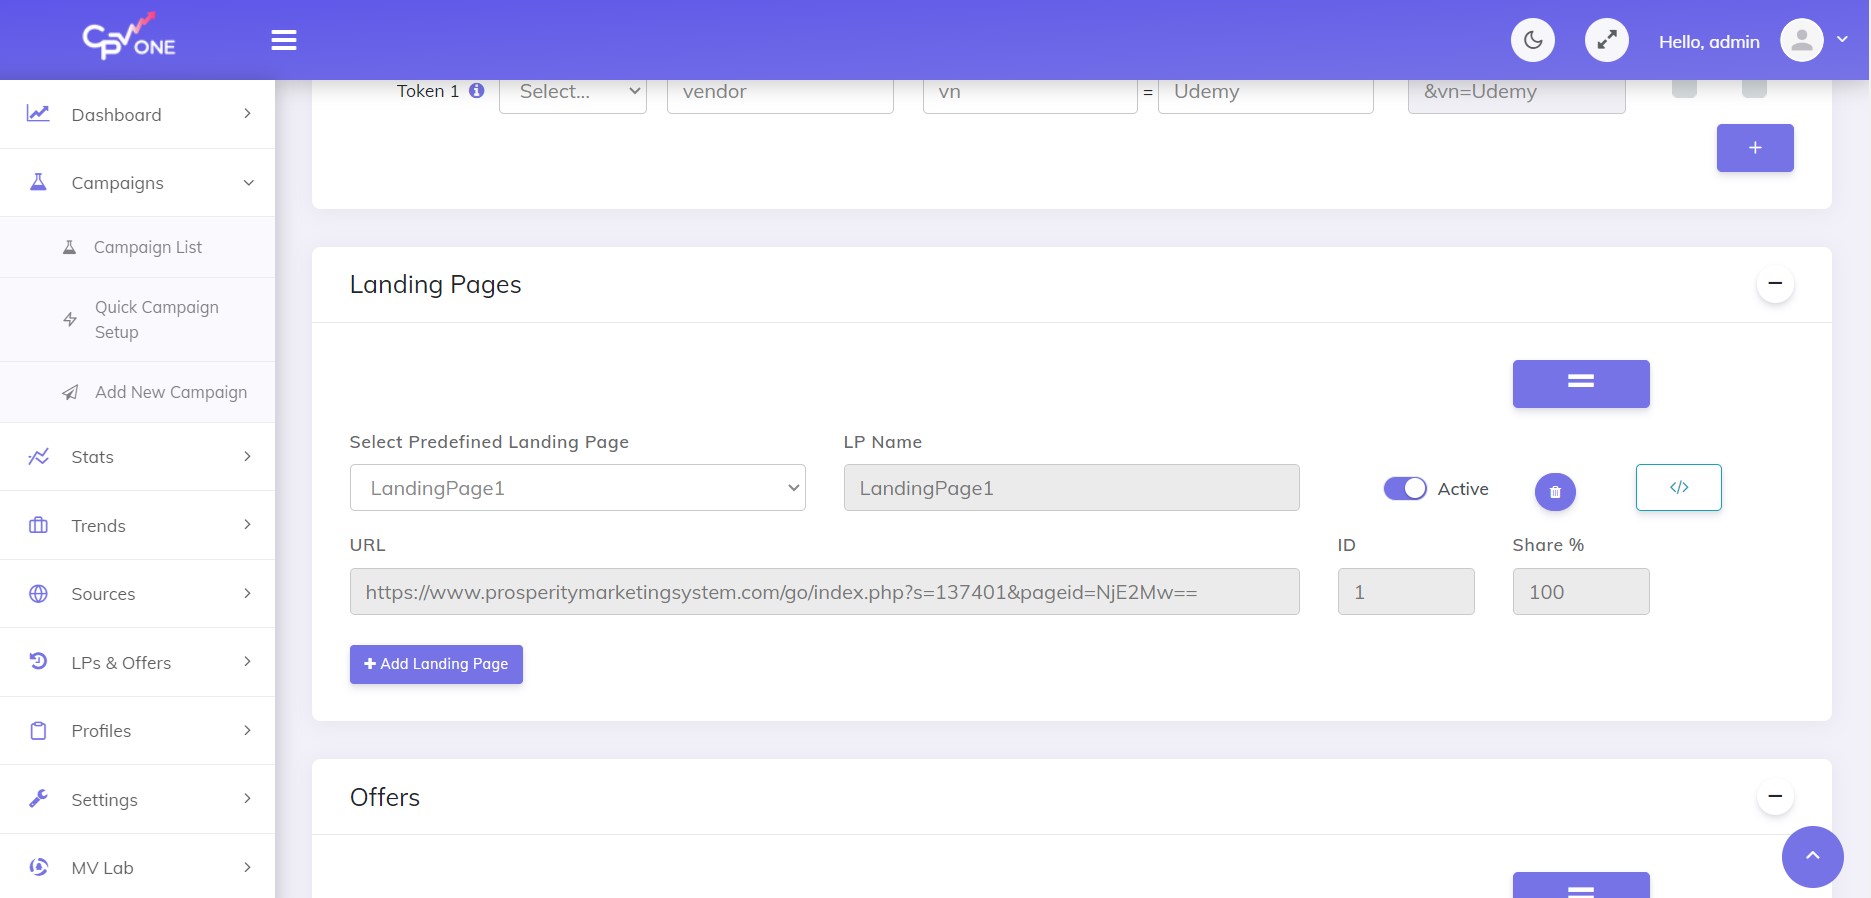
The same offer
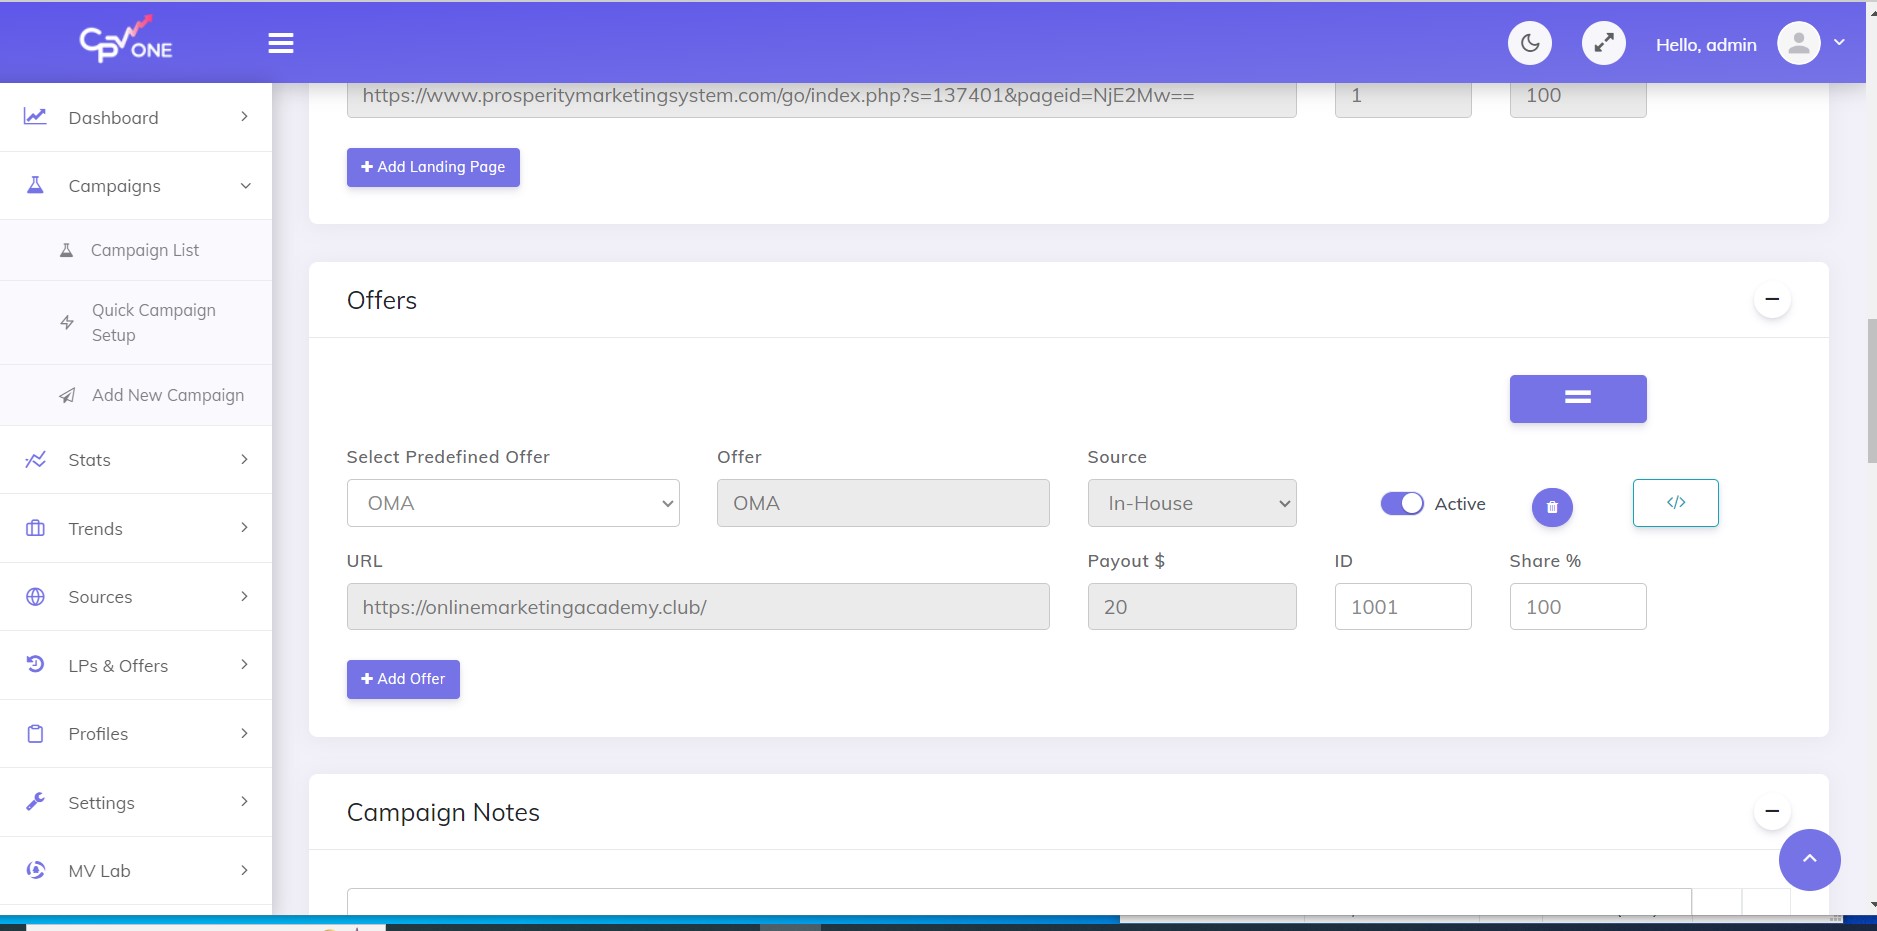
and got the links that start with my domain name. Now, I just need to put the codes with my domain in the pages and promote my offer.
If you want to create a campaign in WordPress here is the tutorial on how to easily track it: Easy Tracking for WordPress
Sort of a conclusion…
In conclusion, incorporating affiliate link tracking under your own domain doesn’t have to be a complex process.
The task becomes a manageable, step-by-step endeavor with platforms such as CPV One.
From purchasing your domain on Namecheap to setting up and tracking a campaign in CPV One, each step leads you closer to optimizing your marketing efforts, creating a more streamlined and insightful affiliate marketing experience.
It’s important to remember that optimization isn’t a one-and-done deal. It requires regular monitoring, tweaking, and experimenting.
Nonetheless, the initial setup outlined in this article constitutes the critical foundation upon which your affiliate marketing success is built.
So be patient, be persistent, and keep optimizing—your affiliate marketing achievements are within your grasp!
If I missed something in this article, you can find an in-depth explanation in the CPV One documentation.
If you want to test this tracker with your domain name, you have a 14-day free trial.
If you need additional help with setting domain names or campaigns, just contact us and I will help you with everything.
Remember: To get the most out of your domain name and CPV One, test different campaigns and track your results regularly. Optimization is an ongoing process and is key to successful affiliate marketing!
Author: Elizabeta Kuzevska
Elizabeta is a certified Digital marketer and Email strategist. With 15+ years of experience in digital marketing, she helps B2B companies boost their online presence through digital strategies, strategic email marketing, & SEO content marketing. As founder and CEO of Online Marketing Academy and co-founder of Lead Gen Marketing, she is passionate about learning from and supporting others.