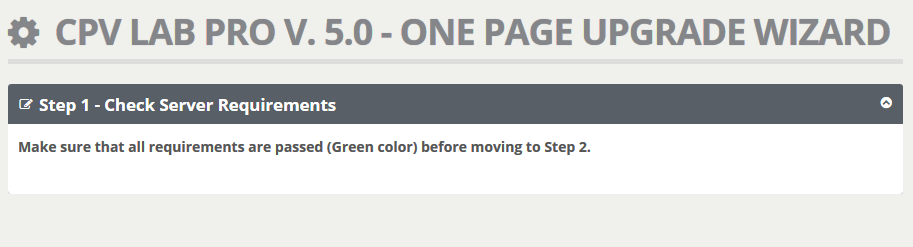
CPV LAB PRO V. 6.0 - ONE PAGE UPGRADE WIZARD
- To upgrade CPV Lab Pro (opens new window) to the latest version, you need to follow the instructions from the
upgrade-wizard.phppage. - There are only 5 steps required (and 1 optional step) to complete (around 15 min):
- Step 1. Check Server Requirements
- Step 2. Download Upgrade Package
- Step 3. Import Database Update Files
- Step 4. Verify the Database
- Step 5. Upload the New Files
- Step 6. Constants-user.php - Only if you upgrade from CPV Lab 2.x
Pre-requirements
- You need to have an older version of CPV Lab Pro already installed
- Before accesing the upgrade page you need to make sure you have the following available on your server:
- Linux Server - VPS or Dedicated Hosting (recommended)
- PHP 5.3 or Above (PHP 7.0 or above recommended)
- MySQL 5.1 or Above
- minimum 100 MB of disk space
- ionCube Loader version 10.2 or Above
- External requests enabled
- 256MB of Memory allocated to PHP Process (memory_limit key from php.ini)
- Required PHP Extensions
- iconv extension
- mbstring extension
- mysqli extension
- session extension
- SimpleXML extension
- zip extension
- xmlreader extension
- json extension
- We recommend making a backup of the database and the files from your CPV Lab Pro instance. It’s better to be safe in case something goes wrong.
- The database can be backed up from PhpMyAdmin and the files can be copied with an FTP client application.
- Download the Upgrade Wizard Package for your PHP version from the User Area (opens new window). Login into the User Area (opens new window) using the credentials received on email when CPV Lab Pro (opens new window) was purchased.
- Copy and unzip this package on your computer
- Then upload ALL files and folders from the package on your server by using Filezilla FTP client (opens new window) or File Manager utility from cPanel or any other FTP utility.
- You should upload the files in the location where you have CPV Lab Pro (opens new window) installed
- Access
upgrade-wizard.phppage in a browser
- The link to this page should be:
http://<your_CPV_Lab_Pro_Location>/upgrade-wizard.php
- Access
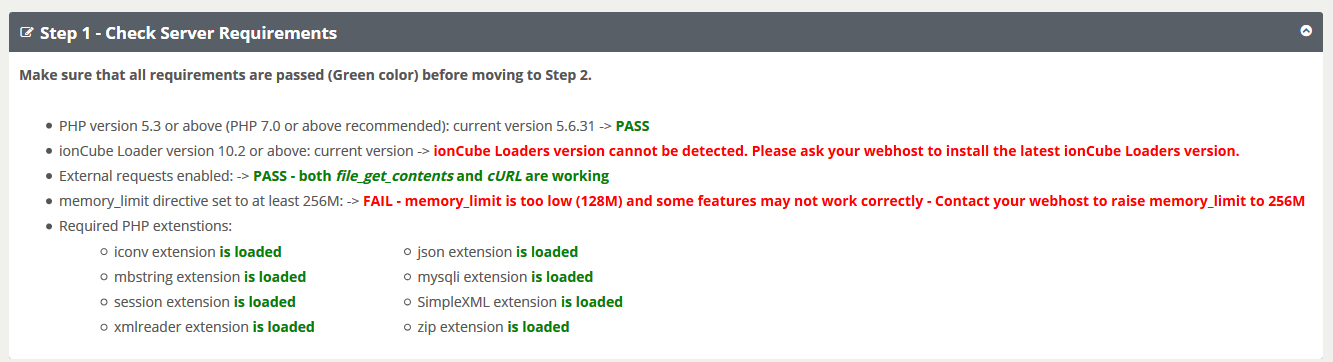
Step 1. Check Server Requirements
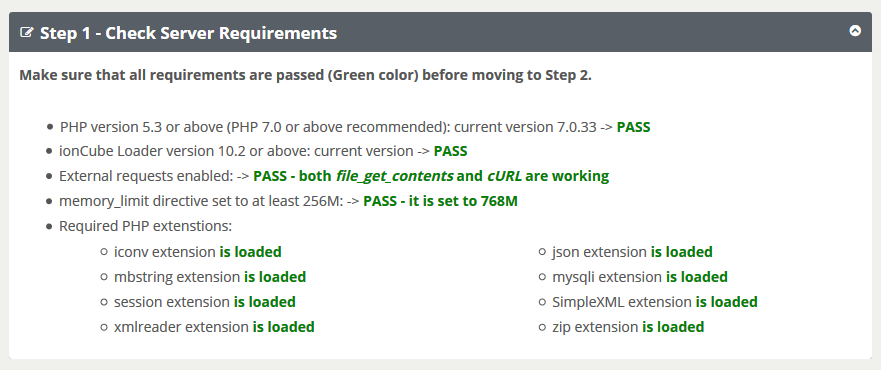
- A list with all the server requirements will appear in the Step 1 section
- If your server is missing any of the items, it will be signaled with a RED message
- If all your server requirements are met, they should all have a GREEN message
- Once you have all the server requirements met (they are all GREEN ), then you can move to Step 2. Download Upgrade Package
Step 2. Download Upgrade Package
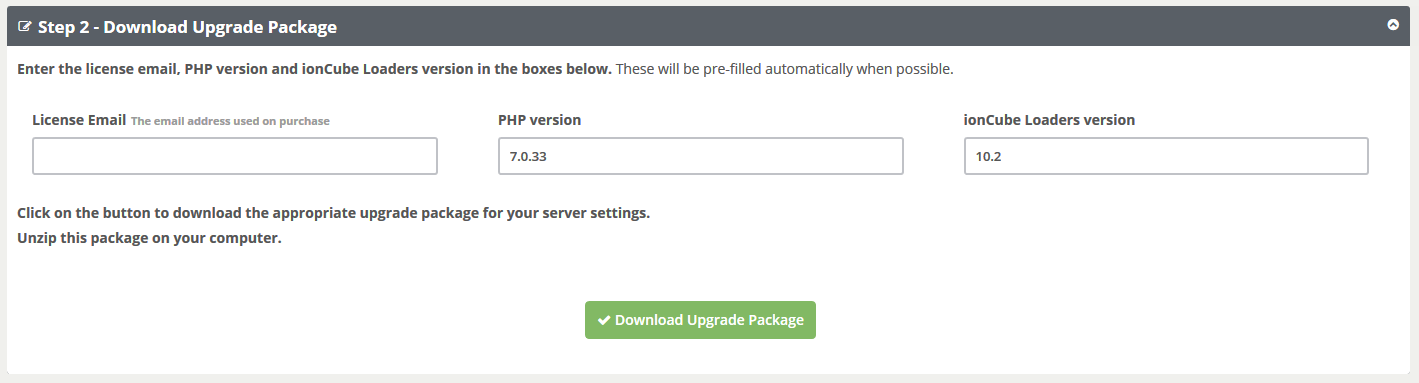
In order to download the Upgrade Package you need to provide the following information:
- License Email - is the email used to purchase the license for CPV Lab Pro (opens new window)
- PHP Version - will be pre-filled automatically when possible.
- ionCube Loader version - will be pre-filled automatically when possible.
Click "Download Upgrade Package" to download the appropriate upgrade package for your server settings.
An archive will be downloaded
Unzip this package on your computer
Step 3. Import Database Update Files
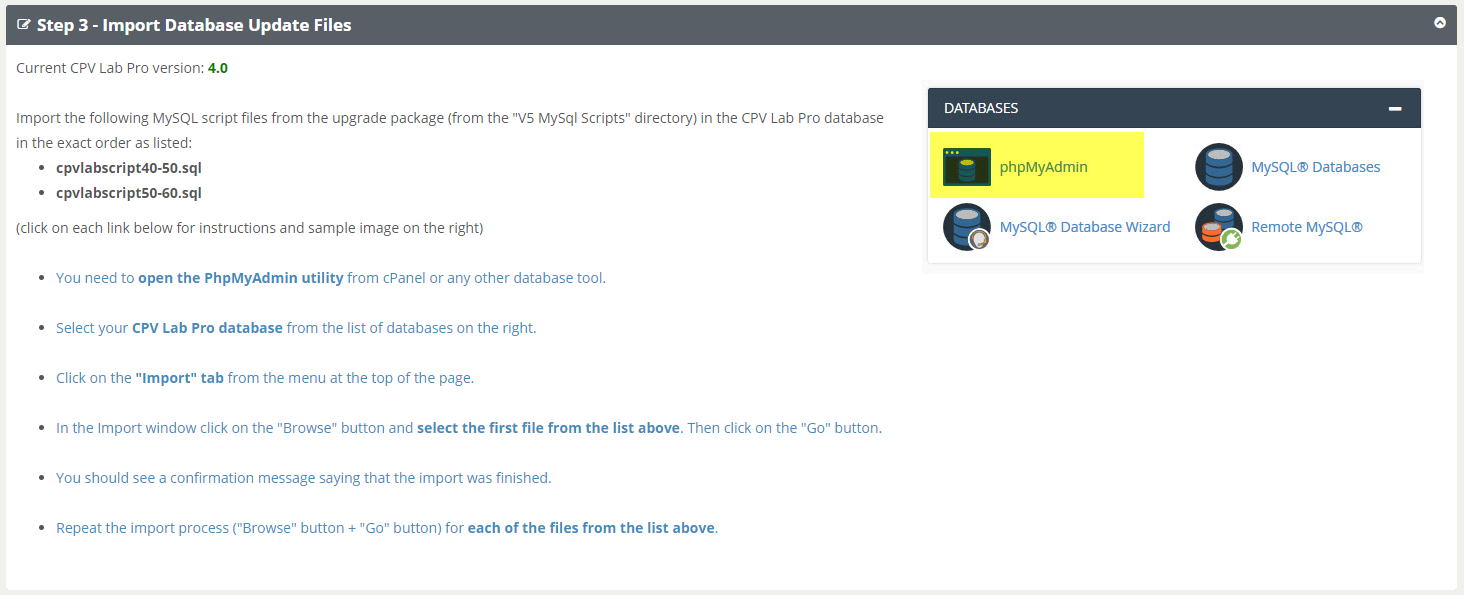
Import the following MySQL script files from the upgrade package (from the "V6 MySql Scripts" directory) in the CPV Lab Pro database in the exact order as listed in the Wizard page. In this example we have:
cpvlabscript40-50.sqlcpvlabscript50-60.sql
Follow these steps in order to import the scripts above (click on each link for instructions and sample image on the right side of the page) :
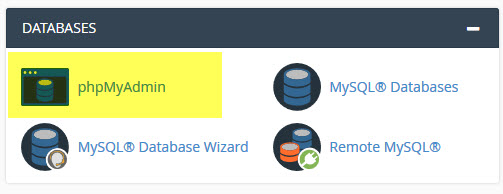
- You need to open the PhpMyAdmin utility from cPanel or any other database tool.
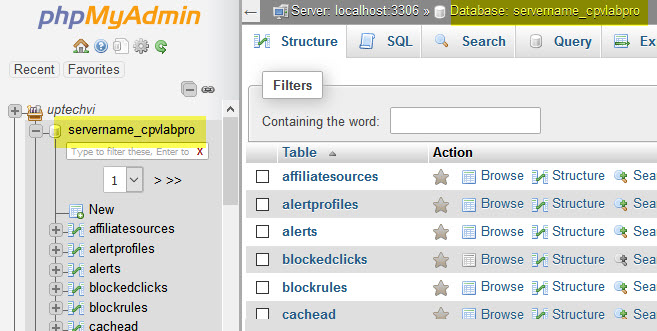
Select your CPV Lab Pro database from the list of databases on the right.
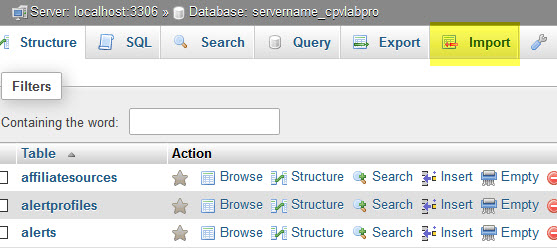
Click on the "Import" tab from the menu at the top of the page.
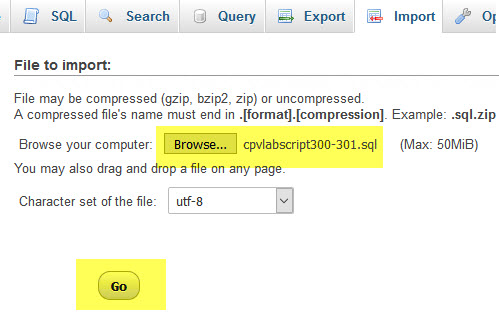
In the Import window click on the "Browse" button and select the first file from the list above. Then click on the "Go" button.
You should see a confirmation message saying that the import was finished.

Repeat the import process ("Browse" button + "Go" button**) for each of the MySQL files from the list above.**
Once you complete all the above steps, you can go to next step : Step 4. Verify the Database
Step 4. Verify the Database
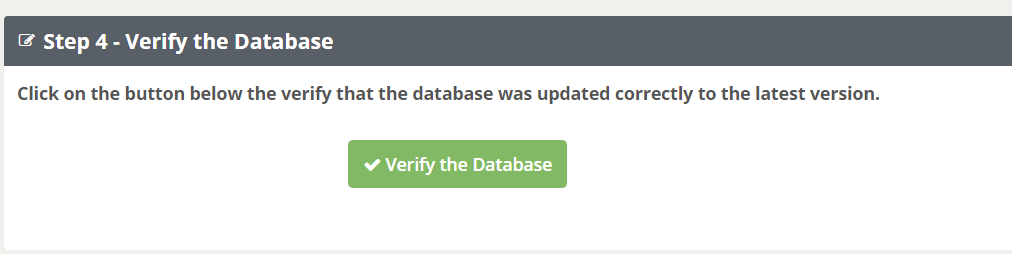
- Here you will check that the files from Step 3 were imported correctly
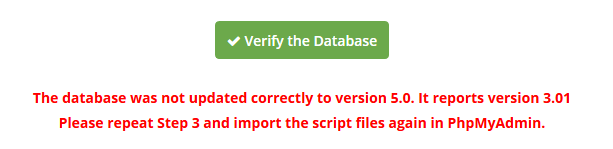
Click on the "Verify the database" button to verify that the database was updated correctly to the latest version.
- if you get the message below, then you need to repeat STEP 3 instructions:
- if the message received is "Database was updated correctly to the latest version. You can continue to Step 5.", then you can continue to Step 5. Upload the New Files
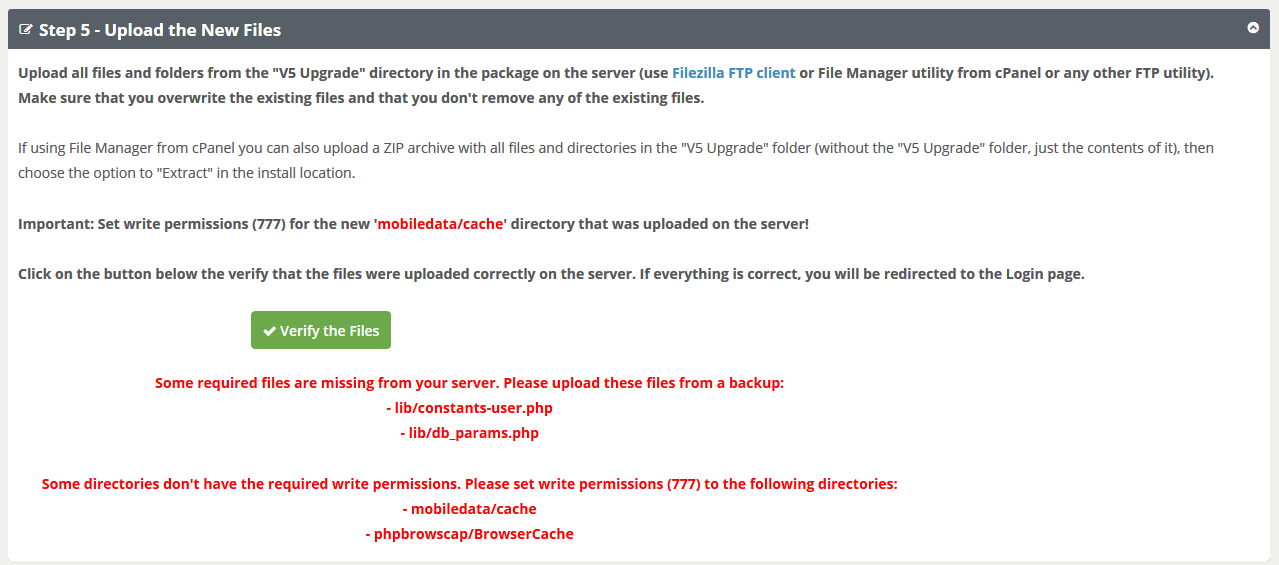
Step 5. Upload the New Files
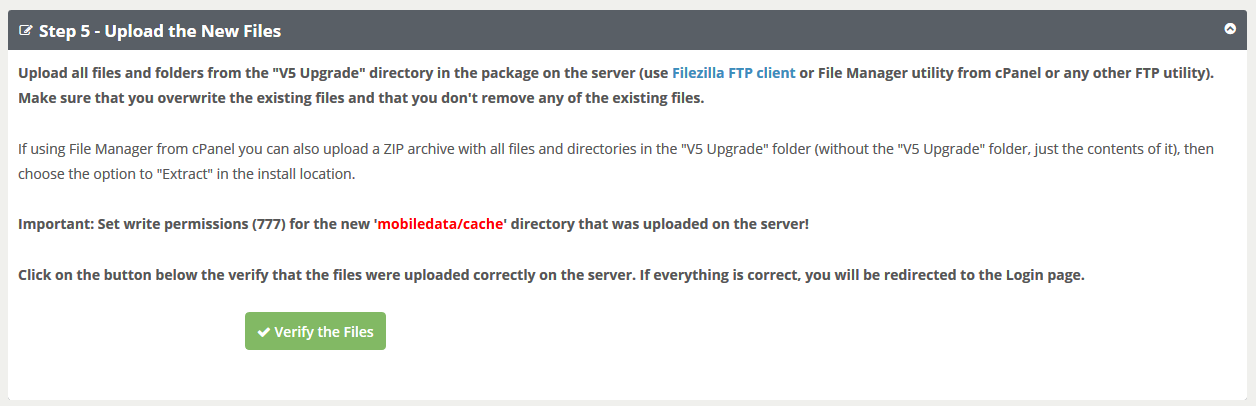
- Upload all files and folders from the "V6 Upgrade" directory in the package on the server (use Filezilla FTP client (opens new window) ) or File Manager utility from cPanel or any other FTP utility).
- Make sure that you overwrite the existing files.
- Set write permission (777) to the new 'mobiledata/cache' directory from the root of your CPV Lab Pro instance. You can use Filezilla or the File Manager utility from cPanel to do this.
- Click "Verify the Files" button to make sure all files are setup correctly.
- Ready! Go and check the updates! ☺️
Step 6. Constants-user.php - Only if you upgrade from CPV Lab 2.x
If you upgrade from CPV Lab 2.x, please make sure that you have a file named
constants-user.phpin the “lib” directory.If this file is missing from the “lib” directory, then you should download the archive from the link below and upload the
constants-user.phpfile on the server in the “lib” directory:https://cpvlab.pro/download/constants-user.zip
About Error Messages
All the error messages/warnings will be RED
Most error messages include indications on how to be solved
- Examples:
You shouldn't go to a next step until you solve all the warnings from the current step
Once a step is completed, you can move forward to the next step
IMPORTANT NOTE
- If the Upgrade Wizard page doesn't load and shows a blank screen or a message about corrupted files, then please check the ionCube Loader version from your server and make sure that you have ionCube Loader version 10.2 or newer.
- IonCube Loader 10.2 or newer is required for CPV Lab Pro 6.0.

- If the Upgrade Wizard page appears without texts and images, then please check that the following 2 PHP extensions are enabled on the server:
- mbstring
- cURL