
In this quick guide (plus video), we’ll walk you through the step-by-step installation of CPV Lab Pro, from download to launch. Whether you’re just starting with ad tracking or upgrading your setup, this tutorial makes it easy to follow along.
You’ll need an active CPV Lab subscription to get started.
Before we dive into the setup, make sure you have the following ready:
Requirements:
- Domain – a domain you will use for tracking
- Hosting (shared, VPS, or dedicated, your choice)
- Active CPV Lab subscription
- Access to file manager, or FTP Protocol tool
- Free File Extractor (like winzip or winrar)
That’s it! Once you check off the list above, you’re ready to move on to the installation steps.
| Table Of Contents: | Section: |
| Intro |  Go To Go To |
| ➀ Step 1: Download Installation Files | Go To |
| ➁ Step 2: Upload Installation Files | Go To |
| ➂ Step 3: Installation Wizard | Go To |
| ➃ Step 4: Permission Files | Go To |
| ➄ Step 5: Create Database | Go To |
| ➅ Step 6: Security Settings | Go To |
| ➆ Step 7: Login! 🙂 | Go To |
| Closing | Go To |
Step 1: Download the Installation Files
To get started, log in to your CPV Lab Pro account.
From your dashboard, click on the “CPV Lab License” section in the main menu. This will take you to your license management area.

Once you’re there, scroll down to find the Install Package. Click the download button to save the latest installation files to your computer.

Step 2: Upload Installation Files
Once you’ve downloaded the CPV Lab installation files, it’s time to upload them to your hosting account.
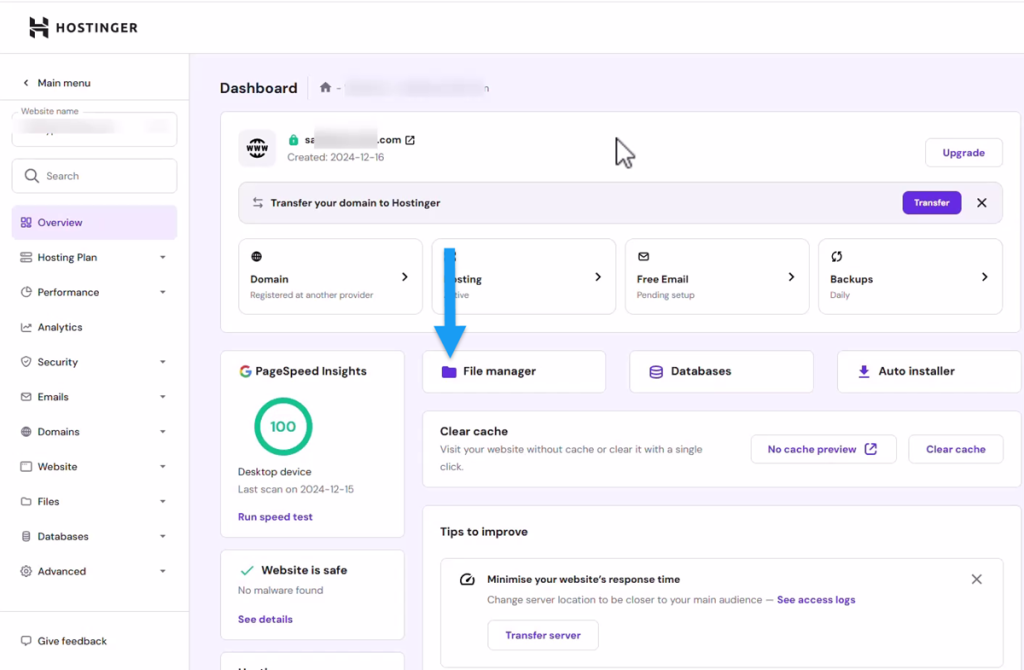
Log in to your file manager (usually found in your hosting control panel).
If you’re using an FTP tool like FileZilla, make sure to extract the files from the archive first using WinRAR or WinZip. These tools are free and easy to use.
Then, upload the files to the main root directory of our CPV Lab licensed domain. This root directory is typically named public_html or might be the folder named after your domain.
🔍Tip: Hosting your self-hosted ad tracker on a dedicated domain ensures faster load speeds and better data ownership, which is essential for serious media buyers and performance marketers.
Keep in mind if you are using a FTP protocol tool you will have to extract the installation files with a tool like winrar, or winzip which can be found easily online.

Step 3: Installation Wizard
Once the files have been uploaded, it’s time to launch the CPV Lab Pro Installation Wizard, this will walk you through the rest of the setup.
To do this, open your browser and type your domain name followed by
/install-wizard.phpExample:
yourdomain.com/install-wizard.php
From here we will be taken to the wizard page that will help assist us in completing the installation. If our hosting provider passes the requirements for the installation process we can continue with the setup by clicking the “Next” button.

Next, you’ll be asked to enter your CPV Lab Pro license email in the “License Email” field. This should be the email you used when purchasing your license.

After that, click the “Download Install Package” button directly in the wizard.
Once the package is downloaded to your computer, extract the archive and upload the contents from the V12 folder to the main/root directory of your licensed domain.

(We’re using version 12 as the example in this tutorial.)

After the files are uploaded we can go back to the wizard in your browser. Then, click the “Next” Button.

Step 4: Permission Files
Next up: let’s make sure the file permissions are set correctly so CPV Lab can run without issues.
Inside the installation wizard, you’ll see a button that says: “Check file permissions automatically”.
Click it.
From here will need to check the file permissions. You can check the file permissions automatically by clicking the “Check file permissions automatically” button.

✅ If you’re using Hostinger (like in our example), good news, the install wizard will usually set the correct file permissions automatically for you.
But don’t worry if you’re using a different provider. Most recommended hosting services (see our full list here) will also work just fine with the automatic check or with small updates
Once the check is complete and everything is green, hit “Next” to continue the setup.

Step 5: Create Database
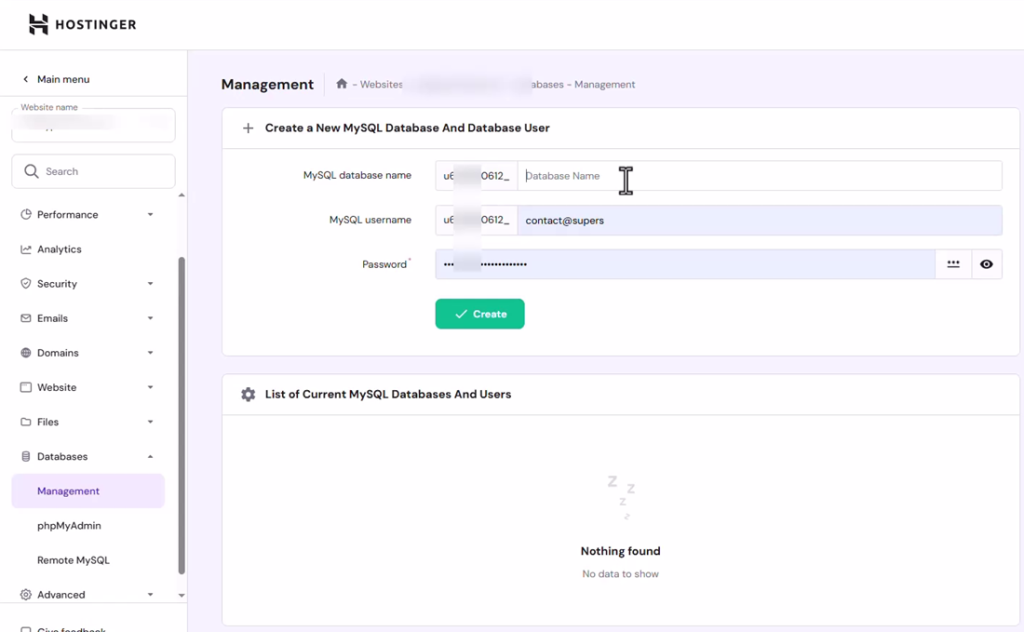
Now it’s time to give CPV Lab Pro a place to store your campaign data, let’s set up your MySQL database
If you’re using Hostinger (like in this example), here’s what to do:
- Go to the “Databases” tab
- Click on “Management”
- Now, create a new MySQL database:
- Fill in the Database Name
- Choose a Username
- Create a strong Password
- Hit “Create” and you’re done!
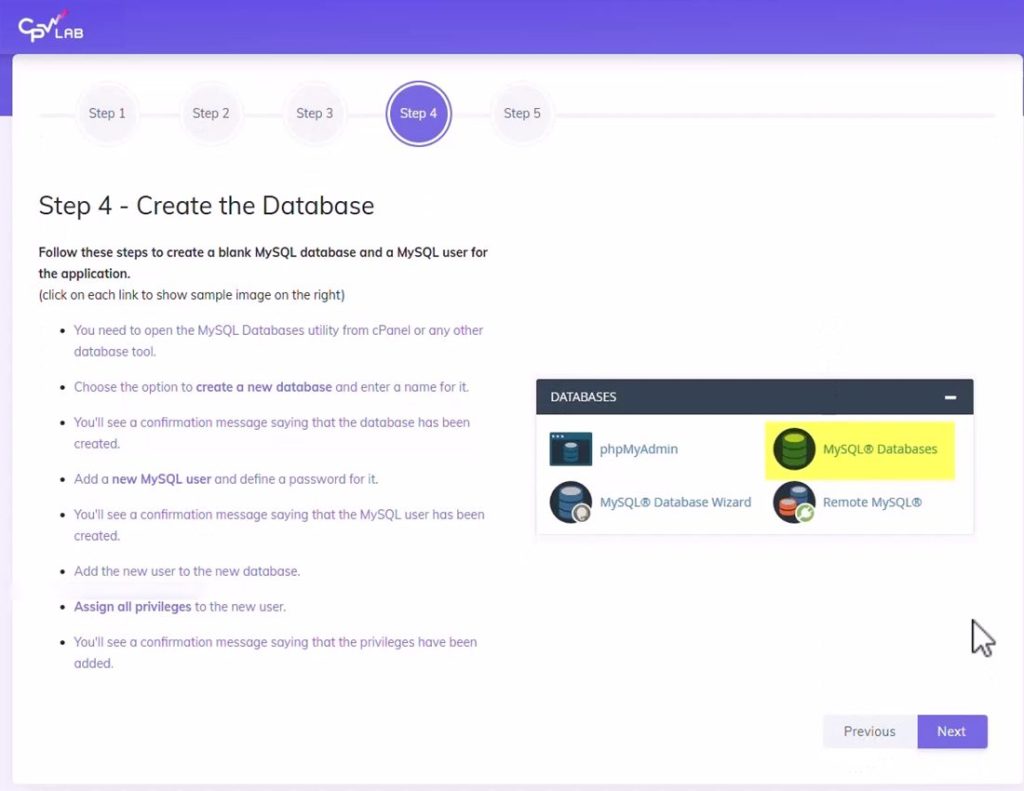
If you’re using Hostinger like I am, you can click on the “Databases” tab and click on “Management” menu item to create a new database.
💡 Using cPanel instead?
Look for “MySQL Databases” in your dashboard. The layout may look different, but the steps are nearly the same.
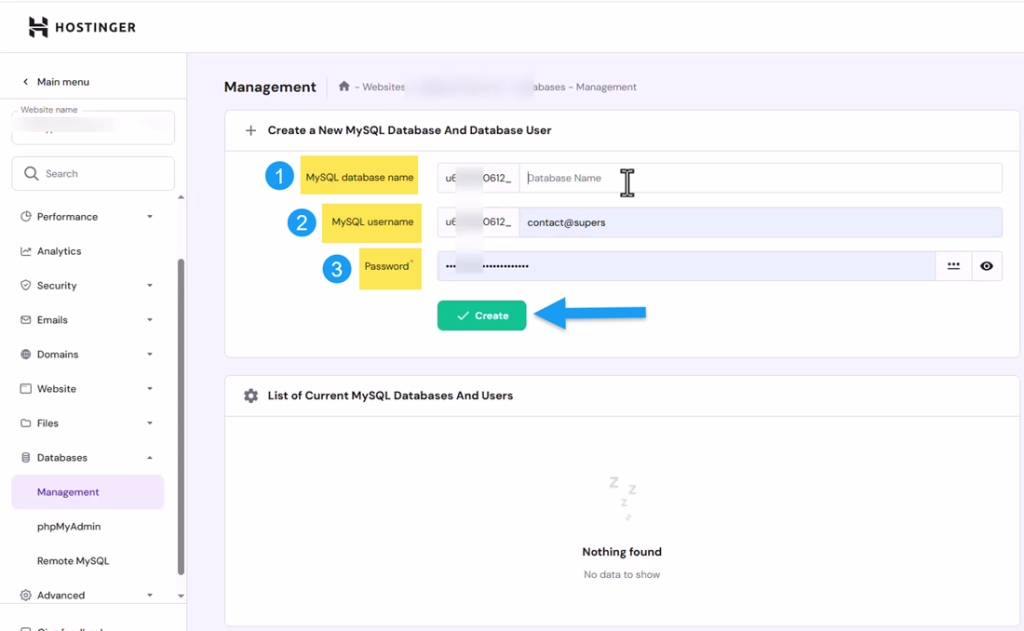
Once we’re in the area to create a new MySQL Database, we’re going a to create a database name as follows:
- “MySQL database name” field
- Add a username in the “MySQL username” field
- Add password in the “Password” field.
- Then, we can click the “Create” button.
Once your database is ready, go back to the CPV Lab install wizard and enter the info in the required fields:
- Database Name → the one you just created
- Username & Password → as set above
- License Email → your CPV Lab Pro license email
- Database Server Name → keep it set to localhost (this works for most hosting setups)

Below you can see how we’re going to need to add the Database Name into the “Database Name” field, and our CPV Lab Pro license email into the “License Email” field.

As I said, the Database user name will go into the “Database User” field, and the database’s password in the “Database Password” field.
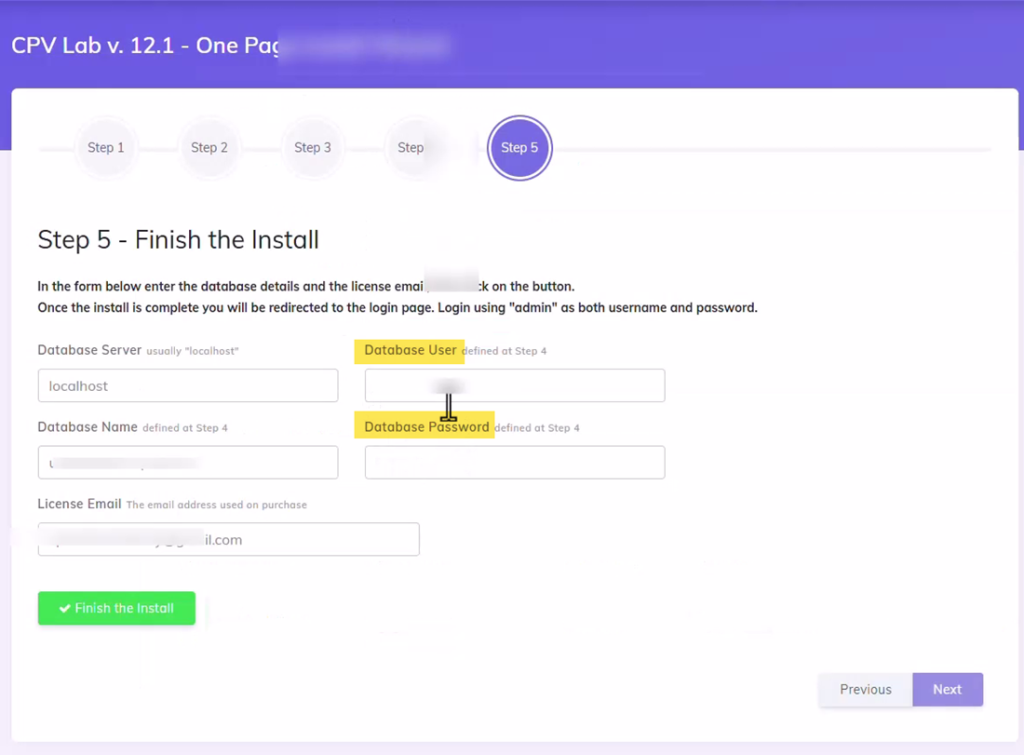
Now we can click the “Finish Install” button to finish the installation process for your self-hosted ad tracker.

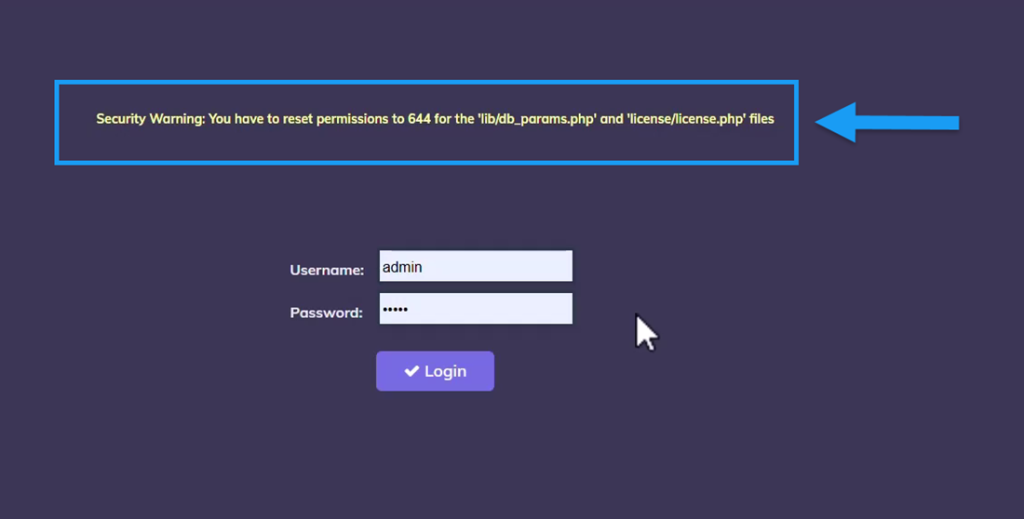
Step 6: Fix the Security Warning
Once the installation is finished, you might see a security warning the first time you visit your CPV Lab login page. Don’t worry, this is normal and easy to fix.
This step ensures your tracking setup stays safe and private by updating the file permissions on two important files.
Here’s what to do:
- Open your File Manager (or use your FTP tool).
- Go to the root directory of your domain – this is where you uploaded the tracker.
- Find and open the lib folder.
- Inside, look for a file named: db_params.php
- Right-click → choose Permissions
- Set the file permissions to 644
- Click Update/Save
- Now go back to the main root folder again.
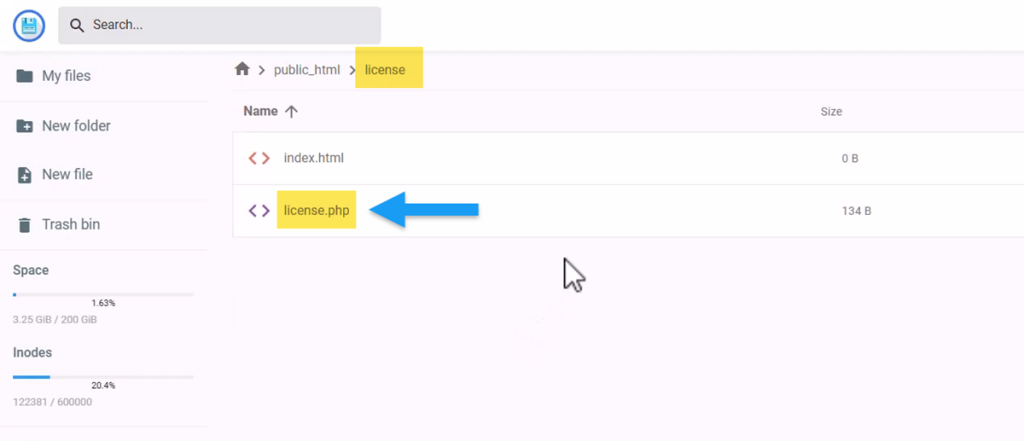
- Open the license folder.
- Find the file called: license.php
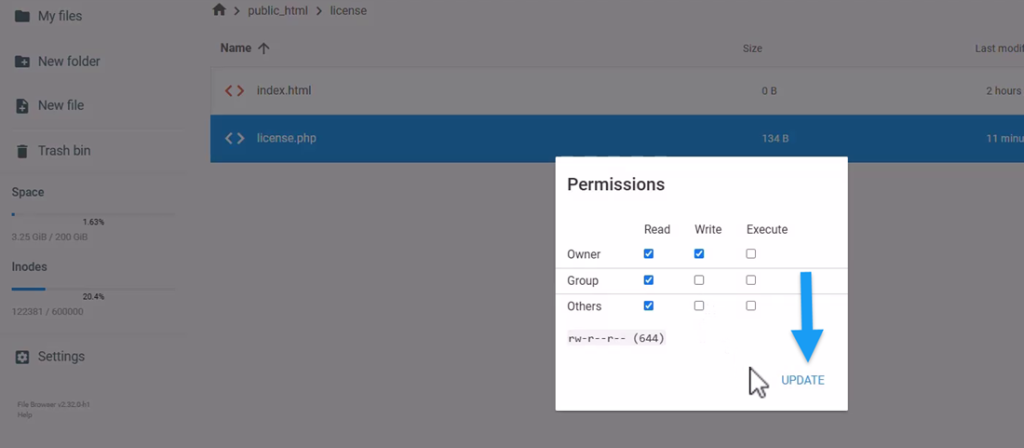
- Right-click → Permissions → set it to 644
- Save and close
The first file will be in the “lib” folder. In file manager (or your ftp protocol tool) find and enter the “lib” folder.
Note: This will be in the main/root directory of your licensed CPV Lab Pro domain.

Search for the file called “db_params.php” (which is lib/db_params.php)
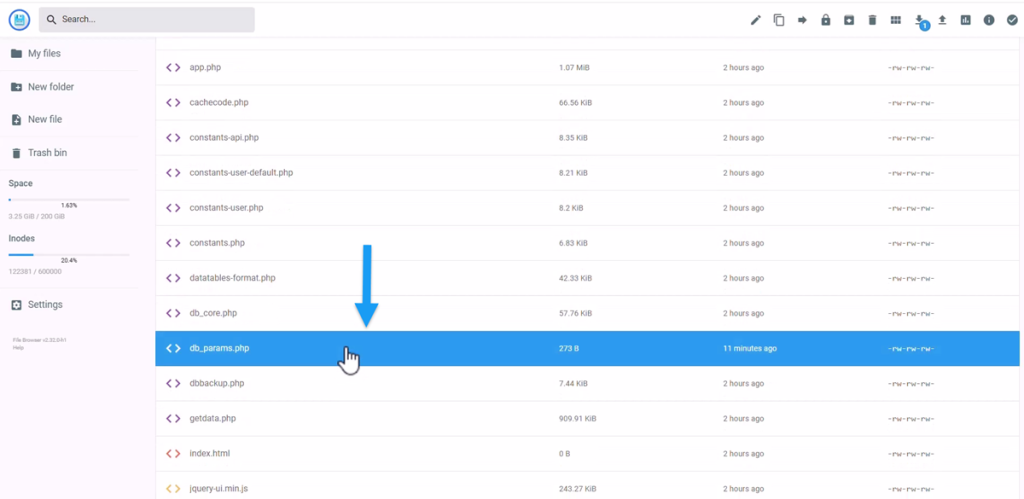
Then, we’re going to right click and select the “Permissions” menu item.
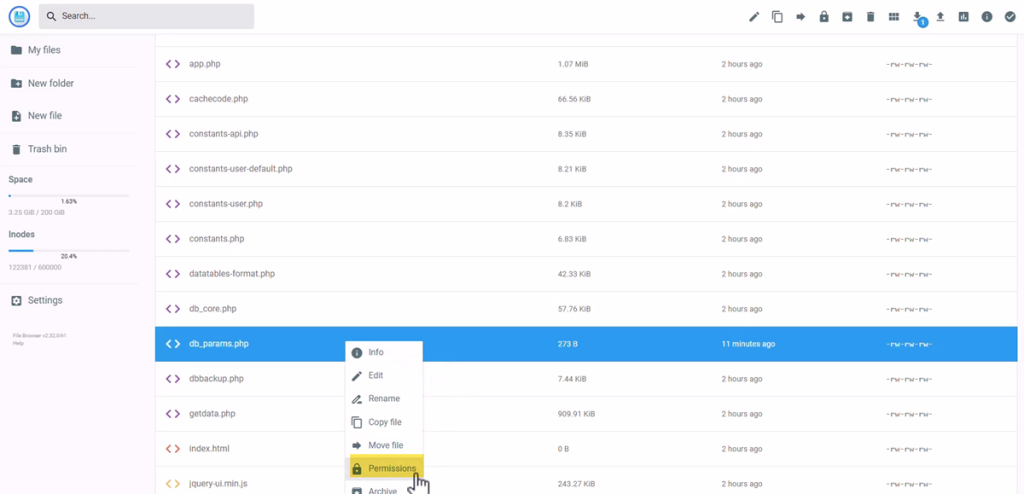
We need to update the file permissions to “644″ by selecting the appropriate boxes, and then click “Update” (this will vary from platform but should be very a similar process).

Next, we will repeat this process by going back to the main directory. Find and enter to the “license” folder, and find the “license.php” file (license/license.php)
Then, update the permissions file as we did previously to “644″ as well.
Now, we go back to the login page this security warning should be resolved.
Note: The login page will be your licensed CPV Lab Pro domain followed by “/login.php”.
Example: https://example.com/login.php
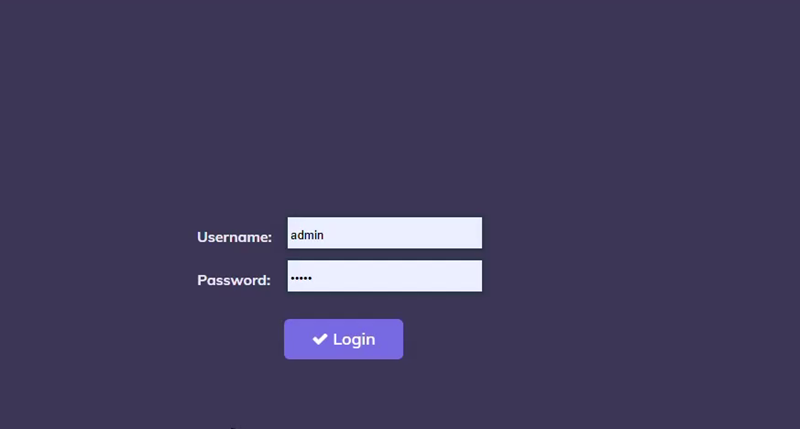
Step 7: Login! 🙂
Now it’s time to log in to your CPV Lab Pro tracker for the first time. Just head to:
https://yourdomain.com/login.php
When logging in the first time keep in mind that your users name and password are both “admin” (until you change it after the first login).
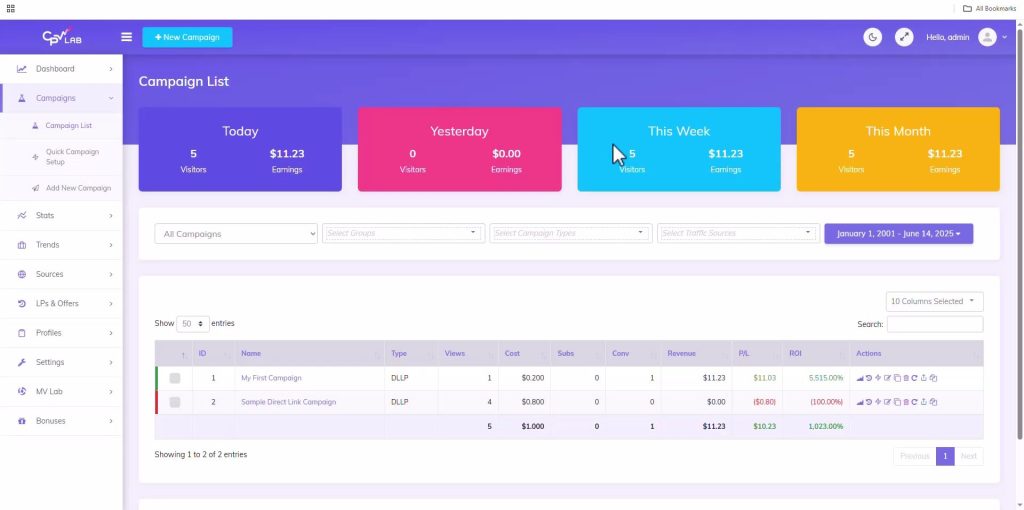
Once you’re in, you’re ready to set up your first tracking campaign and start collecting real data from your traffic.
To sum up
Hopefully this guide has helped you to install CPV Lab Pro as easy as possible.
Whether you’re running affiliate offers, lead generation, or ecom campaigns, CPV Lab Pro gives you total control with server-side (S2S) tracking and powerful optimization tools.
If anything doesn’t work as expected, the CPV Lab Support Team is always here to help.
Here is a video showing step by step how to do the installation:
CPV Lab Pro self-hosted tracker installation guide
This step-by-step guide helps you install the latest version of CPV Lab Pro, a self-hosted ad tracker used by affiliate marketers, media buyers, and performance advertisers. Whether you’re setting up for the first time or moving from another tracker, this tutorial will show you how to install CPV Lab from scratch using your domain, hosting panel, and license key. Make sure your server passes the compatibility test and follow the wizard setup for fast deployment.
2. What’s the difference between CPV Lab Pro and CPV One?
CPV Lab is the self-hosted version — you install it on your own domain and server.
CPV One is the cloud-hosted version — we handle the hosting and maintenance for you.
Both use the same tracking engine, but CPV One is more beginner-friendly and maintenance-free. Think of it as the little brother that’s ready to run without setup.
3. Can I run CPV Lab Pro on shared hosting?
Yes, as long as your hosting meets the requirements. Many users start on shared hosting providers like Hostinger or SiteGround, but for better performance we recommend VPS or dedicated hosting if you plan to scale.
Here you can find more information about the recommended hosting providers we saw working the best so far.
4. What traffic sources does CPV Lab support?
CPV Lab works with any traffic source, from mainstream to specific traffic sources or organic.
Facebook Ads, Google Ads, TikTok, Taboola, native ads, push ads, email traffic, and more. As long as you can send a click and get a conversion back, you can track it.
If you can click it, you can track it!
5. Can I track more than one offer in the same campaign?
Yes! You can rotate multiple offers or landing pages, track them all in the same campaign, and get performance breakdowns by offer, lander, GEO, device, and more.
Split testing is super easy with CPV Lab Pro.

Guest Author: Patrick Hill
Patrick is an affiliate marketer with 8+ years marketing experience. He was certified at Meclabs Research Institute in 2019 for value proposition development and a Photoshop designer. He has experience working as a technical support manager at a CPA network, and loves to make graphic design and programming easy for average people.