
Custom Tracking Domains
A custom tracking domain lets you use your own domain - or a subdomain you own - in your CPV Lab (opens new window) and CPV One (opens new window) tracking links, instead of the default tracker domain.
This guide explains what custom tracking domains are, why you need them, and how to set one up - using either direct DNS configuration or Cloudflare.
Why Use a Custom Tracking Domain?
By default, every campaign URL and tracking link uses the base domain of your tracker:
- CPV Lab: the domain where you installed CPV Lab (e.g.
tracker.yourdomain.com) - CPV One: the standard CPV One cloud domain (which is shared with multiple users)
Using a custom tracking domain gives you several advantages:
1. Cleaner, more trustworthy campaign URLs
A tracking link from go.yourbrand.com looks more professional than one from a generic tracker domain. Some ad platforms are less likely to flag it.
2. Required by some traffic sources Google Ads requires the campaign URL domain to match the display URL and landing page domain. A custom tracking domain that is a subdomain of your landing page satisfies this requirement.
Example:
- Landing page:
https://lose-weight-today.com/top-methods.html - Without custom domain:
https://tracker.cpvlab.com/base.php?c=1&key=xxxxx - With custom domain:
https://go.lose-weight-today.com/base.php?c=1&key=xxxxx
3. First-party tracking Using a subdomain of your landing page domain means tracking cookies and data are treated as first-party. This improves tracking accuracy and is less likely to be blocked by browsers.
4. Ad blocker protection Known tracker domains are often blocked by ad blockers. A custom domain on your own brand is much less likely to be targeted.
5. Keeps your main tracker domain private Your visitors and competitors see only your branded domain - not the underlying tracker.
Before You Start
For CPV One users:
- You need a domain or subdomain you own
- Access to your domain's DNS settings (at your domain registrar or Cloudflare)
For CPV Lab users:
- Same as above, plus:
- Your CPV Lab server IP address (or the main CPV Lab domain name)
- Access to your hosting control panel if you are on a shared IP address
Quick Summary
- Option A - Set Up with Direct DNS
- Option B - Set Up with Cloudflare (Recommended)
- Add the Domain to CPV Lab or CPV One
- Extra Step for Shared IP Addresses (CPV Lab)
- Add SSL to Your Custom Tracking Domain
- Use Your Custom Domain in a Campaign
- Test Your Custom Domain
Step 1 - Get a Domain
If you do not already own the domain you want to use as a custom tracking domain, purchase one first.
Recommended domain registrars:
💡 Using a subdomain? You do not need to buy a new domain - just create a subdomain on a domain you already own. For example:
go.yourdomain.comortrack.yourdomain.com.
💡 Buying a dedicated tracking domain? Use a neutral domain name that does not obviously identify it as a tracker. Avoid words like "track", "click", "redirect" in the domain name if possible.
Option A - Set Up with Direct DNS
Use this method if you manage your DNS directly at your domain registrar (Namecheap, GoDaddy, Namesilo, etc.) and are not using Cloudflare.
Find Your CPV Lab IP Address or Domain
You will need either the IP address or the domain name of your CPV Lab server to create the DNS record.
- IP address: Go to ip-lookup.net (opens new window) and look up your CPV Lab domain to find its IP address.
- Domain name: This is the main domain where CPV Lab is installed (e.g.
cpvlab.yourdomain.com).
☁️ CPV One users: You do not need an IP address. Use the CPV One domain provided to you as the CNAME target below. See the instructions for CPV One in each step below.
Create a DNS Record
Log in to your domain registrar and go to the DNS settings for your custom tracking domain. Create either an A Record or a CNAME Record - you only need one.
Option 1 - A Record (use when you have the IP address):
| Field | Value |
|---|---|
| Type | A Record |
| Host | @ (for root domain) or the subdomain name (e.g. go for go.yourdomain.com) |
| Value | The IP address of your CPV Lab server |
| TTL | Auto or 3600 |

Option 2 - CNAME Record (use when you have the domain name):
| Field | Value |
|---|---|
| Type | CNAME Record |
| Host | @ (for root domain) or the subdomain name (e.g. go) |
| Value | Your main CPV Lab domain (e.g. cpvlab.yourdomain.com) |
| TTL | Auto or 3600 |

💡 DNS changes can take anywhere from a few minutes to 24 hours to propagate. You can check the status at whatsmydns.net (opens new window).
Option B - Set Up with Cloudflare (Recommended)
Cloudflare is free and gives you two benefits over direct DNS:
- faster propagation
- automatic SSL for your custom tracking domain - no separate SSL certificate needed.
💡 If your custom domain already hosts a website (like a WordPress site), adding it to Cloudflare will require changing your nameservers. This may affect your existing site. In this case, we recommend purchasing a separate domain to use as your tracking domain.
Steps
- Log in to Cloudflare (opens new window) or create a free account.
- Click Add a Site and enter your custom tracking domain.
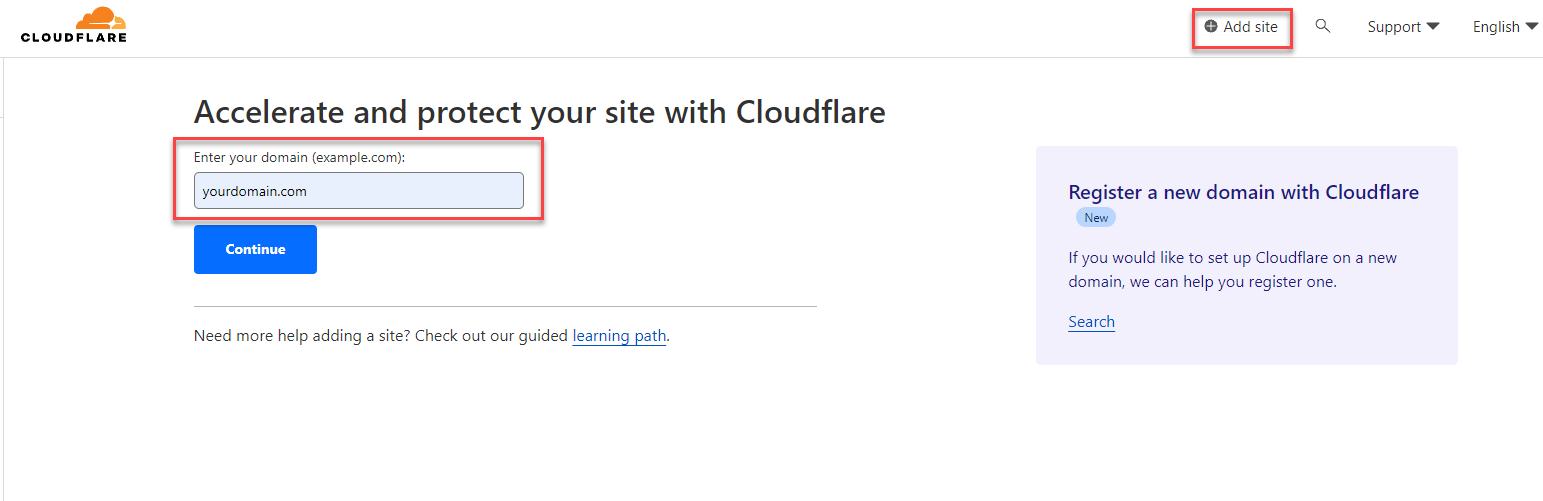
- Follow Cloudflare's steps to import your existing DNS records.
- Go to DNS ➡️ Records.
- Create a CNAME Record:
| Field | Value |
|---|---|
| Type | CNAME |
| Name | @ (for root domain) or subdomain name (e.g. go) |
| Target | Your CPV Lab domain - or your CPV One domain |
| Proxy status | DNS Only (grey cloud - OFF) |
| TTL | 1 minute (as low as possible) |
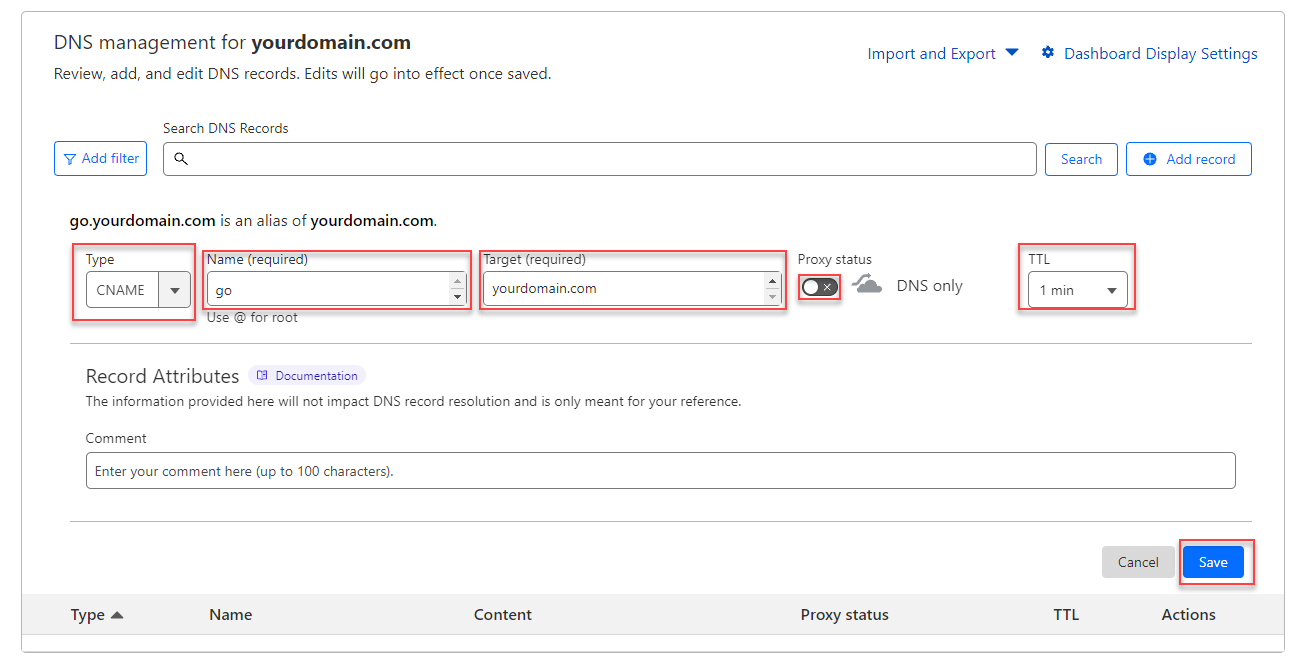
⚠️ Set Proxy status to DNS Only (grey cloud). Do NOT enable the orange Cloudflare proxy for your tracking domain CNAME. The orange proxy routes traffic through Cloudflare's CDN which can interfere with CPV Lab tracking. Keep it grey (DNS only).
- Click Save.
- Cloudflare will give you two nameservers. Update your domain's nameservers at your registrar to point to Cloudflare.
- Wait for DNS propagation - usually 1 to 24 hours.
💡 SSL with Cloudflare: Cloudflare provides automatic SSL (HTTPS) for your custom tracking domain at no cost. Once your domain is active on Cloudflare, HTTPS is enabled automatically. No separate SSL certificate needed.
Add the Domain to CPV Lab or CPV One
Once the DNS record is created, register the custom domain inside your tracker.
- Log in to your CPV Lab or CPV One dashboard.
- Go to Settings ➡️ Custom Domains.
- Enter your custom tracking domain starting with
https://:https://go.yourdomain.com - Click Test Domain to verify that the DNS is resolving correctly and SSL is active.
- Click Save.

✅ The domain is now registered and available to use in your campaigns.
Extra Step for Shared IP Addresses (CPV Lab Only)
☁️ CPV One users: Skip this section - it does not apply to you.
If your CPV Lab server does not have a dedicated IP address (common on shared hosting), you need to tell the server to also accept traffic for the custom tracking domain.
Otherwise the server will not know what to do with requests arriving at the custom domain.
Choose the method that matches your server setup:
cPanel Hosting
For a root domain as custom tracking domain:
- Log in to cPanel
- Go to Domains ➡️ Addon Domains
- Add the custom tracking domain and set its Document Root to the same folder as your main CPV Lab installation

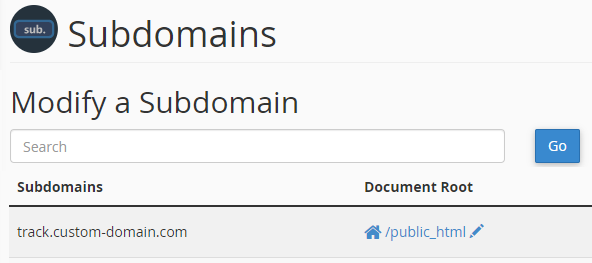
For a subdomain as custom tracking domain:
- Log in to cPanel
- Go to Domains ➡️ Subdomains
- Create the subdomain and set its Document Root to the same folder as your main CPV Lab installation
Cloudways
- Log in to Cloudways and open your CPV Lab application.
- Go to Domain Management.
- Click ADD DOMAIN and add your custom tracking domain as an Alias domain.

Other Servers (Apache)
Add a virtual host (vhost) in your Apache configuration for the custom tracking domain, pointing its document root to the same path as your main CPV Lab installation.
Add SSL to Your Custom Tracking Domain
Your custom tracking domain needs SSL (HTTPS) to work correctly with modern affiliate networks and ad platforms.
If you set up with Cloudflare: SSL is already active. No action needed.
If you set up with direct DNS: Install an SSL certificate for the custom domain on your server. The easiest option is a free Let's Encrypt certificate via cPanel.
→ See the full guide: Add SSL Certificate
Use Your Custom Domain in a Campaign
Once the custom domain is saved in CPV Lab or CPV One, you can select it in any campaign setup.
- Go to Campaigns and open a campaign (or create a new one).
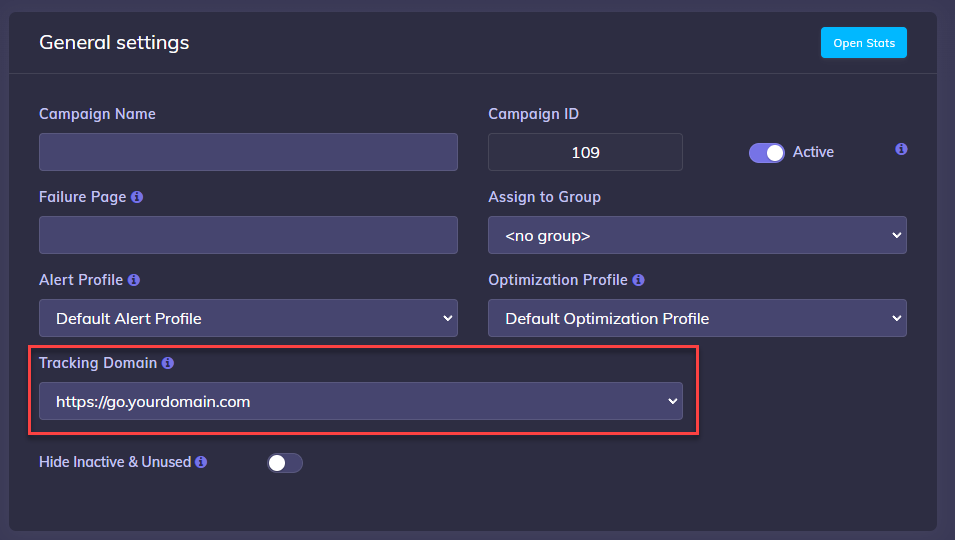
- In the campaign setup, find the Tracking Domain dropdown.
- Select your custom tracking domain from the list.
- All tracking links shown in the campaign setup will now use your custom domain.
Test Your Custom Domain
Before using it in live campaigns, verify the domain is working correctly.
- After DNS propagation (wait up to 24 hours), open this URL in your browser:
https://your-custom-domain.com/custom-domain-check.php - If the page loads without errors - the domain is set up correctly.
- You will not be able to log in at this URL - that is expected. You just need to confirm the page loads.
❌ Page not loading? DNS may still be propagating. Wait a few more hours and try again. Check propagation status at whatsmydns.net (opens new window). If it still does not work after 24 hours, double-check your DNS record and the domain entry in CPV Lab settings.
DNS Configuration Examples
Here are four common setup scenarios with the correct DNS records for each.
Example 1 - CPV Lab on root domain, custom domain is a root domain
- CPV Lab is at:
cpvlab.yourdomain.com(IP:11.22.33.44) - Custom tracking domain:
custom-tracking.com - DNS record: A Record - Host:
@- Value:11.22.33.44
Example 2 - CPV Lab on root domain, custom domain is a subdomain
- CPV Lab is at:
cpvlab.yourdomain.com(IP:11.22.33.44) - Custom tracking domain:
go.custom-tracking.com - DNS record: A Record - Host:
go- Value:11.22.33.44 - Or CNAME: Host:
go- Value:cpvlab.yourdomain.com
Example 3 - CPV Lab on a subdomain, custom domain is a root domain
- CPV Lab is at:
tracker.cpvlab.com(IP:11.22.33.44) - Custom tracking domain:
custom-tracking.com - DNS record: A Record - Host:
@- Value:11.22.33.44 - Or CNAME: Host:
@- Value:tracker.cpvlab.com
Example 4 - CPV Lab on a subdomain, custom domain is also a subdomain
- CPV Lab is at:
tracker.cpvlab.com(IP:11.22.33.44) - Custom tracking domain:
go.custom-tracking.com - DNS record: A Record - Host:
go- Value:11.22.33.44 - Or CNAME: Host:
go- Value:tracker.cpvlab.com
You may also find useful: