How to Build a Landing Page with Lovable and Track It with CPV Lab
What you need: A CPV Lab | CPV One (opens new window) account, a Lovable.dev account, a GitHub account (for Method 2)
What This Guide Covers
Lovable.dev (opens new window) is an AI-powered website builder. You describe what you want in plain text, and it builds the page for you. No coding required.
For media buyers and affiliate marketers, this is a game changer. You can spin up a clean, fast affiliate landing page in minutes - then connect it to CPV Lab to track every click and conversion.
This guide shows you two ways to add CPV Lab tracking to your Lovable page:
- Method 1 - Lovable Chat Interface (easier, no GitHub needed)
- Method 2 - GitHub + VS Code (more control, better for users with tech knowledge)
You only need to follow one method. If you are not a developer, start with Method 1.
Before you start either method, you need your CPV Lab (opens new window) tracking code and tracking links ready. This means you need to create a campaign in CPV Lab | CPV One and your tracking code and tracking links will show in the Links &Pixels section.
You can find both here:
CPV Lab Tracking Code and Tracking Links Documentation (opens new window)
What You Need from CPV Lab First
Before you touch Lovable, grab these things from your CPV Lab campaign:
Create a campaign with a lovable landing page
- Setup a normal campaign in CPV Lab | CPV One and add a new landing page with a test URL (you will replace it with the actual URL or your Lovable new page)
Step 1 link - This is your campaign tracking link. It goes on your CTA button (or any link that sends the user to the offer).
Step 2 code - This is your tracking pixel/JavaScript code. It goes just above the closing </body> tag on your landing page.
Keep both of these open in a tab. You will need them in both methods below.
Not sure where to find these? Check the full setup guide here: CPV Lab Tracking Code and Tracking Links (opens new window)
Method 1 - Add CPV Lab Tracking via the Lovable Chat Interface
This is the easiest method. You do everything inside Lovable - no GitHub, no VS Code, no external tools.
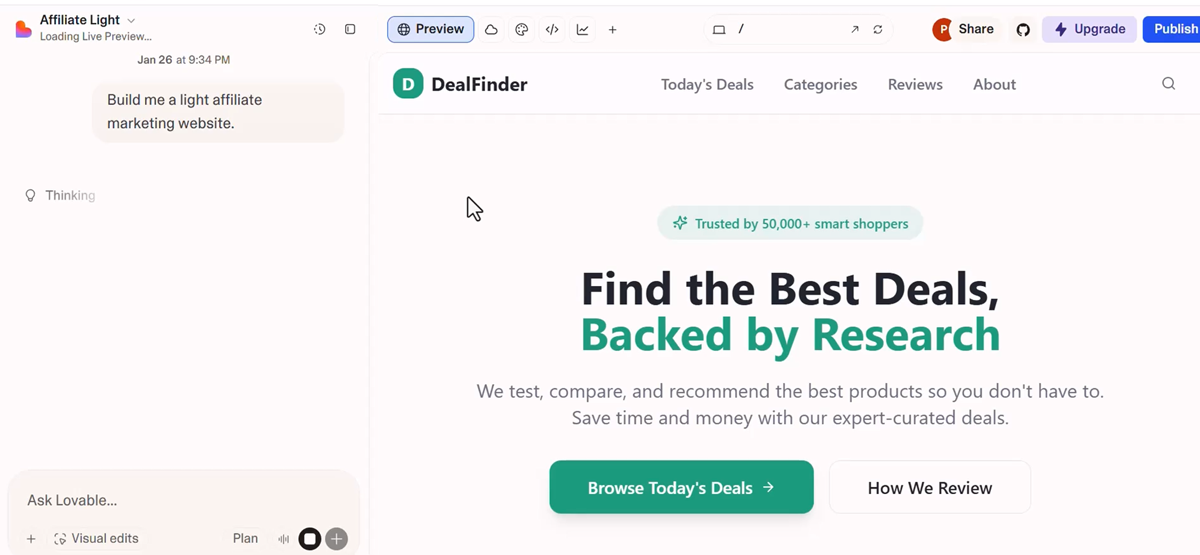
Step 1 - Build Your Landing Page in Lovable
Go to lovable.dev (opens new window) and log in to your account.
In the prompt box, describe the landing page you want to build. Be specific - the more detail you give, the better the result.
Example prompt:
"Build me a clean affiliate marketing landing page for a nutra product (weight loss supplement). It should have a hero section with a headline, a short benefits list, a CTA button that says 'Claim Your Offer', and a footer."
Hit enter and wait for Lovable to generate your page. This usually takes 1-2 minutes.
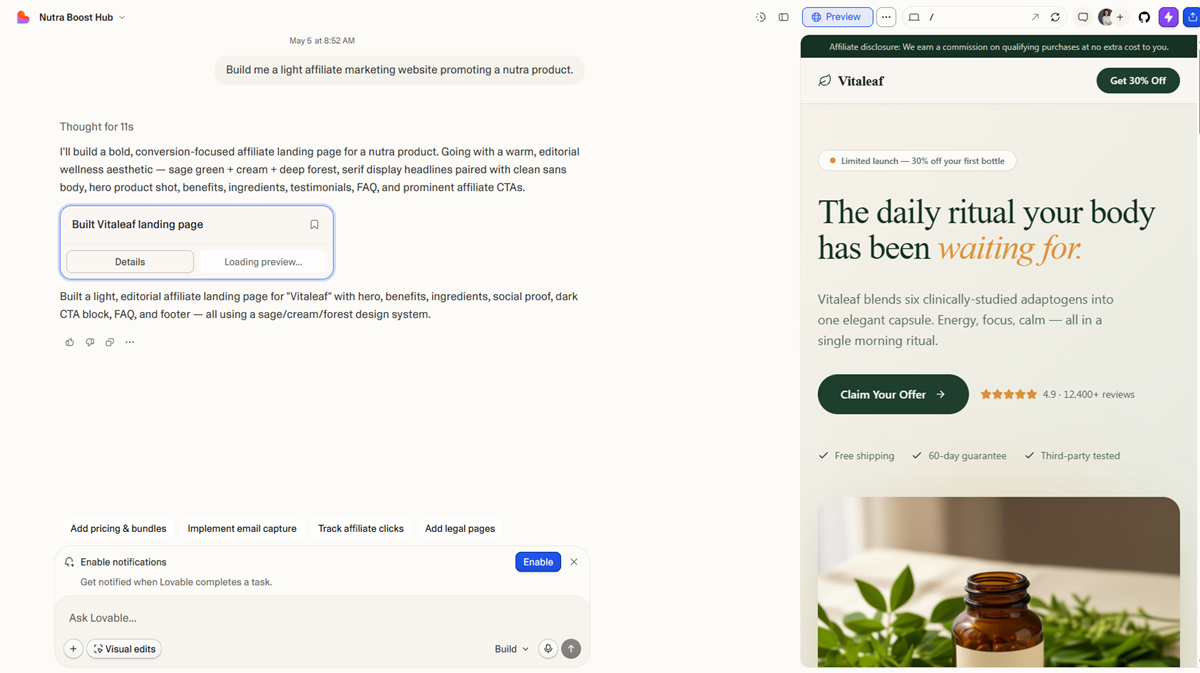
Step 2 - Preview Your Page
Once Lovable finishes building, you will see a live preview on the right side of the screen.
Check that the page looks the way you want it. Pay attention to:
- Where your main CTA button is
- The overall layout and sections
- Any text you want to change
You do not need to finalize the design yet. You just need to know where the CTA button is for the next step.
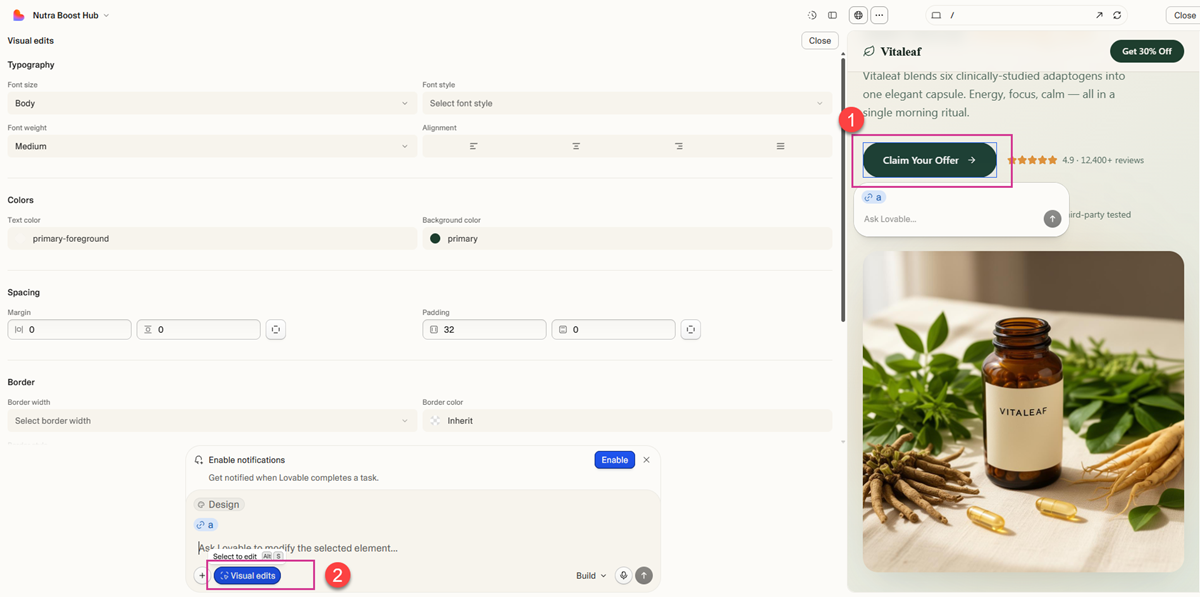
Step 3 - Add Your CPV Lab Tracking Link to the CTA Button
Now you are going to tell Lovable to replace the CTA button link with your CPV Lab Step 1 tracking link.
First you need to copy the Step1 Tracking Link from your CPV Lab campaign.
This can be found on the Links & Pixels section inside campaign setup page.
![]()
In the Lovable chat box on the left, type a message like this:
"Replace the [Aaffiliate_URL] link on all the CTA buttons with this URL: [paste your CPV Lab Step 1 link here]"
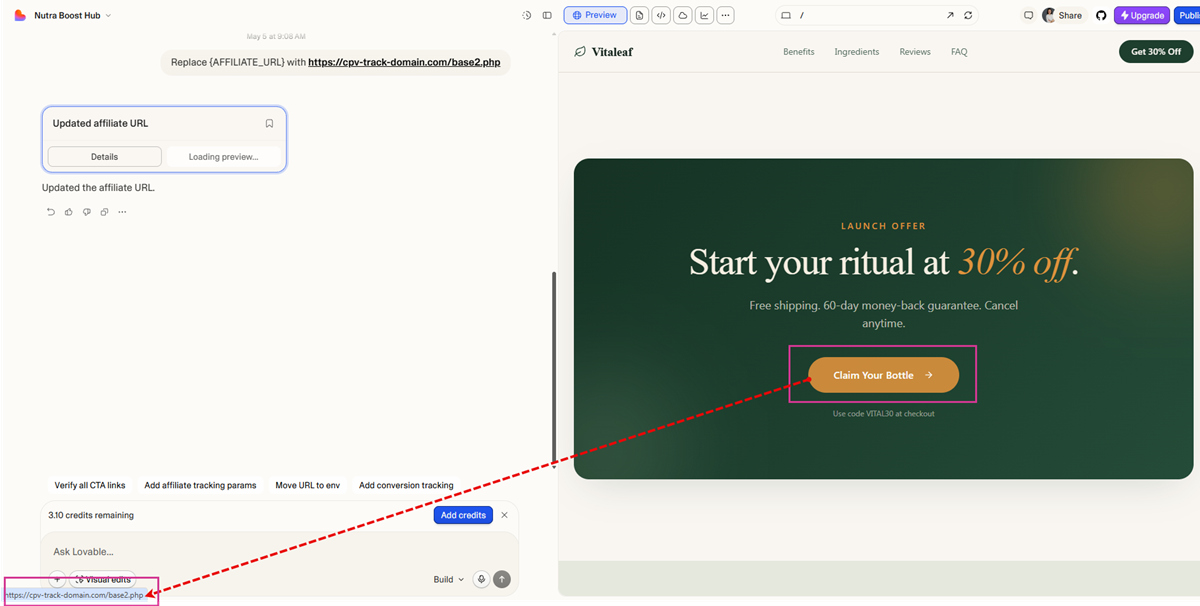
Lovable will update the code automatically and show you the result in the preview.
Check the result: Click the CTA button in the preview. It should now go to your offer URL (via your CPV Lab tracking link).
Tip: If you have more than one CTA button on your page, tell Lovable which one to update, or ask it to update all of them at once, as in the prompt above.
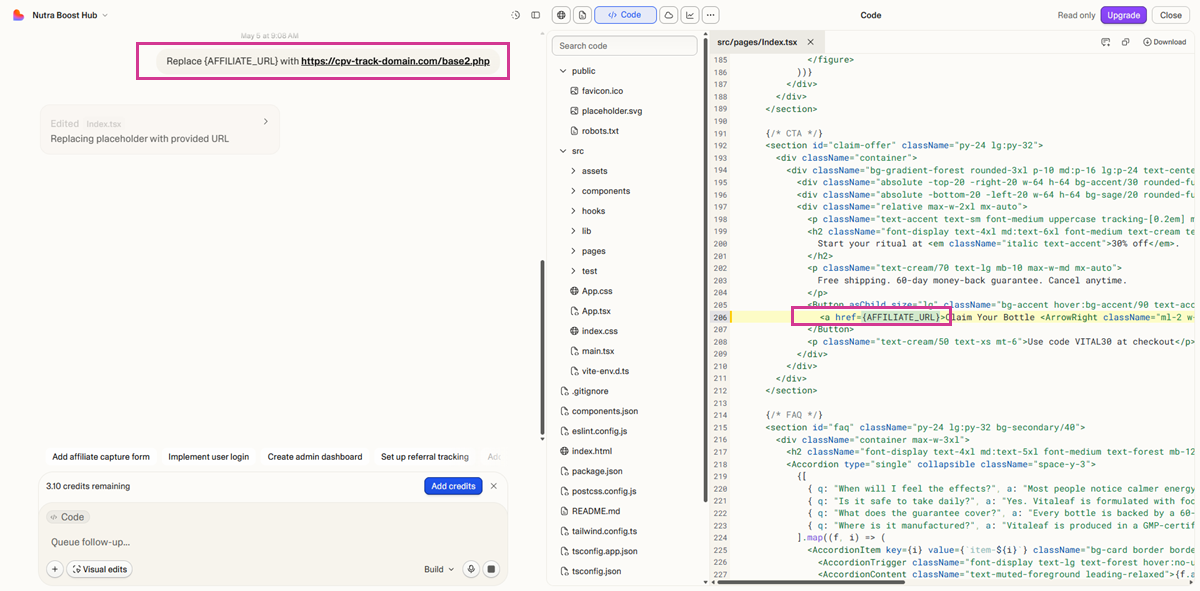
Step 4 - Add Your CPV Lab Tracking Pixel (Step 2 Code)
Now you need to add the CPV Lab | CPV One JavaScript tracking code to your page. This code needs to go just above the closing </body> tag in your HTML.
In the Lovable chat box, type:
"Add the following code before the
</bod>tag in the index page: [paste your CPV Lab Step 2 code here]"
Lovable will add the code to the correct place automatically.
First, get the code from your CPV Lab | CPV One campaign:
![]()
Prompt Lovable to add the tracking code:
![]()
Step 5 - Verify the Code Was Added Correctly
Before you publish, double check that the tracking code was added in the right place.
In Lovable, click on the code view or open the file explorer on the left side. Navigate to your index.html file.
Scroll to the bottom of the file. You should see your CPV Lab Step 2 code sitting just above the </body> tag.
If the code is there, you are good to go.
Step 6 - Publish Your Page
Click the Publish button in Lovable (top right of the editor).
Lovable will give you a live URL for your page. This is the URL you will use as your landing page in your CPV Lab campaign.
Tip: You should use a custom domain for your landing page, as the custom domain used for tracking. In this way you will avoid losing data as you will be using first party data.
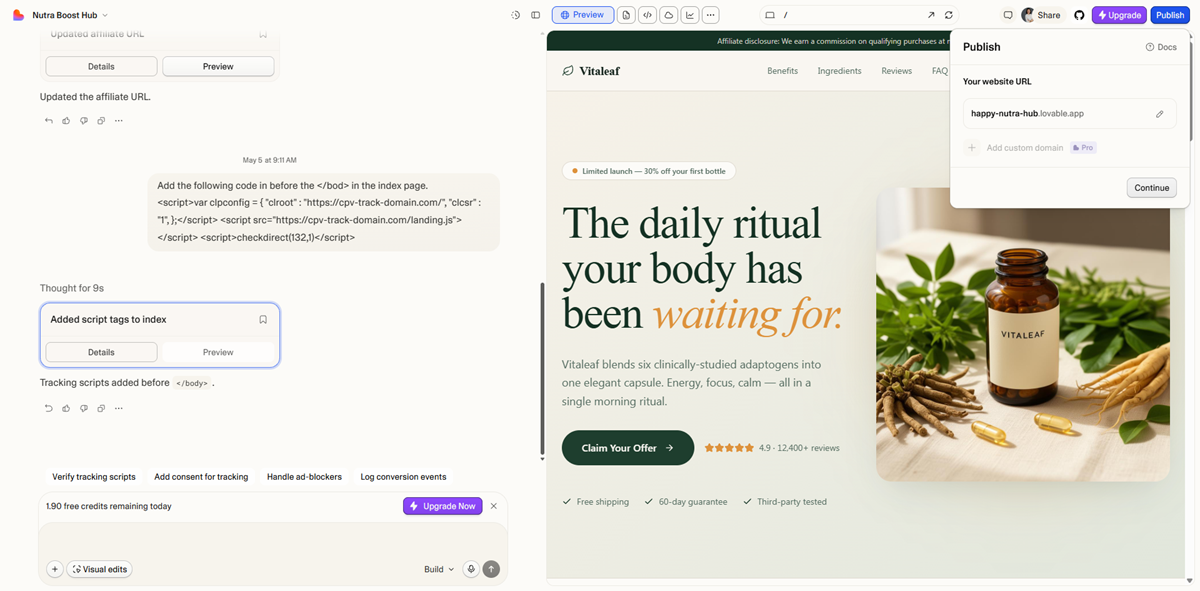
Important: Copy this URL. You will need it when setting up your campaign landing page URL inside CPV Lab.
TIP
You can check that the code is placed correctly by checking the "page source" of your landing page and looking for the Step 2 code.
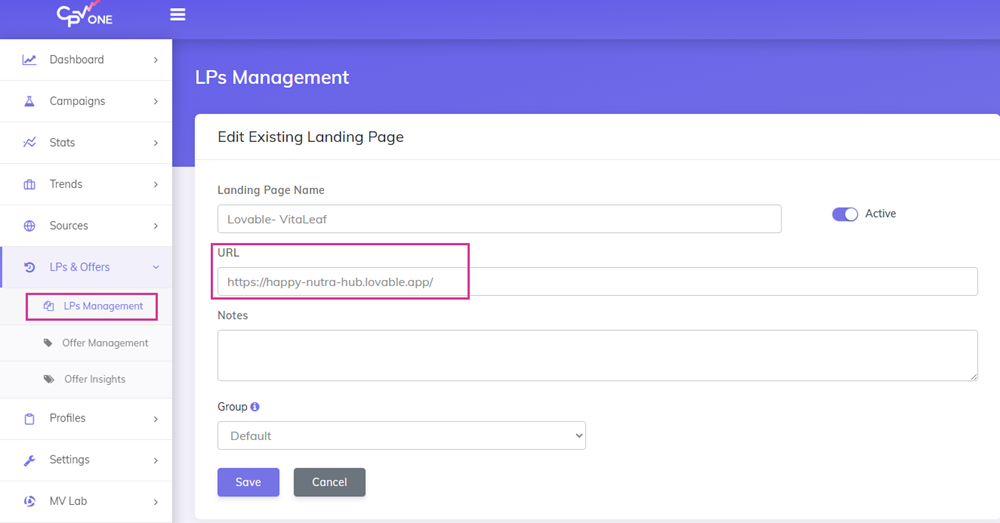
Step 7 - Update landing page link in CPV Lab | CPV One
Go to LPs&Offers ➡️ LPs Management in your CPV Lab | CPV One dashboard.
Search for the landing page used in your campaign and edit it.
Change the URL to be the one from Lovable.
Method 1 - Done
Your landing page is live and tracking is active. Every click on your CTA button will be tracked through CPV Lab via the Step 1 link, and every page visit will fire the Step 2 pixel.
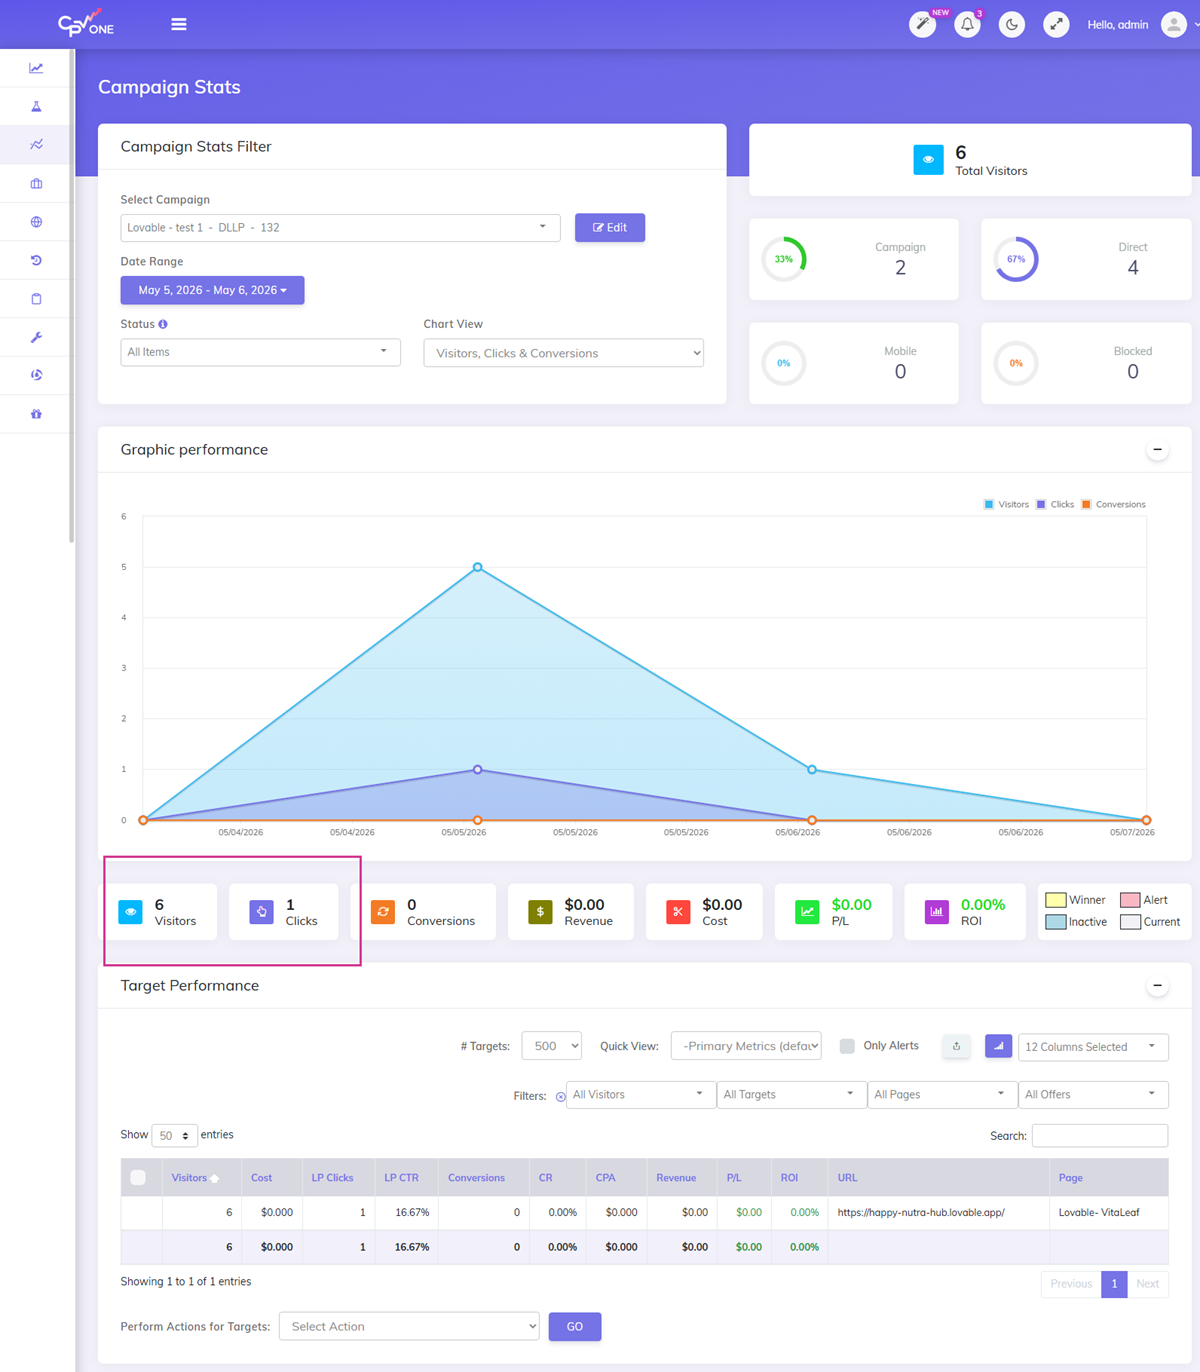
To do a test:
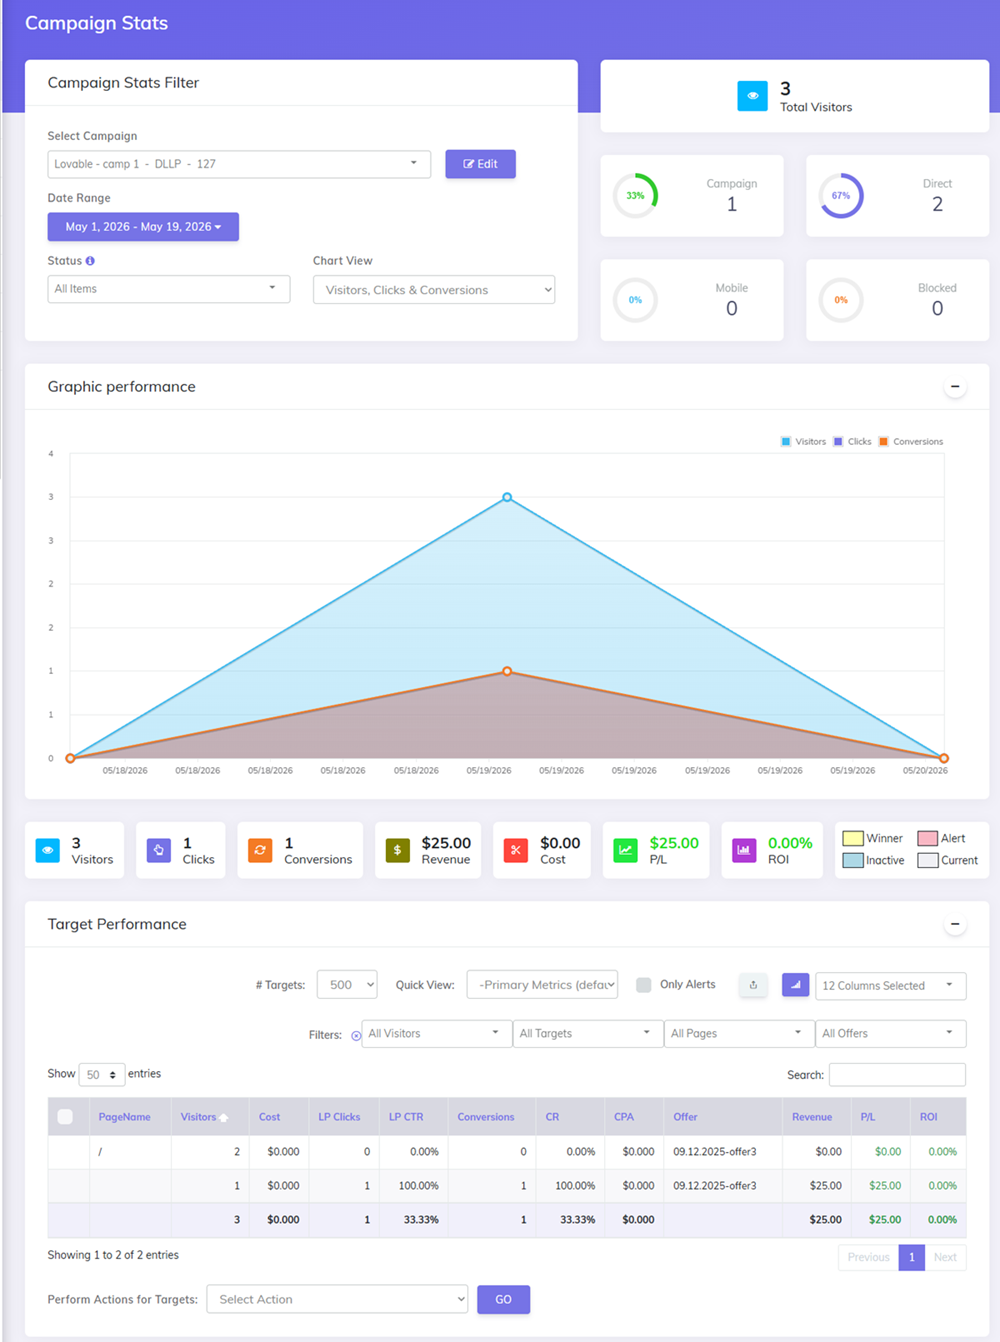
- Copy the Campaign URL from your CPV Lab | CPV One campaign setup page.
- Load it in browser.
- Check the stats - in the campaign stats you will see the visitor and the click to the offer.
Method 2 - Add CPV Lab Tracking via GitHub and VS Code
This method gives you more control over the code. It is better if you are comfortable with GitHub or want to manage your landing page files directly.
Step 1 - Build Your Landing Page in Lovable
Same as Method 1 - go to lovable.dev (opens new window), log in, and generate your landing page using a prompt.
Wait for Lovable to finish building your page.
Step 2 - Connect Your Lovable Project to GitHub
Once your page is generated, you need to push it to GitHub so you can edit the code in VS Code.
In Lovable, click the GitHub icon in the top right area of the editor.
Screenshot: Show the Lovable editor with the GitHub icon highlighted in the top right.
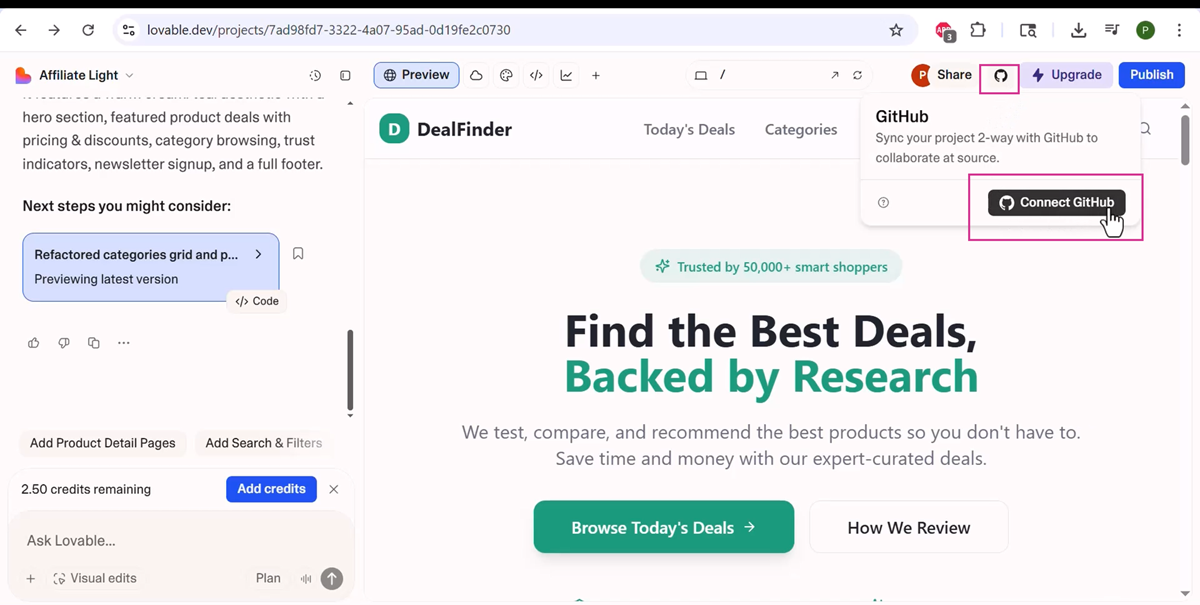
Click Connect to GitHub.
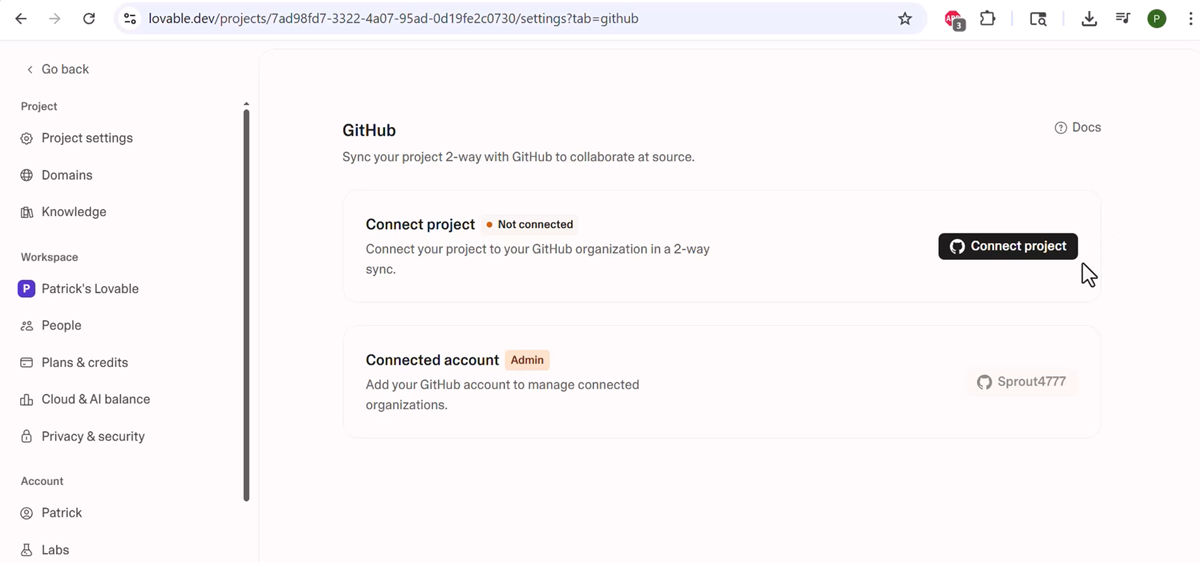
Click Connect Project. You will be asked to authorize Lovable to access your GitHub account. Follow the prompts and click Transfer Anyway to confirm.
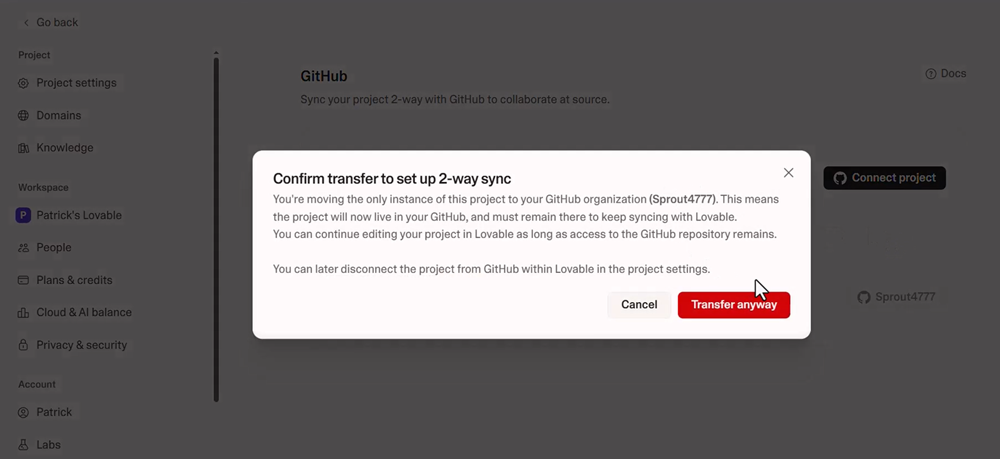
Once connected, your Lovable project will appear as a repository in your GitHub account.
Step 3 - Open the Project in VS Code
Back in Lovable, click the GitHub icon again.
This time, click Edit in VS Code.

VS Code will open with your project files loaded. Give it a few seconds to fully load.
Step 4 - Add Your CPV Lab Tracking Link to the CTA Button
In VS Code, look at the file structure on the left. Your CTA button is most likely inside the components folder, in a file called something like HeroSection or similar.
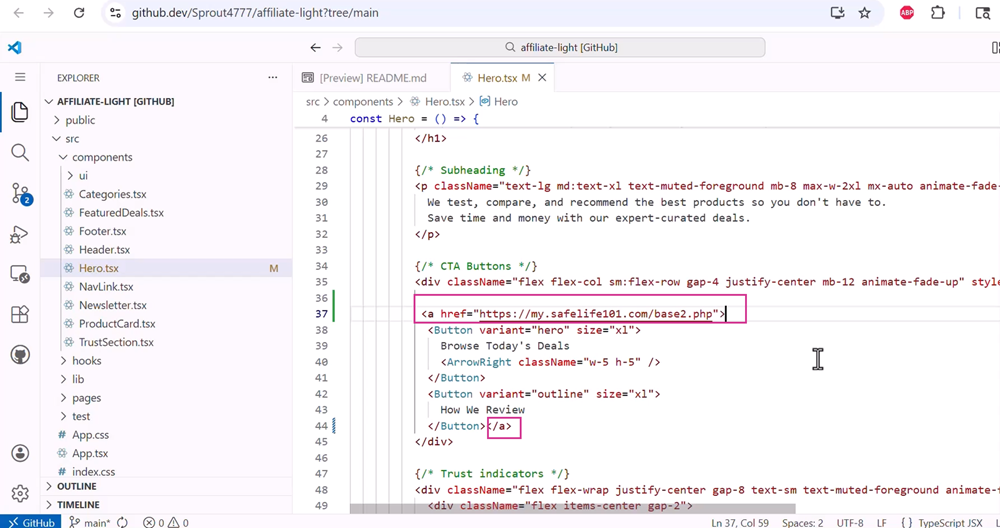
Open the file that contains your CTA button. Find the button element in the code.
You need to wrap the button with an anchor tag (<a>) that uses your CPV Lab Step 1 link as the href.
Example - before:
<button class="cta-button">Get Your Free Trial</button>
Example - after:
<a href="YOUR_CPVLAB_STEP1_LINK_HERE">
  <button class="cta-button">Get Your Free Trial</button>
</a>
Replace YOUR_CPVLAB_STEP1_LINK_HERE with your actual CPV Lab Step 1 tracking link.
Save the file (Ctrl+S on Windows, Cmd+S on Mac).
Step 5 - Add Your CPV Lab Tracking Code (Step 2 Code)
In VS Code, open your index.html file. You can find it in the root of your project (not inside any folder).
![]()
Scroll to the very bottom of the file. Find the closing </body> tag.
Paste your CPV Lab Step 2 tracking code just above the </body> tag.
Example:
    <!-- CPV Lab Tracking Code -->
    [YOUR STEP 2 CODE HERE]

</body>
</html>
Save the file.
Step 6 - Push Your Changes to GitHub
Once you have saved both files, you need to push the changes back to GitHub so Lovable picks them up.
In VS Code, open the Source Control panel (the branch icon on the left sidebar, or press Ctrl+Shift+G).
Type a commit message (for example: "Add CPV Lab tracking") and click Commit, then Push.
Go back to Lovable. Your changes will sync automatically from GitHub. You should see the updated version of your page in the preview.
Step 7 - Publish Your Page
Click the Publish button in Lovable (top right).
Copy the live URL that Lovable gives you.
This is your landing page URL for your CPV Lab campaign.
Step 8 - Update landing page link in CPV Lab | CPV One
Go to LPs&Offers ➡️ LPs Management in your CPV Lab | CPV One dashboard. Search for the landing page used in your campaign and edit it. Change the URL to be the one from Lovable.
Method 2 - Done
Your landing page is live with full CPV Lab tracking connected via GitHub.
What Happens Next - Inside CPV Lab
Once your landing page is published, go back to CPV Lab and make sure your campaign is set up correctly:
- Your landing page URL is the Lovable published URL
- Your offer URL is setup correctly ( the Step 1 tracking link on your CTA button will redirect to the offer URL from CPV Lab | CPV One)
- Your Step 2 pixel is firing on the landing page - means the visitor is tracked
Run a test click through your campaign URL to make sure everything is tracking correctly before you send live traffic.
Tip: Use CPV Lab's campaign URL to test and verify clicks and conversions are recording as expected.
Frequently Asked Questions
Can I use CPV One instead of CPV Lab with this setup?
Yes. The tracking code and tracking links work the same way in CPV One. The steps in this guide apply to both products.
Do I need to republish my Lovable page every time I change the tracking code?
Yes. Any time you edit the code (via chat or GitHub), click Publish / Update again to push the changes live.
What if Lovable puts the tracking code in the wrong place?
Use the code view in Lovable or VS Code to check. Or you can simply check "page source" in the browser and search for the Step 2 code. It must be just above the closing </body> tag. If it is somewhere else, ask Lovable to move it, or move it manually in VS Code.
Can I use this setup with any traffic source?
Yes. Once your landing page is live and tracking is connected, you can use the campaign URL from CPV Lab with any traffic source - Google Ads, Facebook Ads, native ads, push traffic, emails, organic, and more.
Video Tutorials
Method 2 - GitHub Method:
Method 1 - Lovable Chat Interface Method:
(Coming soon - video will be added soon)
Have questions about this setup? Contact CPV Lab Support (opens new window) and we'll help you get it working.