Setting up landing page tracking campaigns in CPV Lab is easy.
CPV Lab offers integration with Traffic Sources and Affiliate Networks through predefined catalogs.
This means that you don’t have to search for tokens manually or to configure the Postback URL manually, you will have everything you need to get started quickly inside the CPV Lab ad tracker. The cloud version of CPV Lab is affiliate tracking software CPV One.
There are 6 different campaign types in CPV Lab which are designed to cover all scenarios that you may need, from simple direct link campaigns, to lead capture campaigns and complex multi-level funnels.
- Direct Link & Landing Page
- Landing page sequence
- Lead Capture & Opt ins
- Multiple path campaign
- Multiple Option campaign
- Email Follow-up
For your first campaign, we recommend that you choose a Direct Link & Landing Page campaign which is the basic campaign setup and the starting point for all other campaign types.
What do you need to start with a landing page traffic campaign
Before starting a campaign you need to:
- Import the traffic source that you want to use
- Import the Affiliate network from where you will promote offers; If you have your own offers, then you can use the default “in-house” offer source
- Add your landing pages
- Add your offers links (hoplinks)
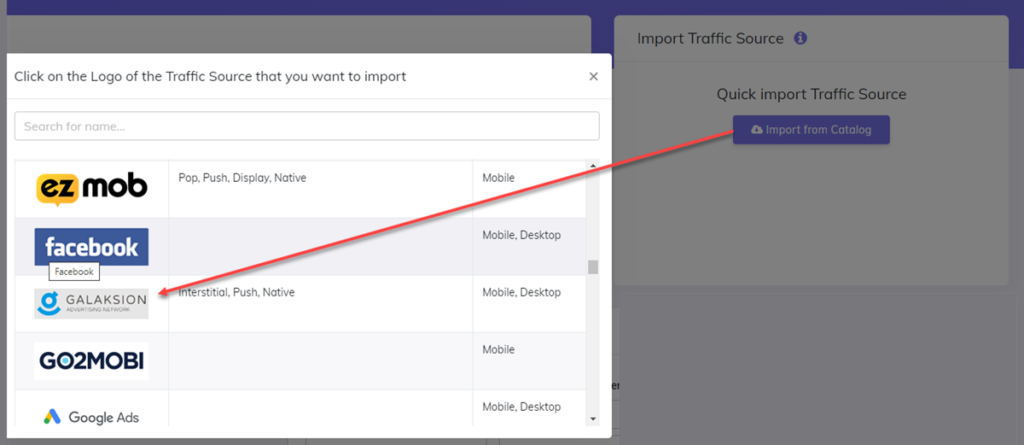
Step 1: Select your Traffic Source
The Traffic Source is the network that will bring traffic to your campaign.
The Traffic Source also sends details about visitors in the form of Tokens that get placed in the Campaign URL.
You can have a single traffic source in your campaign, but you can also receive and track organic traffic to your campaign.
- Navigate to the Traffic Sources page from the Sources menu in CPV Lab and look for the desired traffic source in the Catalog.
- Click on the desired Traffic Source in the Catalog and it will be loaded with all the available tokens.
- Save the traffic source and now it will be available for use in your campaigns.
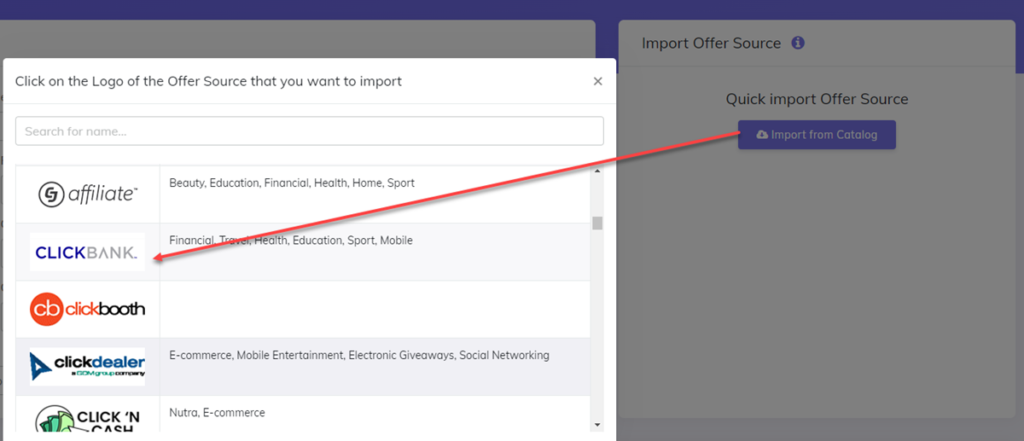
Step 2: Select your Offer Source
The Offer Source or Affiliate Network is the network that provides the offer pages and the one you will send traffic to and receive payouts from.
You can have multiple offers from different Offer Sources in the same CPV Lab campaign.
Note: If you promote your own offers, then you can skip this step.
- Navigate to the Offer Sources page from the Sources menu in CPVLab and look for the desired offer source in the Catalog to locate it.
- Click on the desired Offer Source in the Catalog and it will be loaded on the page.
- Save the offer source and now it will be available for use in your campaign.
Step 3: Add your landing pages and offers
Go to the “LPs & Offers” management menu and select LPs Management.
There you need to add your landing pages so you can use them easily inside your campaign.
You can group them in different groups for easier management.

Also, go to the Offer Management menu to add the offers you want to promote.
Make sure that you select the right Offer source for each offer so you get accurate reporting.
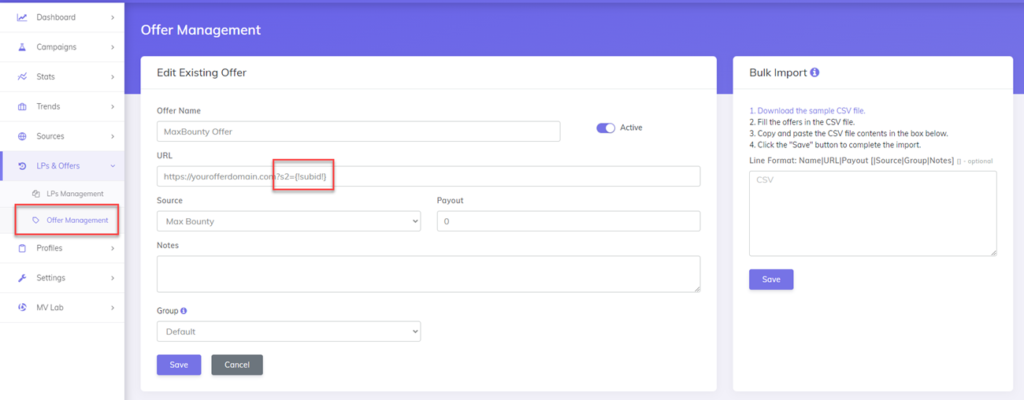
For each Offer, we need to add the URL adjusted with the subID parameter (as shown in the Offer Template field).
Each network has different parameters for the “subid”, the unique code for each visitor.
You can find the exact format of the Offer URL in the Offer Template field for each network and it contains the {!subid!} token which gets automatically replaced by the actual clickID for each visitor.
Step 4: Setup the landing page tracking campaign
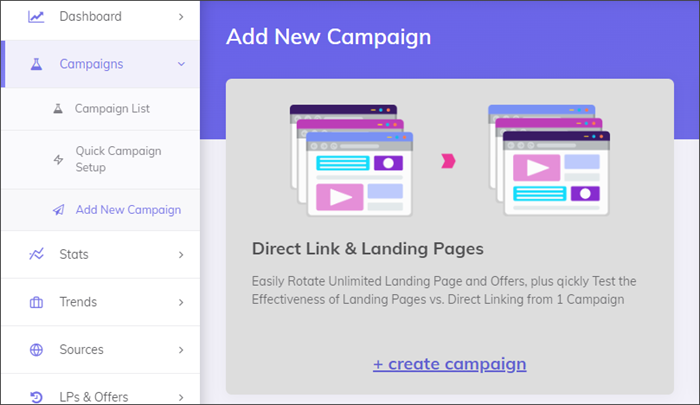
Choose to create a new Direct Link & Landing Page campaign and you will be redirected to the campaign setup page.
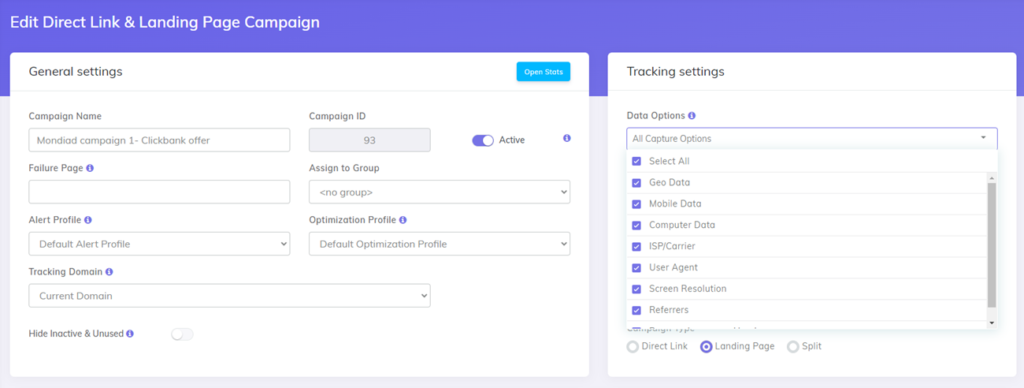
This page can be intimidating at first because it offers many options and customizations, but for your first campaign you only have to define some of the options and leave everything else to the default values:
- Enter a name for your campaign
- Select the Data Options that you want to capture.
- These are metrics captured internally by the tracker. You can also check all of them.
- Choose your Traffic Source
- Define the Bid or the CPC of your incoming traffic
- this is needed if you have a fixed or a largely unchanged CPC
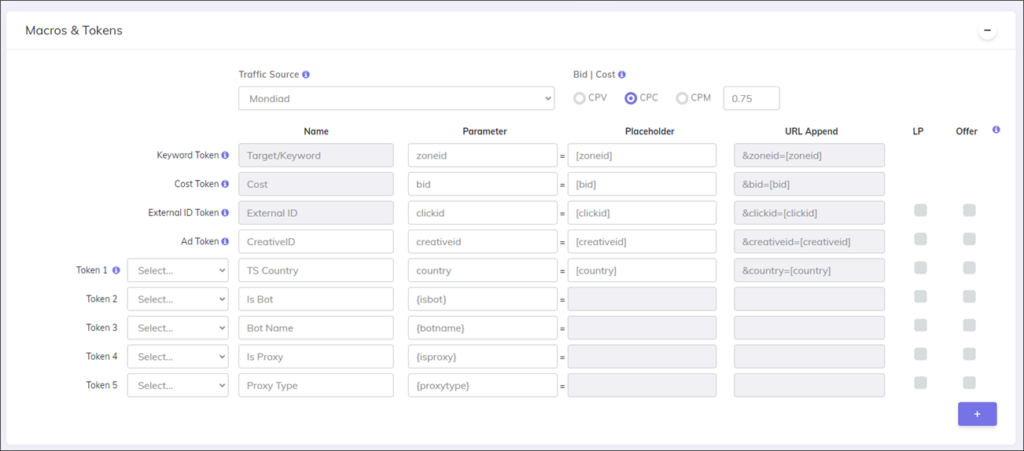
- The Macros & Tokens section will be automatically filled with data based on the selected Traffic Source.
- The main tokens are Keyword, Cost, External ID and Ad Token and additional tokens can be captured in the 15 Extra Token controls.
- Use the dropdown controls to easily select more tokens.
Note: You should only select the information that you want to see here, it is not mandatory to capture all tokens provided by the Traffic Source.
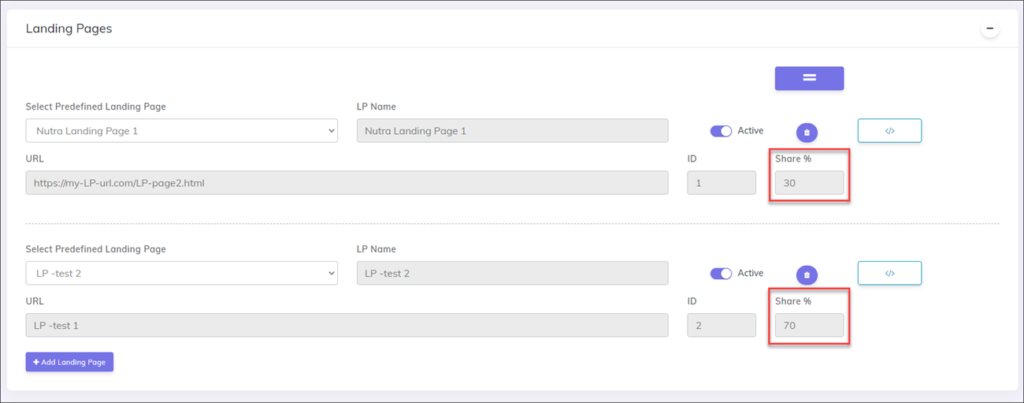
- Now go to the Landing Pages section and choose the pages from the predefined landing pages entered previously.
- Each landing page will have a unique ID assigned automatically.
- You will need to define the shares (percentage of traffic) for each page or just click on the Equal Shares button.
- Example: In the image below we will define 2 landing pages with 30% and 70% shares.
- this means that CPV Lab will rotate visitors between the 2 landing pages so that from every 100 visitors we get 30 visitors to LP1 and 70 visitors to LP2
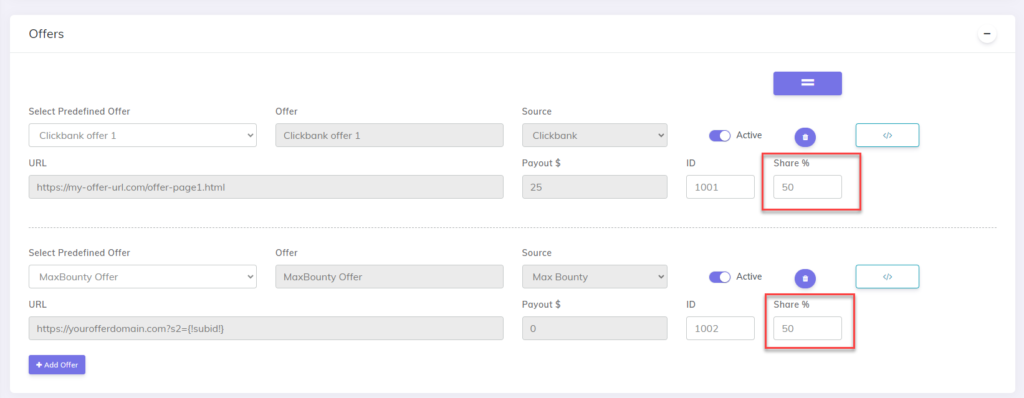
- Now go to the Offers section and select the offers that visitors will be redirected to when they click the link or button on the landing page.
- Just like for landing pages, each offer will get a unique ID and you need to set the share percentage.
- Also, define a Payout that will be used in case the actual payout isn’t passed by the affiliate network.
- Example: in the image below we are defining 2 offers with a 50% share each, this means that CPV Lab will split traffic evenly between my 2 offer pages.
- Notice that Offer URLs contain the subID parameter specific to each affiliate network in order to pass the unique clickID for each visitor in place of the {!subid!} token
- Save the campaign and the configuration from the campaign setup page is complete
Step 5. Adjust the Landing Page Tracking for CPV Lab
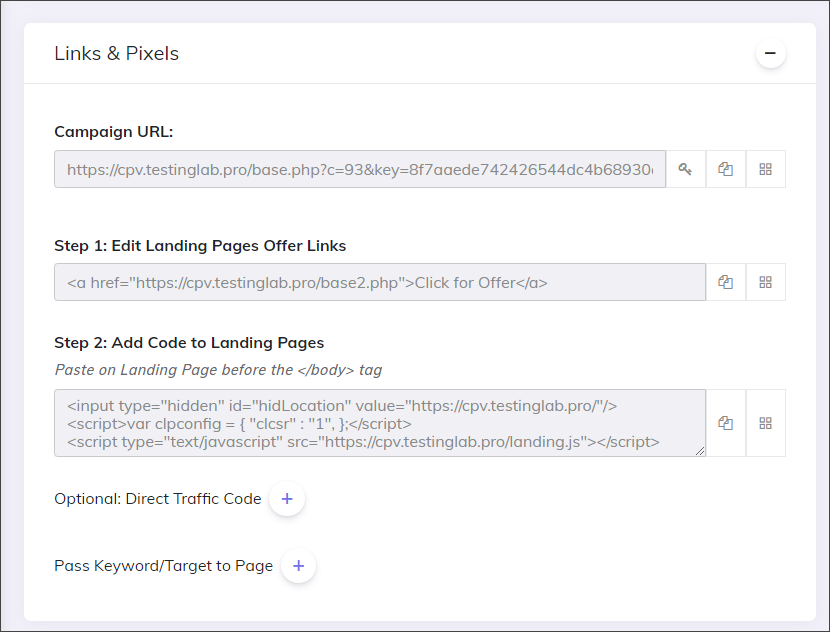
Below the save button from the campaign setup page you will see the Links & Pixels section.
Here you will find the 2 changes that needed to be done in your landing page HTML code in order to integrate with the CPV Lab tracker.
Changes to your landinge pages code
Step 1: you need to change the links from the Landing Page that point to the offer page and replace them with the base2.php link provided.
- This is done because the actual offer redirect will be done by CPV Lab.
Step 2: you need to include the 3 lines of code provided at Step 2 in the HTML code of your landing pages.
- Copy these 3 lines of code and paste them in your landing pages HTML, just above the </body> ending tag.
Step 3: An extra step is needed if using a Traffic Source that requires parallel tracking (like Google Ads, Microsoft Ads).
- In this case, you also need to take the JavaScript version of the Direct Traffic Code and place it on the landing page, after the Step 2 code.
- This Direct Traffic Code can be also seen next to each landing page.
Step 6. Setup the Tracking Pixel or Postback URL
In order to pass back conversion details from your Affiliate Network to CPV Lab you need to setup either the tracking pixel or the Postback URL in your network interface.
To track conversions in your tracker from the affiliate network, use the Postback URL.
The preferred option is to use a Postback URL as this offers more accurate results, so first check if your affiliate network supports Postback URLs.
If they do, then take the Postback URL for your specific Offer Source and submit it to the network.
Otherwise use one of the 3 versions of the Tracking Pixel (image, iframe, or script) and add it to the affiliate network interface.
Step 7. Test your campaign
In order to test the landing page tracking campaign, you need to take the Campaign URL provided on the campaign setup page and load it in a browser.
- You should be redirected quickly to the landing page and if you check the Stats page you will see that a click was registered in your campaign.
- Click on the CTA button or Link to the offer (which is now a base2.php link) and you will get redirected to the Offer page. If you check the Stats page again you will see that a click was registered in your campaign.
- If a visitor continues and purchases the offer, then the Affiliate Network will fire the Tracking Pixel or Postback URL that was setup in their interface, and a conversion will be marked in CPV Lab.
You can also see non-aggregated data about incoming visitors from your campaigns on the Visitor Stats page.
Step 8. Submit the Campaign URL to the Traffic Source and launch your campaign
Once you have tested the campaign and everything works well, you are ready for real traffic.
- You can reset your campaign clicks from the campaigns page in order to start without the test clicks registered before.
- Then you need to submit the Campaign URL exactly as provided in the campaign setup page to your Traffic Source and to setup the campaign in their interface. Here you will choose the traffic type and then launch your campaign.
- If using a Traffic Source that requires parallel tracking (like Google Ads or Microsoft Ads), then you won’t be using the Campaign URL and you will set the actual landing page URL as the Final URL for your ads. In this case you also need to place the Direct Traffic code inside the HTML of the landing page.
- If you want to skip the Landing Pages and send visitors directly to the Offer Pages, then you need to select ‘Direct Link’ as the campaign type and the rest of the setup remains the same.
Conclusion
Once you have the first campaign working, you can start exploring other campaign types available in CPV Lab or CPV One, each adding unique tracking capabilities. This experience with various campaign types can be advantageous when applying for approval in CPA networks. Demonstrating your proficiency in using sophisticated tools like CPV Lab or CPV One shows CPA networks that you’re serious about your affiliate marketing efforts and capable of handling diverse campaigns.
I hope these details were useful and that they offered more details about campaign setup in CPV Lab.
If you prefer cloud based version of CPV Lab we have solution for you: CPV One is the cloud-based version of CPV Lab ad tracker integrated with over 200+ ad platforms and traffic sources.
Let us know if you have any questions.

Author: Radu Draghici
Radu is the CTO of CPV One & CPV Lab ad tracker. He has 20+ years experience in software development and 10+ years experience in affiliate marketing. Combining these 2 fields, he started developing an ad tracking platform that helps marketers with multiple reports and relevant stats in order to optimize their campaigns.


