Receiving Conversions: Pixels and Postback URLs
This page explains how to get conversion data into CPV Lab | CPV One.
When a visitor converts - buys a product, fills a form, completes a trial - something needs to tell CPV Lab (opens new window) about it. That something is either a tracking pixel or a postback URL.
Both do the same job: they tell CPV Lab "this click just converted." The difference is how they do it.
💡 Not sure which one you need? Read How Conversion Tracking Works first. It explains the difference in plain language and helps you decide.
Quick Summary
- Receiving Conversions: Pixels and Postback URLs
Where to Find Your Pixels and Postback URL
Every campaign in CPV Lab (opens new window) | CPV One (opens new window) has its own unique pixels and postback URL. Here is how to find them.
- Go to Campaigns in your dashboard.
- Open the campaign you want to set up tracking for.
- Click Edit to open the campaign setup page.
- Scroll down to the Links & Pixels section.
![]()
You will see 3 pixel options and one postback URL for each affiliate network used in the campaign.
Each one is pre-generated for your campaign. You do not need to build these URLs manually - just copy and paste them where needed.
The General postback URL is customizable for different systems.
Method 1: Postback URL (S2S)
The postback URL (also called a Server-to-Server pixel or S2S postback) works differently from the pixel methods below.
Instead of firing code in the visitor's browser, the affiliate network's server sends conversion data directly to CPV Lab's server. The visitor's browser is not involved at all. This makes it the most reliable conversion tracking method.
Use the postback URL when:
- You are promoting offers through an affiliate or CPA network
- Your network supports S2S postback integration (most do)
- You want tracking that is not affected by ad blockers, iOS restrictions, or browser privacy settings
- You cannot place pixel code on the conversion page
What it looks like:
https://cpv-track-domain.com/adclick.php?subid=NETWORK_SUBID_TOKEN&revenue=NETWORK_REVENUE_TOKEN
![]()
Where to place it:
👤 Affiliate media buyer: Copy the postback URL from your CPV Lab campaign setup. Log in to your affiliate network. Find the postback or S2S tracking section (sometimes called "Global Postback", "Conversion Postback", or "S2S Settings"). Paste the CPV Lab postback URL there.
🏪 Advertiser / ecommerce brand: If your shopping cart or conversion platform supports S2S postbacks, you can use this method instead of placing pixel code on your page. Check your platform's documentation for where to enter a postback URL.
The SubID - how the conversion gets matched to the right click:
- When CPV Lab records a click, it creates a unique SubID (Click ID) for that visitor.
- That SubID travels with the visitor through your funnel.
- When the affiliate network fires the postback URL, it sends the SubID back to CPV Lab - and CPV Lab matches the conversion to the exact click that started it.
This is why the postback URL contains a SubID token - a placeholder that the network replaces with the real SubID value when it fires the postback.
Real example:
You are promoting an offer from MaxBounty. MaxBounty's SubID token is #S2# and their payout token is #RATE#. Your CPV Lab postback URL would look like this:
https://cpv-track-domain.com/adclick.php?subid=#S2#&revenue=#RATE#
You paste this into MaxBounty's postback settings for your offer. When a visitor converts, MaxBounty automatically fires:
https://cpv-track-domain.com/adclick.php?subid=abcdefgh_11_222&revenue=25
CPV Lab receives this, looks up the click with SubID abcdefgh_11_222, and marks it as a conversion in your report.
⚠️ Important: The SubID token name (
#S2#in the example above) depends on your affiliate network. Every network uses a different token name. Check your network's documentation or ask your account manager for the correct token to use.
Method 2: Tracking Pixel
A tracking pixel is a small piece of code that you place on a webpage. When the page loads in the visitor's browser, the pixel fires automatically and sends the conversion data to CPV Lab.
Use a tracking pixel when:
- You own the page where the conversion happens (your own thank-you page, order confirmation, or lead form)
- Your affiliate or CPA network lets you paste pixel code directly into their interface
- You need to fire multiple third-party pixels at the same time alongside your CPV Lab pixel
There are three types of tracking pixel in CPV Lab | CPV One. The type you use depends on what your network or page supports.
1. Image Pixel
The image pixel is the simplest option. It is a single line of HTML that loads a 1x1 transparent pixel. When the image loads, CPV Lab records the conversion.
Use the image pixel when:
- Your affiliate network supports image pixel placement
- You are placing the pixel on your own thank-you or confirmation page
- Your network does not require JavaScript
What it looks like:
<img src="https://cpv-track-domain.com/adclick.php" width="1" height="1" border="0" />
![]()
Where to place it:
🏪 Advertiser / ecommerce brand: Paste this code into the
<body>of your order confirmation or thank-you page. Every time a customer lands on that page after converting, the pixel fires.
👤 Affiliate media buyer: Log in to your affiliate network. Find the pixel or conversion tracking section for your offer. Paste the image pixel code there. The network will fire it when a conversion happens.
Real example:
You are running a lead generation campaign. Your thank-you page URL is https://yourdomain.com/thank-you. You paste the image pixel into the HTML of that page just before the closing </body> tag:
<img src="https://cpv-track-domain.com/adclick.php" width="1" height="1" border="0" />
</body>
When a visitor submits the form and lands on the thank-you page, the pixel fires - and CPV Lab marks the conversion.
⚠️ Note: Some networks require a secure pixel (
https://). If your network asks for this, make sure your tracking domain has an SSL certificate installed. See the SSL section below.
2. Iframe Pixel
The iframe pixel loads your CPV Lab conversion tracking inside a hidden frame. Its main advantage is that it can fire additional third-party pixels at the same time - image pixels, script pixels, other postback URLs - all from within the same iframe.
Use the iframe pixel when:
- You need to fire multiple pixels at once (for example, your CPV Lab pixel AND a Facebook pixel AND a network pixel)
- Your network requires an iframe pixel specifically
- You are running co-reg or multi-offer campaigns where multiple pixels need to fire per conversion
What it looks like:
<iframe src="https://cpv-track-domain.com/adclickf.php" width="1" height="1" frameborder="0" scrolling="no"></iframe>
![]()
What you can nest inside the iframe pixel:
The iframe pixel can fire these additional pixel types when a conversion happens:
- Image pixels -
<img src="http... - Iframe pixels -
<iframe src="http... - Script pixels -
<script... - Postback URLs - plain URLs starting with
http...
💡 Tip: The iframe pixel is the most flexible option. If you are ever unsure which pixel type to use, the iframe pixel will handle the most cases correctly.
Real example:
You are promoting an offer that requires you to fire both the CPV Lab pixel and the ad network's own conversion pixel. You use the iframe pixel as your main tracking pixel, and add the ad network's pixel URL in the Additional Pixels section below it.
<!-- Your iframe pixel on the thank-you page -->
<iframe src="https://cpv-track-domain.com/adclick.php" width="1" height="1" frameborder="0" scrolling="no"></iframe>
Then in the Additional Pixels section in CPV Lab campaign setup, you add the network's pixel URL - and CPV Lab fires both when the conversion happens.
3. Script Pixel
The script pixel uses JavaScript instead of an image or iframe. Some networks specifically require JavaScript-based tracking.
Use the script pixel when:
- Your affiliate network requires a JavaScript pixel
- Your thank-you page can run scripts
- The network's documentation specifies a
<script>tag format
What it looks like:
<script type="text/javascript" src="https://cpv-track-domain.com/adclicks.php"></script>
![]()
Where to place it:
Paste the script pixel code into the <head> or <body> of your thank-you or confirmation page, or paste it into your affiliate network's pixel field if they accept script tags.
Passing Revenue with Your Pixel or Postback
CPV Lab can record not just that a conversion happened - but also how much revenue it generated. This lets you track ROI, not just conversions.
To pass revenue, add the revenue parameter to your pixel or postback URL.
The value of this parameter should be the network's revenue token - a placeholder that the network replaces with the actual payout amount when it fires the pixel or postback.
Image pixel with revenue:
<img src="https://cpv-track-domain.com/adclick.php?revenue=YOUR_REVENUE_TOKEN" width="1" height="1" border="0" />
💡 Tip: The revenue parameter will be sent via your revenue parameter, depending on your website.
Postback URL with revenue:
https://cpv-track-domain.com/adclick.php?subid=NETWORK_SUBID_TOKEN&revenue=NETWORK_REVENUE_TOKEN

Real example:
You are using MaxBounty as your affiliate network. MaxBounty's revenue token is #RATE# and their SubID token is #S2#. Your postback URL would be:
https://cpv-track-domain.com/adclick.php?subid=#S2#&revenue=#RATE#
When a $12.50 conversion happens, MaxBounty fires:
https://cpv-track-domain.com/adclick.php?subid=abc123xyz&revenue=12.50
CPV Lab records the conversion with $12.50 revenue - and you can see it immediately in your campaign report.
💡 If no revenue is passed: CPV Lab will use the default payout amount set in your campaign setup. Go to the campaign setup page and check the Payout field if you want to set a default.
Where to configure the revenue parameter per network:
Each affiliate network uses a different token name for revenue. CPV Lab stores the correct token for each network in the Offer Sources settings.
- Go to Settings ➡️ Offer Sources
- Find your network and open its settings
- Check the Revenue Parameter field - this is the token name CPV Lab expects

SSL - HTTP vs HTTPS
Some affiliate networks and platforms require that your pixel or postback URL starts with https:// rather than http://.
⚙️ CPV Lab (self-hosted) users: You need an SSL certificate installed on your tracking domain to use
https://URLs. If your pixel currently starts withhttp://and your network requireshttps://, follow the SSL Certificate setup guide. Once installed, simply changehttptohttpsin your pixel or postback URL.
☁️ CPV One users: Your tracking domain already runs on HTTPS. No action needed.
How to Test That It's Working
After you set up your pixel or postback URL, always test before sending live traffic.
For postback URLs:
- Copy your CPV Lab Campaign URL in the browser - a new visitor is recorded in Visitor stats
- Copy the visitor SubID
- Go to campaign setup page and copy your CPV Lab postback URL
- Paste it into your browser and replace the SubID token with your test visitor SubID - for example:
?subid=abcdefgh_11_222 - Press Enter. The URL should load with no error
- Go to your CPV Lab visitor stats report. You should refresh and see a conversion appear within a few seconds
For tracking pixels:
- Open your thank-you or confirmation page in a browser
- Right-click and choose Inspect or View Page Source
- Search for your CPV Lab tracking domain in the page source to confirm the pixel is there
- Submit a test conversion
- Check your CPV Lab campaign report for the conversion
✅ Conversion appears in CPV Lab? Your tracking is working. You are ready to send live traffic.
❌ No conversion showing? Check these common causes:
- The SubID token in your postback URL does not match what your network sends - confirm the correct token with your network
- The pixel or postback URL was not saved correctly in the network - re-copy it from CPV Lab and re-paste it
- Your tracking domain is not on HTTPS and the network requires it - see the SSL guide
Video Tutorial
Find more details about tracking pixels and postback URL in the video below:
https://www.youtube.com/watch?v=bMUS9Vdbv90 (opens new window)
Tracking a Second Event: Subscribers, Checkouts, and Leads
Most campaigns track one conversion event - a sale, a lead, a sign-up. But many traffic sources and affiliate networks let you track two separate events per visitor. CPV Lab | CPV One supports this with a dedicated Subscribers Pixel and a Subscribers Postback URL.
This is useful in three situations:
| Vertical | Event 1 (Conversion) | Event 2 (Subscriber) |
|---|---|---|
| iGaming | Deposit (FTD) | Registration / First login |
| Ecommerce | Purchase / Sale | Add to cart / Initiate checkout |
| Lead generation | Sale / Upsell | Opt-in / Form submission |
| Affiliate (CPA) | Main conversion | Order form impression / Trial start |
By tracking both events, you can:
- See the full funnel - how many people trigger event 1 vs event 2
- Send two optimization signals to your traffic source (e.g. one for checkout, one for purchase)
- Identify where visitors drop off before the main conversion
Important - the second event can be used only with Lead Capture or Landing Page Sequence
The Subscribers Postback URL (S2S)
For networks that support server-to-server tracking for secondary events - especially iGaming networks and push ad networks - CPV Lab | CPV One provides a dedicated Subscribers Postback URL.
This works exactly like the main postback URL, but fires for the second event only.
Format:
https://cpv-track-domain.com/adsub.php?subid=NETWORK_SUBID_TOKEN

Where to paste it:
Log in to your affiliate network. Find the postback settings for secondary events - this may be labelled as "Registration Postback", "Lead Postback", "Order Form Pixel", or "Opt-in form submission". Paste the CPV Lab Subscribers Postback URL there.
The Subscribers Pixel
The subscribers pixel works exactly like the standard tracking pixel - but it fires for your second event, not the main conversion.
CPV Lab | CPV One generates a unique subscribers pixel for each campaign.
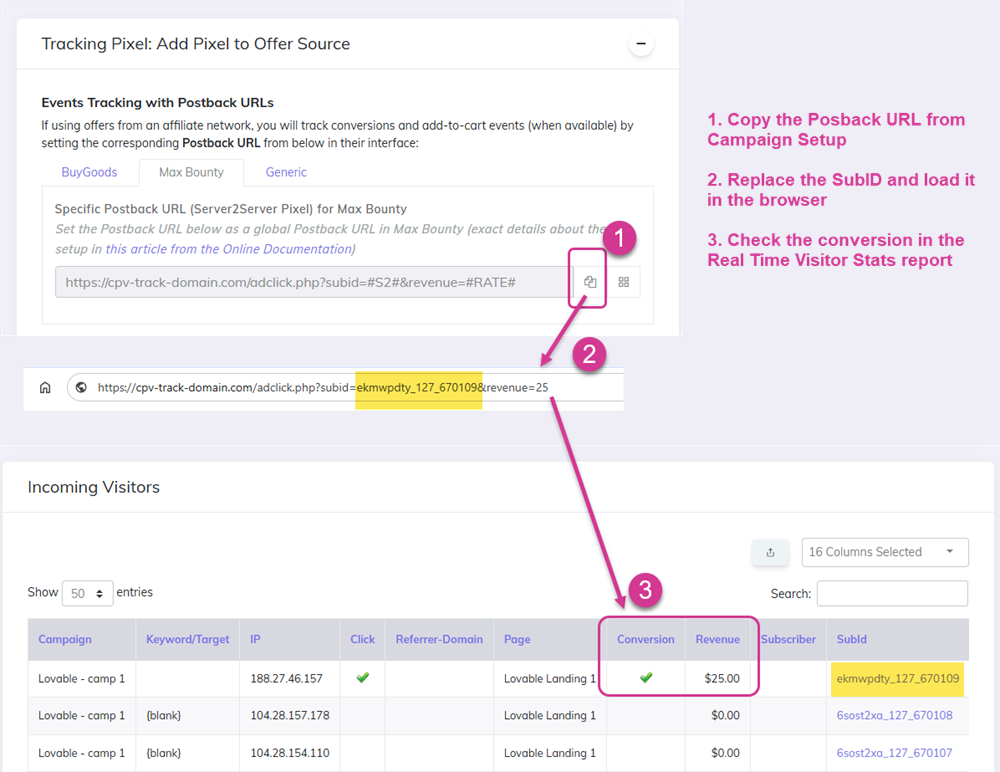
You will find it in the Links & Pixels section of your campaign setup, under Tracking Pixel: Add Pixel to Offer Source.
![]()
Example: The subscribers pixel is an image tag. It looks like this:
<img src="https://cpv-track-domain.com/adsub.php" width="1" height="1" border="0" />
Note the adsub.php - this is what separates it from the main conversion pixel (adclick.php). This is the URL that records a subscriber event in your CPV Lab reports.
Where to Place the Subscribers Pixel
Use cases depend on your vertical and network:
🏪 Ecommerce - tracking Initiate Checkout (e.g. BuyGoods, Digistore24, Maxweb, ClickBank):
Many ecommerce networks let you add a pixel to their checkout page directly from your affiliate dashboard - without needing access to the checkout page HTML.
BuyGoods example:
- Log in to your BuyGoods account
- Find the offer you are promoting and click on it
- Go to Settings ➡️ Funnel Pixels
- Find the Checkout section
![]()
- Go to your CPV Lab | CPV One campaign setup page
- Scroll to Links & Pixels ➡️ Tracking Pixels
- Copy the Subscribers Pixel - the image tag (it must start with
<img, not<script) - Paste the image tag into the Checkout field in BuyGoods Funnel Pixels
- Click Save
⚠️ Important: BuyGoods requires an image tag, not a postback URL and not a script tag. Make sure you copy the
<img...version of the subscribers pixel, not the postback URL.
Every time a visitor reaches the BuyGoods checkout page, the pixel fires - and CPV Lab records a subscriber event for that campaign.
Maxweb example:
The setup on Maxweb follows the same pattern but they use the Subscribers Postback URL. Maxweb supports the second Postback URL in their offer settings page for tracking secondary events like add-to-cart or checkout.
- Go to your Maxweb offer settings.
- Find the postback placement section for secondary events.
- Paste the CPV Lab Subscribers Postback into the correct field.
- Save.
💡 Many afiliate networks, like Clickbank, Buygoods, Digistore24, Maxweb, support the image pixel method for tracking secondary events. The field name varies - look for "Checkout Pixel", "Funnel Pixel", "Add to Cart Pixel", or similar.
👤 iGaming affiliates - tracking Registrations and Deposits:
Most iGaming networks support two separate postback URLs - one for deposits (main conversion) and one for registrations (subscriber event). Use the Subscribers Postback URL for this (see the next section below).
📋 Lead generation - tracking Opt-ins:
If you are running an opt-in campaign and your thank-you page is accessible, place the subscribers pixel on that page. When a visitor submits the form and lands on the thank-you page, the pixel fires and records the opt-in as a subscriber event.
<!-- Place on your opt-in thank-you page -->
<img src="https://cpv-track-domain.com/adsub.php" width="1" height="1" border="0" />
💡 No thank-you page? If your autoresponder redirects directly to an offer without a thank-you page, you can still track subscribers. See Tracking Subscribers without a Thank You Page for how to use the
base3.php?adsub=1method with Aweber and other autoresponders.
What You See in Your CPV Lab Reports
Once the subscribers pixel or postback is set up, your real time visitors report will show two separate columns:
- Conversion - main conversion events (purchases, deposits, completed leads)
- Subscriber - subscriber events (checkouts initiated, registrations, opt-ins)

This lets you calculate your opt-in rate, checkout-to-purchase rate, or registration-to-deposit rate directly inside CPV Lab - without needing a separate analytics tool.
You may also find useful: