Sending Conversion Data to Ad Platforms
This page explains how to send conversion data out of CPV Lab (opens new window) | CPV One (opens new window) - to your traffic source or ad network.
When CPV Lab records a conversion, it can automatically notify your ad platform about it.
This closes the loop between your tracker and your traffic source - and gives the ad network the signal it needs to optimize your campaigns.
There are two things this page covers:
- Traffic Source Postback URLs - sending the main conversion event to your ad network
- Additional Pixels and Postback URLs - firing extra third-party pixels or postbacks when a conversion happens
- Sending a Second Event - passing a subscriber or secondary goal to your traffic source for dual-goal optimization
💡 Looking for how to receive conversions INTO CPV Lab? That's a different direction. See Receiving Conversions: Pixels and Postback URLs.
Quick Summary
- Sending Conversion Data to Ad Platforms
How the Outbound Flow Works
Here is what happens when a conversion is recorded and CPV Lab fires data outward:
Visitor clicks your ad
        ↓
Traffic source passes a unique click ID in the campaign URL
        ↓
CPV Lab captures and stores the click ID
        ↓
Visitor converts (sale, lead, sign-up)
        ↓
Affiliate network fires the CPV Lab postback URL
        ↓
CPV Lab records the conversion
        ↓
CPV Lab fires your Traffic Source Postback URL
        ↓
Ad network receives the conversion signal
        ↓
Ad network optimizes your campaign for more conversions
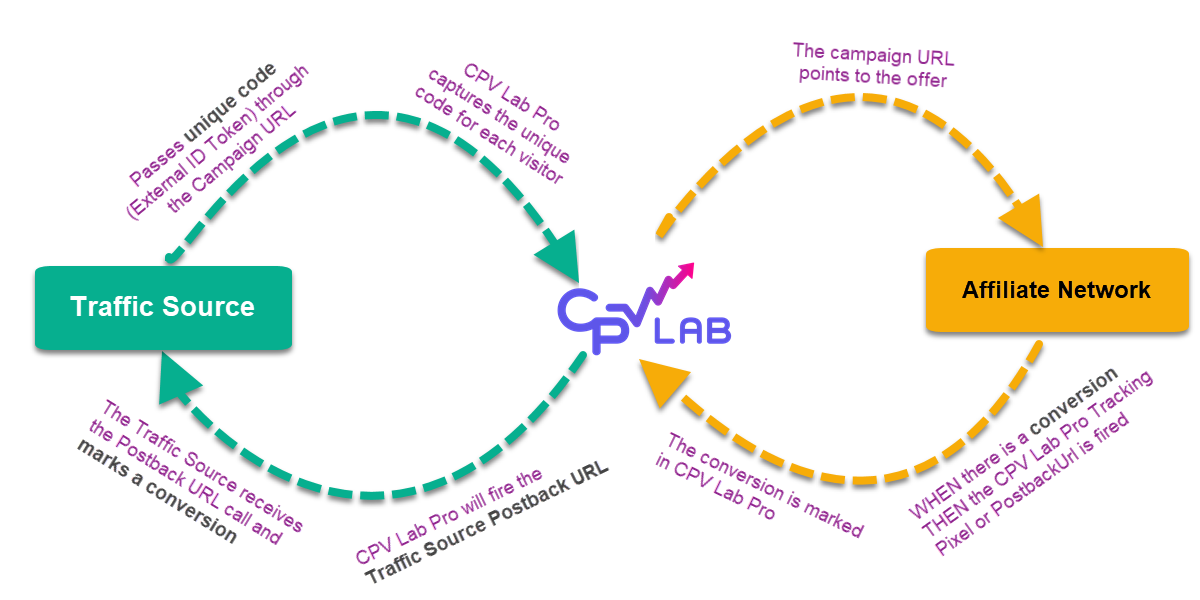
The key to this flow is the unique click ID.
- Your traffic source passes a unique code for each visitor in the campaign URL.
- CPV Lab stores it.
- When the conversion fires, CPV Lab sends that same code back to the traffic source - so the network knows exactly which click converted.
Part 1: Traffic Source Postback URL
The Traffic Source Postback URL is the URL CPV Lab (opens new window) (or CPV One (opens new window)) fires to your ad network when a conversion is recorded. It tells the network: "This specific click converted."
You set this up once per campaign, in the Links & Pixels section of the campaign setup page.
When you select a traffic source for your campaign, the Traffic Source Postback URL appears pre-filled in the TS Conversions section.

All you need to do:
- Check the box to enable the Traffic Source Postback URL for this campaign.
- Replace the placeholder with REPLACE in the URL with your actual account ID / authentication from the traffic source.
Pre-configured Traffic Sources (Recommended)
Most traffic sources imported from the CPV Lab | CPV One traffic sources catalog come with the postback URL already built and formatted correctly. You do not need to construct the URL manually.
Most of the time, all you have to do is update the parameters with REPLACE, if there are any.
When you select a traffic source from the catalog, the Traffic Source Postback URL appears pre-filled.
All you need to do: Change the REPLACE placeholders with the actual values that you see in your traffic source account (like your ad network account ID or pixel ID). That's it. CPV Lab handles the rest automatically on every conversion.
PopCash example:
The pre-filled URL for PopCash looks like this:
https://ct.popcash.net/click?aid=REPLACE&clickid={!tscode!}&payout={!revenue!}
Enter your PopCash account ID instead of REPLACE in the above URL:
https://ct.popcash.net/click?aid=YOUR_ACCOUNT_ID&clickid={!tscode!}&payout={!revenue!}
When a visitor with click ID abcdefgh converts with $20 revenue, CPV Lab fires:
https://ct.popcash.net/click?aid=YOUR_ACCOUNT_ID&clickid=abcdefgh&payout=20
PopCash receives this and marks the $20 conversion in their system. You see it in CPV Lab AND in PopCash at the same time.
✅ Using a catalog traffic source? Enable the postback, add your account ID, and you are done. Skip to Part 2 or Part 3.
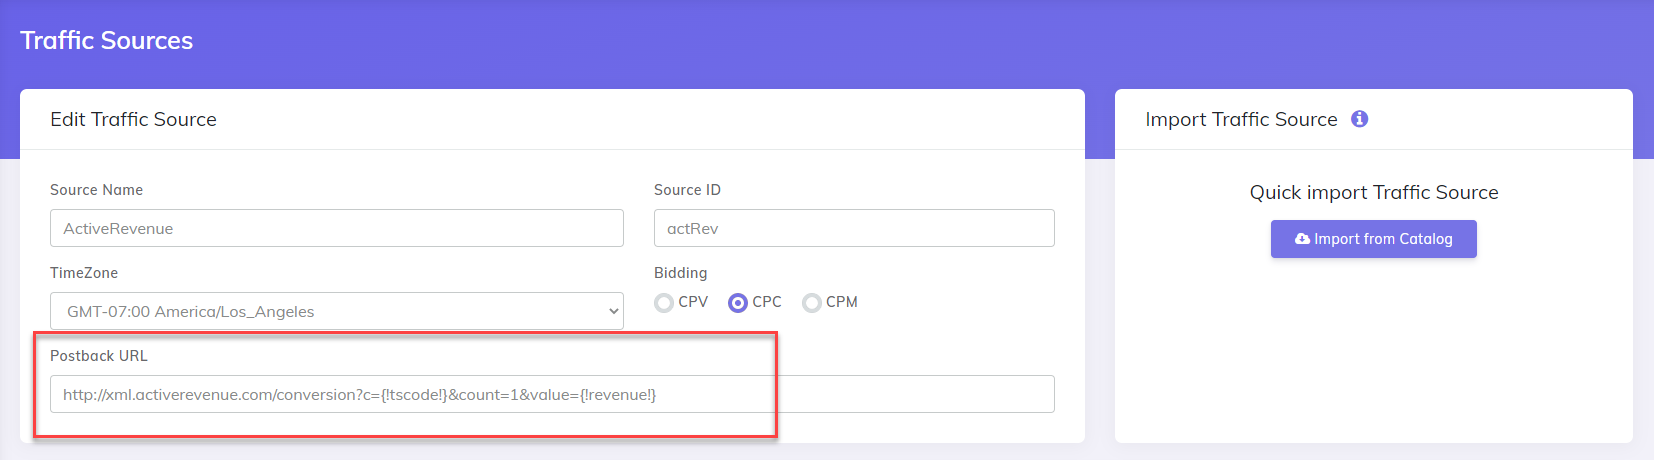
Setting Up Manually
If your traffic source is not in the CPV Lab catalog, you can add it manually.
- Go to your traffic source account and find their macros and the postback or S2S conversion tracking settings.
- Find their postback URL format - it is a link, it may look something like this:
https://network.com/postback?clickid=CLICK_ID&payout=PAYOUT - Replace the click ID placeholder with
{!tscode!}and the payout placeholder with{!revenue!}:https://network.com/postback?clickid={!tscode!}&payout={!revenue!} - Go to your CPV Lab | CPV One dashboard.
- Go to to Sources ➡️ Traffic sources.
- Create a new traffic Source with the macros and the postback from your ad network
- Save it
⚠️ Important: Make sure your traffic source is configured to pass a unique click ID in the campaign URL. This is the External ID Token in your CPV Lab traffic source settings. Without it, CPV Lab cannot match the conversion back to the correct click and the postback will not work correctly.
The {!tscode!} and {!revenue!} Macros
These two macros are what make the Traffic Source Postback URL dynamic. CPV Lab replaces them with real values automatically on every conversion.
| Macro | What CPV Lab replaces it with |
|---|---|
{!tscode!} | The unique click ID passed by the traffic source for that visitor |
{!revenue!} | The revenue amount recorded for that conversion |
Example with both macros:
Before: https://network.com/postback?clickid={!tscode!}&payout={!revenue!}
After:  https://network.com/postback?clickid=abc123xyz&payout=18.50
💡 Revenue not showing in your traffic source? Make sure your affiliate network is passing revenue in the postback to CPV Lab. If CPV Lab does not have a revenue value, you can set up an average value for that offer. See Receiving Conversions for how to record revenue into CPV Lab.
Part 2: Additional Pixels and Postback URLs
Beyond the Traffic Source Postback URL, CPV Lab | CPV One can fire additional third-party pixels or postback URLs when a conversion happens.
This is useful when you need to notify more than one system at once - for example, firing both a traffic source postback and a Facebook pixel on the same conversion.
You add these in the Additional Pixels section of the campaign setup page. So, each campaign will have it's own additional pixels.
![]()
Rules for additional pixels:
- Add one pixel URL per field
- Click Add Pixel Field to add more
- You can have
Postback URL,<img>tags,iframetags, or<script>tags - Each pixel fires automatically on every conversion for that campaign
What Each Pixel Type Can Fire
Not all CPV Lab pixel types support all additional pixel formats. Here is what each one can fire:
| CPV Lab Pixel Type | Can fire these additional pixels |
|---|---|
| Image Pixel | Postback URLs only (http...) |
| Iframe Pixel | Image pixels (<img...), Iframe pixels (<iframe...), Script pixels (<script...), Postback URLs (http...) |
| Script Pixel | Script pixels (<script...), Postback URLs (http...) |
| Postback URL | Postback URLs only (http...) |
💡 The iframe pixel is the most flexible option. If you need to fire multiple different types of additional pixels from the same campaign, use the iframe pixel as your main CPV Lab tracking pixel.
How to Add Additional Pixels
Example - firing a OddBytes postback alongside your main conversion:
- You are promoting an offer on OddBytes
- You want OddBytes to receive the conversion signal for campaign optimization.
- And you want to send information about the conversion to a CRM or another system (like Slack).
- Go to your CPV Lab campaign setup ➡️ Links & Pixels section
- Make sure the OddBytes postback shows up on the TS Conversions section
- Add your secondary Postback URL as Additional Pixel
- You can include placeholders that will be replaced by CPV Lab with actual details of the conversion, like
{!revenue!},{!target!}, etc. See full list here
- You can include placeholders that will be replaced by CPV Lab with actual details of the conversion, like
- Save the campaign.
![]()
When a conversion fires, CPV Lab notifies both OddBytes and your second system (CRM) (via the additional pixel) automatically.
Passing Extra Tokens and Revenue in Additional Pixels
If you collect extra data in your funnel - like email, phone, or custom values - and store them in CPV Lab Extra Tokens, you can pass that data in your additional pixels too.
Use these placeholders in your additional pixel URL:
| Placeholder | What it passes |
|---|---|
{!token1!} ... {!token15!} | Value captured in Extra Token 1 - 15 |
{!adtoken!} | Value captured in Ad Token |
{!revenue!} | Revenue amount from the conversion |
Example:
A third-party network requires you to pass their pixel with an email address, a custom ID, and the revenue amount. Their pixel format is:
https://network.com/pixel.php?email=...&uid=...&rev=...
You have stored the visitor's email in Extra Token 1 and their user ID in Extra Token 2. Enter it in CPV Lab like this:
https://network.com/pixel.php?email={!token1!}&uid={!token2!}&rev={!revenue!}
![]()
When a conversion fires, CPV Lab replaces the placeholders with the actual captured values:
https://network.com/pixel.php?email=user@example.com&uid=abc123&rev=25.00
💡 This works with all pixel types - image pixels, script pixels, iframe pixels, and postback URLs. The placeholders are replaced the same way regardless of pixel type.
Fire Additional Pixels for Specific Offers Only
By default, additional pixels fire for every conversion in a campaign - regardless of which offer converted. But you can restrict a pixel to fire only when a specific offer converts.
This is useful when:
- You are running multiple offers in one campaign
- Each offer has a different advertiser or network that needs its own pixel
- You want to send offer-specific revenue or data to different platforms
How to set it up:
In the Additional Pixels section, each pixel field has an Offer IDs box next to it.
- Leave it blank - the pixel fires for all offers
- Enter one Offer ID - the pixel fires only when that offer converts
- Enter multiple Offer IDs separated by commas - the pixel fires when any of those offers converts
![]()
💡 Where do I find the Offer ID? Go to Offers on your campaign setup. The ID is shown in the offers added to your campaign. You can edit the Offer ID inside your campaign setup.
Part 3: Sending a Second Event to Your Traffic Source
CPV Lab | CPV One can send two separate events to your traffic source - not just the main conversion. This lets the ad network optimize for two goals at once.
💡 For a full explanation of what the subscriber event is and how CPV Lab tracks it internally, see Receiving Conversions: Pixels and Postback URLs - Tracking a Second Event.
Why use two events?
- Faster optimization signal - early events like opt-ins or checkout starts give the network more data sooner, especially when final conversions are rare
- Better audience building - more events means the algorithm can find similar users faster
- Full funnel visibility - you can see where visitors drop off between the two events
Common use cases:
| Traffic Source Goal 1 | Traffic Source Goal 2 |
|---|---|
| Purchase / Deposit | Initiate Checkout / Registration |
| Sale | Opt-in / Lead |
| Final conversion | Order form impression |
How to Set It Up
You need to configure two postback URLs in your campaign setup - one for conversions and one for subscribers.
- Go to your CPV Lab | CPV One campaign setup page.
- Scroll to Links & Pixels.
- Find the TS Conversions section - this is your main conversion postback. It should already be set up.
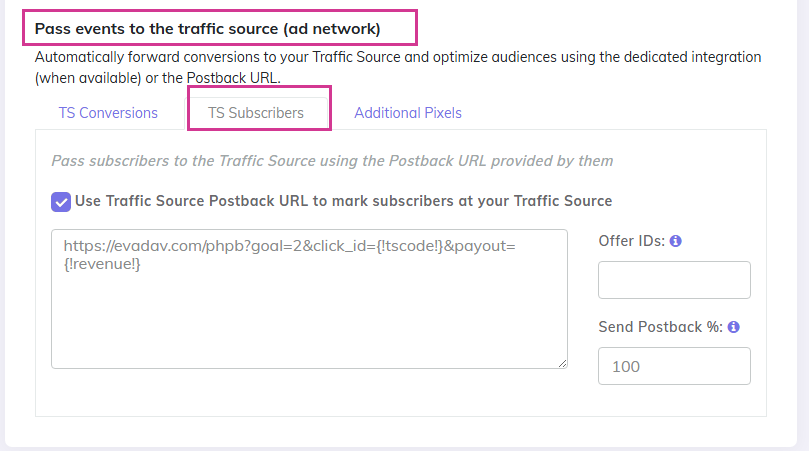
- Find the TS Subscribers section - this is where you add the second event postback.
- The subscribers postback URL field shows up only for "Lead Capture" or "Landing Page Sequence" campign types.
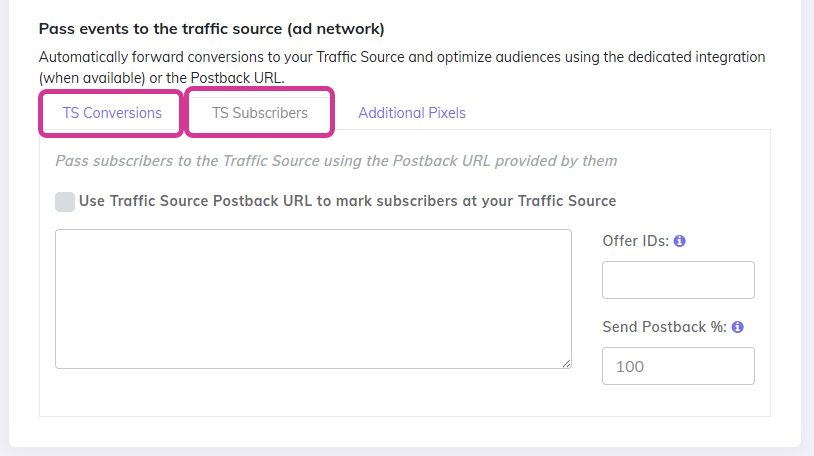
- In TS Subscribers, enter the postback URL your traffic source uses for secondary events.
- Use
{!tscode!}for the unique visitor ID - Use the traffic source's specific goal parameter for the second event type (check your traffic source documentation for this)
- Use
- Save the campaign.
- Test both events before sending live traffic:
- Trigger a test subscriber event (e.g. submit the opt-in form) and confirm the traffic source receives the subscriber goal
- Trigger a test conversion and confirm the traffic source receives the conversion goal
Passing the Subscriber Event to Your Traffic Source
Once CPV Lab knows about a subscriber event, it can pass that event to your ad network or traffic source - so the network can use it for campaign optimization.
This means your traffic source can optimize for two goals at once - for example:
- Goal 1: Purchase (main conversion)
- Goal 2: Initiate Checkout (subscriber event)
This gives the ad algorithm more signal, especially useful in the early stages of a campaign when purchase events are rare.
To set this up:
- Go to your campaign setup page in CPV Lab | CPV One.
- Scroll to the Traffic Source section.
- Find the Subscriber Event Postback field (the second postback for your traffic source).
- Confirm that the correct traffic source token is pre-filled.
- Log in to your traffic source and make sure it is configured to receive a second conversion event.
💡 Which traffic sources support dual postbacks? Most major push and pop networks support two postback URLs. Check your traffic source's setup in Traffic sources Menu or ask your account manager. Google Ads, TikTok Ads, Snapchat Ads and Meta Ads handle second events differently - through CAPI or conversion action settings rather than postback URLs.
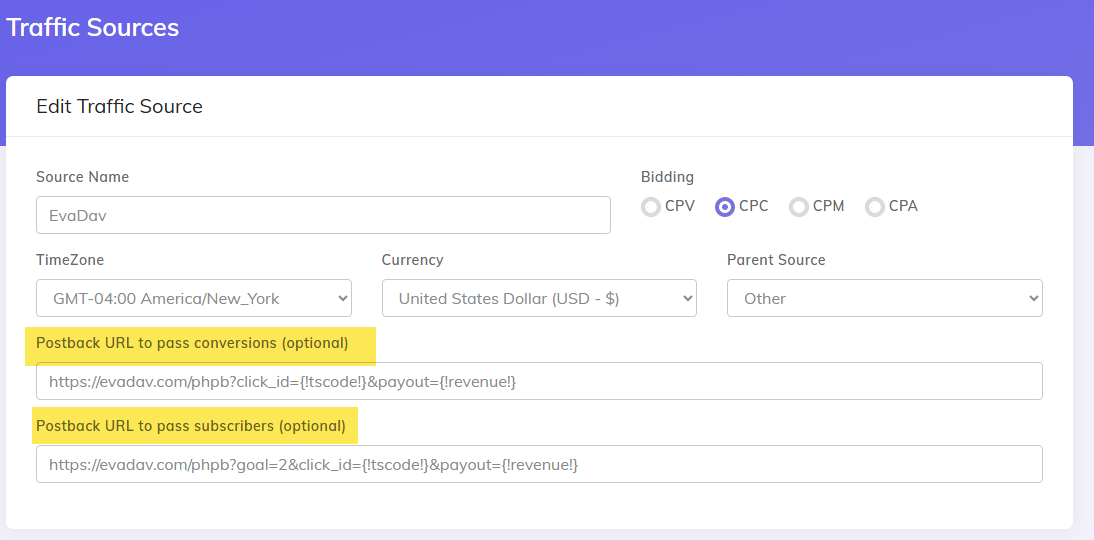
Evadav example:
Evadav supports two separate conversion goals. Your campaign setup in CPV Lab would look like this:
- TS Conversions:
https://evadav.com/phpb?click_id={!tscode!}&payout={!revenue!} - TS Subscribers:
https://evadav.com/phpb?goal=2&click_id={!tscode!}&payout={!revenue!}
The Full Dual-Event Flow
Visitor clicks ad
        ↓
Traffic source passes unique click ID to CPV Lab
        ↓
Visitor fills opt-in form / reaches checkout
        ↓
CPV Lab records subscriber event (adsub.php)
        ↓
CPV Lab fires TS Subscribers postback → Traffic source records Goal 2
        ↓
Visitor completes purchase / final conversion
        ↓
CPV Lab records conversion (adclick.php)
        ↓
CPV Lab fires TS Conversions postback → Traffic source records Goal 1
        ↓
Traffic source optimizes campaigns using both signals
⚠️ This feature only works with traffic sources that support multiple conversion goals. Check with your traffic source account manager to confirm they support two postback URLs for separate goals before setting this up.
You may also find useful: