Advanced: Revenue, Offer Pixels, and Extra Tokens
This page covers three advanced configuration options for pixels and postback URLs in CPV Lab | CPV One.
You do not need these for a basic campaign. But if you are running multi-offer campaigns, upsell funnels, co-registration flows, or collecting lead data from forms - these features give you significantly more accurate tracking and richer data in your reports.
💡 New to pixels and postbacks? Start with How Conversion Tracking Works before reading this page.
Quick Summary
- Feature 1 - Cumulative Revenue Tracking
- Feature 2 - Extra Tokens and Prepop
- Feature 3 - Offer-Specific Pixels
Feature 1 - Cumulative Revenue Tracking
The Problem This Solves
By default, CPV Lab records the last revenue value received for a click.
If a visitor converts twice: - first on a $10 offer, then on a $15 upsell - CPV Lab (opens new window) replaces the $10 with $15. Your total revenue shows $15, not $25.
This is fine for simple one-offer campaigns. But for upsell funnels, co-reg flows, or any campaign where one visitor can generate multiple payouts, it gives you wrong revenue data.
Cumulative revenue tracking fixes this.
Instead of replacing the revenue, CPV Lab adds each new payout to the running total.
| Scenario | Default behavior | Cumulative behavior |
|---|---|---|
| Conversion 1: $10 | Revenue = $10 | Revenue = $10 |
| Conversion 2: $15 | Revenue = $15 (replaced) | Revenue = $25 (added) |
| Conversion 3: $8 | Revenue = $8 (replaced) | Revenue = $33 (added) |
Use cumulative revenue tracking when:
- One visitor can convert on multiple offers in the same campaign (upsell funnel, co-reg, offer path)
- Your affiliate network fires the pixel multiple times - once per conversion event
- You want total revenue per visitor, not just the last payout received
How to Enable It
Add the &cladd=true parameter to your conversion pixel or postback URL. This tells CPV Lab to add each new revenue value instead of replacing it.
This is the Postback URL to receive conversions from the affiliate network.
Standard postback URL (default behavior):
https://cpv-track-domain.com/adclick.php?subid=NETWORK_SUBID_TOKEN&revenue=NETWORK_REVENUE_TOKEN
Postback URL with cumulative revenue enabled:
https://cpv-track-domain.com/adclick.php?subid=NETWORK_SUBID_TOKEN&revenue=NETWORK_REVENUE_TOKEN&cladd=true
![]()
You enter this modified URL in your affiliate network's postback settings - exactly as you would a normal postback URL, just with &cladd=true added.
Real-World Example
You are running a supplement offer funnel with three steps:
- main offer ($27)
- upsell 1 ($47)
- upsell 2 ($19).
- One visitor converts on all three.
Your postback URL in the affiliate network:
https://cpv-track-domain.com/adclick.php?subid=NETWORK_SUBID_TOKEN&revenue=NETWORK_REVENUE_TOKEN&cladd=true
The network fires it three times for this visitor:
Call 1: ...adclick.php?subid=abcdefgh_11_222&revenue=27&cladd=true  → CPV Lab revenue: $27
Call 2: ...adclick.php?subid=abcdefgh_11_222&revenue=47&cladd=true  → CPV Lab revenue: $74
Call 3: ...adclick.php?subid=abcdefgh_11_222&revenue=19&cladd=true  → CPV Lab revenue: $93
Your CPV Lab campaign report shows $93 total revenue for that visitor - the true amount they generated.
Without cladd=true, your report would show $19 - only the last payout received.
⚠️ Requirements:
- Your affiliate network must support passing the revenue amount as a parameter in the postback URL
- Add
cladd=trueto every call of the pixel for that campaign - not just the first one
Feature 2 - Extra Tokens and Prepop
The Problem This Solves
Standard conversion tracking tells you that a visitor clicked and converted. But it does not tell you who that visitor is - their name, email, phone number, age, location, or any other data they entered in a form on your landing page.
Extra Tokens solve this. They let you capture form data from your landing page and store it in CPV Lab - attached to that visitor's click record. You can then see this data in your reports and pass it in outbound pixels to other platforms.
Use Extra Tokens when:
- You have a lead generation form on your landing page and want to capture the submitted data
- You want to pass email, phone, or name to Facebook CAPI or TikTok CAPI for better audience matching
- You need to forward visitor data to an advertiser, CRM, or other system via additional pixels
- You want to segment your reports by a custom visitor attribute (age range, survey answer, etc.)
How Extra Tokens Work
Extra Tokens are captured using the tokens.php pixel - a special image tag that passes form values from your landing page to CPV Lab.
The tokens pixel format:
<img src="https://cpv-track-domain.com/tokens.php?token1=VALUE1&token2=VALUE2&token3=VALUE3" width="1" height="1" border="0" />
The parameters token1, token2, token3 are fixed - they always stay as token1, token2, token3 in the image tag. You replace VALUE1, VALUE2, VALUE3 with the actual values captured from the form.
⚠️ Important: The parameter names in the image tag (
token1,token2,token3) never change. You give them friendly display names in the campaign setup page - like "Email", "Phone", "Age" - but in the pixel URL itself they are alwaystoken1,token2,token3.
Setting Up Extra Token Names in CPV Lab
Before placing the tokens pixel, set up your extra token names in the campaign setup page. This controls how they appear in your reports.
- Go to your campaign setup page in CPV Lab | CPV One.
- Find the Extra Tokens section.
- Give each token a meaningful name - for example:
- Token 1 name:
Email - Token 2 name:
Phone - Token 3 name:
Age
- Token 1 name:
- Save the campaign.
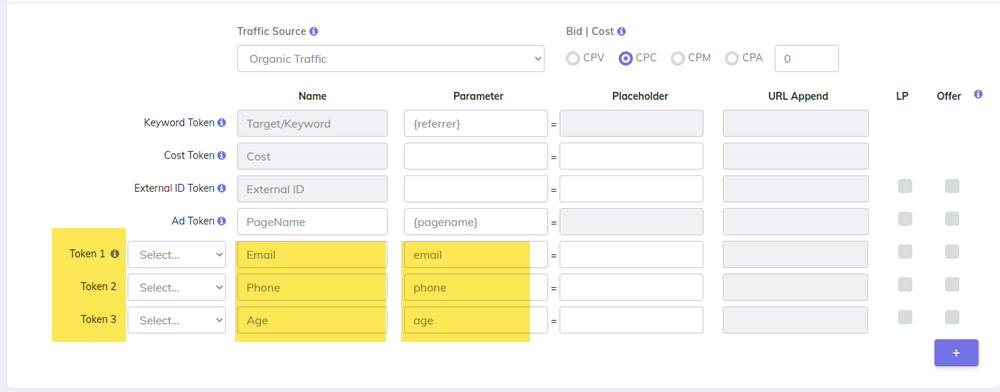
These names appear in your campaign reports as column headers, making the data easy to read.
Where to Place the Tokens Pixel
The tokens pixel can be placed on:
- Your landing page - captures data as soon as the visitor arrives (from URL parameters)
- Your offer page - captures data the visitor submitted in a form
Which one you use depends on where the data is available.
Example 1 - Capturing Form Data from a Landing Page
You have a landing page with a form asking for age and location. When the visitor submits the form, the values are passed to the next page via the URL. You want to store them in CPV Lab.
Your campaign has:
- Extra Token 1 =
Age - Extra Token 2 =
Location
The offer page receives the values in the URL as ?age=27&loc=Home. The tokens pixel on the offer page would be:
<img src="https://cpv-track-domain.com/tokens.php?token1=27&token2=Home" width="1" height="1" border="0" />
![]()
When this page loads, CPV Lab stores:
- Token 1 (Age) =
27 - Token 2 (Location) =
Home
for that visitor's click record. You can now see this data in your CPV Lab reports alongside clicks, conversions, and revenue.
Example 2 - Capturing Email and Phone for CAPI
You are running a lead generation campaign. Visitors fill in their email and phone number on your landing page. You want to pass this data to Facebook CAPI and TikTok CAPI for better conversion matching.
Your campaign has:
- Extra Token 1 =
Email - Extra Token 2 =
Phone
On the thank-you page (after form submission), your form processor outputs the values into the tokens pixel:
<img src="https://cpv-track-domain.com/tokens.php?token1=user@example.com&token2=1234567890" width="1" height="1" border="0" />
CPV Lab (opens new window) stores the email and phone for that visitor.
When the conversion fires, CPV Lab can forward this data to Facebook CAPI and TikTok CAPI - improving event matching accuracy (EMQ) and helping the algorithms find similar audiences.
💡 CAPI integration: If you are using Facebook CAPI or TikTok CAPI with CPV Lab | CPV One, extra tokens captured here are automatically available to pass with each conversion event. See the Facebook CAPI and TikTok CAPI guides for how to configure which tokens are passed.
Using Extra Token Values in Additional Pixels
Once CPV Lab* has captured extra token values, you can include them in any additional pixel URL using the {!tokenN!} placeholders.
| Placeholder | Passes |
|---|---|
{!token1!} | Value stored in Extra Token 1 |
{!token2!} | Value stored in Extra Token 2 |
{!token3!} | Value stored in Extra Token 3 |
{!revenue!} | Revenue amount from the conversion |
Example - passing email and revenue to a third-party CRM pixel:
A CRM system requires a pixel with email and payout when a conversion fires. You have stored the email in Extra Token 1. In the Additional Pixels section of your campaign setup, enter:
https://crm-platform.com/pixel.php?email={!token1!}&payout={!revenue!}
When the conversion fires, CPV Lab replaces the placeholders:
https://crm-platform.com/pixel.php?email=user@example.com&payout=18.50
![]()
Requirements and Limitations
- The tokens pixel must be set up as an image tag (
tokens.php) - not as a postback URL - Extra token values are captured per visitor - they are stored against that visitor's SubID. You can check each visitor info in the click Lookup page.
- You can use up to 15 extra tokens per campaign (token1, token2, token3, etc)
- Token values are updated every time the
tokens.phppixel fires - the latest value replaces any previous value for that token
Feature 3 - Offer-Specific Pixels
The Problem This Solves
In campaigns where one visitor can convert on multiple offers, a single conversion pixel fires for every conversion - regardless of which offer triggered it. This causes two problems:
- You cannot tell which specific offer converted in the affiliate network's interface
- If different offers have different advertisers or networks, each one receives all conversions instead of only their own
Offer-specific pixels fix this by letting you assign a unique pixel per offer. Each pixel only fires when its specific offer converts.
Use offer-specific pixels when:
- You are running a Multiple Option campaign where one visitor can convert on several offers
- You are running a Landing Page Sequence campaign (co-reg or offer path style)
- Different offers in your campaign belong to different advertisers or networks
⚠️ This feature only applies to Multiple Option and Landing Page Sequence campaign types. Standard single-offer campaigns do not need this.
How It Works
For a campaign, each offer in the campaign setup has its own Offer ID shown next to it.

When placing your conversion pixel at the affiliate network, you add a ?ofr=CCC_XXX parameter to the pixel URL:
CCC= your Campaign IDXXX= the Offer ID for that specific offer
This tells CPV Lab: "This pixel should only record a conversion for Offer XXX in Campaign CCC."
Real-World Example
You are running a co-reg campaign with three offers. Your Campaign ID is 45. The three offers have IDs 1002, 1003, and 1004.
Standard postback URL (fires for all offers - not what you want here):
https://cpv-track-domain.com/adclick.php?subid=NETWORK_SUBID_TOKEN
Offer-specific postback URLs:
- Offer 12:
https://cpv-track-domain.com/adclick.php?subid=NETWORK_SUBID_TOKEN&ofr=45_1002 - Offer 13:
https://cpv-track-domain.com/adclick.php?subid=NETWORK_SUBID_TOKEN&ofr=45_1003 - Offer 14:
https://cpv-track-domain.com/adclick.php?subid=NETWORK_SUBID_TOKEN&ofr=45_1004
![]()
You give each affiliate network or advertiser their specific postback URL - with the ofr parameter pointing to their offer only. When a visitor converts on Offer 12, only the Offer 12 pixel fires.
💡 Where do I find the Campaign ID? You have it on the General Settings on your campaign setup page.
💡 Where do I find the Offer ID? It appears in the Offers section of your campaign setup, next to each offer in the offer list. It is not the same as the offer's position number - it is a unique ID assigned to that offer.
Combining with Cumulative Revenue
You can use cladd=true and ofr=CCC_XXX together in the same pixel URL. This lets you track cumulative revenue AND attribute each conversion to the correct offer simultaneously.
Example:
https://cpv-track-domain.com/adclick.php?subid=NETWORK_SUBID_TOKEN&revenue=NETWORK_REVENUE_TOKEN&ofr=45_1002&cladd=true
You may also find useful: