
Meta Ads Conversions API (CAPI) Integration
The Meta Ads Conversions API (CAPI) lets you send conversion events directly from CPV One or CPV Lab to Meta, server-to-server - without relying on the browser pixel. This means conversions are tracked even when the pixel is blocked by iOS privacy settings, ad blockers, or browser restrictions.
This is important for the optimization and delivery of your Meta Ads campaigns. Since the iOS 14 updates in 2021, browser-based tracking for iOS devices has been significantly limited. CAPI fills that gap.
Who This Is For
👤 Affiliate media buyers and agencies: Use Meta CAPI to send purchase or lead events back to Meta for audience optimization and lookalike targeting - even when iOS tracking restrictions or ad blockers would have blocked the pixel from firing.
🏪 Ecommerce and DTC brands: Send purchase events with revenue values, currency, and customer data (email, phone, name) to fuel Meta's algorithm and recover the conversions your pixel is missing. CAPI is now essential for accurate ROAS reporting on Meta.
💡 The centralized CAPI Integrations flow described in this guide is available in CPV One and CPV Lab Version 14+. If you are on an older version of CPV Lab, CAPI is configured directly in the campaign setup page. We recommend upgrading to Version 14.
Before You Start
You need:
- CPV One (opens new window) or CPV Lab V14+ (opens new window)
- At least one active Meta Ads campaign
- A Meta Pixel (also called a Dataset in Events Manager)
- A Conversions API access token from Events Manager
For best results, your campaign should use the no-redirect tracking method with the Direct Traffic code placed in the landing page.
More details about Facebook Ads campaign setup.
Step 1 - Create a Meta Pixel (if not already created)
- Go to Meta Events Manager (opens new window).
- Choose Connect a New Data Source from the left menu.
- Select
"Web"as the type. - Select
"Conversions API"as the connection method.

- Enter a name for your pixel and complete the setup.
- Place the pixel code in your landing page following Meta's instructions.
Once the pixel is created, go to its Settings tab and configure these options:
- Automatic Advanced Matching - set to OFF
- Track Events Automatically Without Code - set to OFF
- First-Party Cookies - keep ON

Step 2 - Get Your Pixel ID
In the Settings tab for your pixel, find the numeric Pixel ID and save it - you will need it when setting up the integration in CPV One or CPV Lab.

Step 3 - Generate the API Access Token
The API Access Token is needed in order to access the API from CPV Lab Pro | CPV One.
- In Events Manager, go to the Settings tab for your pixel.
- Scroll to the Conversions API section.
- Click Generate access token.
- Copy the token and store it securely - treat it like a password.

⚠️ The Generate access token link is only visible to users with developer or admin privileges on the Business account. If you don't see it, ask your Business Manager admin to generate it.
Step 4 - Verify Your Domain on Meta
Meta requires you to verify the domain you send conversions from. This is your landing page domain.
- Go to Brand Safety - Owned Domains (opens new window) in Facebook Business Settings.

- Add your landing page domain and complete the verification using one of Meta's provided methods.
- The easiest option is to create a TXT record in the DNS settings of your domain at your domain registrar.

💡 Check with your tech team or hosting provider if you are unsure how to add a DNS TXT record. This step may vary depending on your setup - confirm with your developer whether it is required for your specific configuration.
Step 5 - Create the Integration in CPV One or CPV Lab
- Go to Sources - CAPI Integrations.
- In the Quick Add section, click the Meta Ads card.
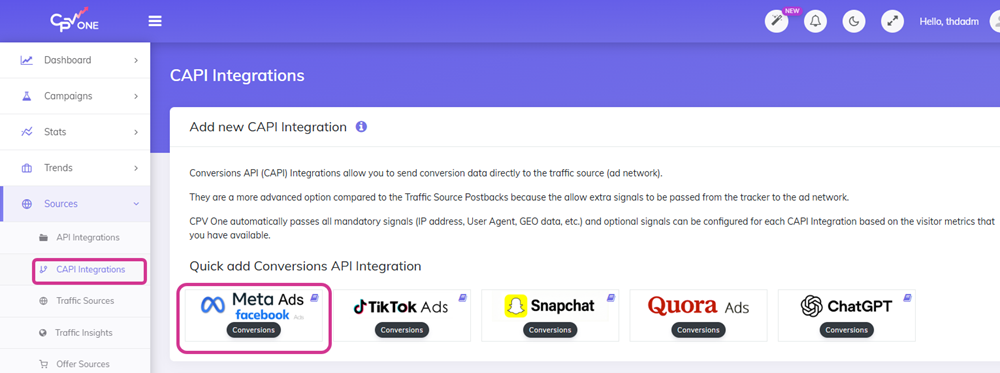
- The Add Facebook Ads CAPI Integration form opens.
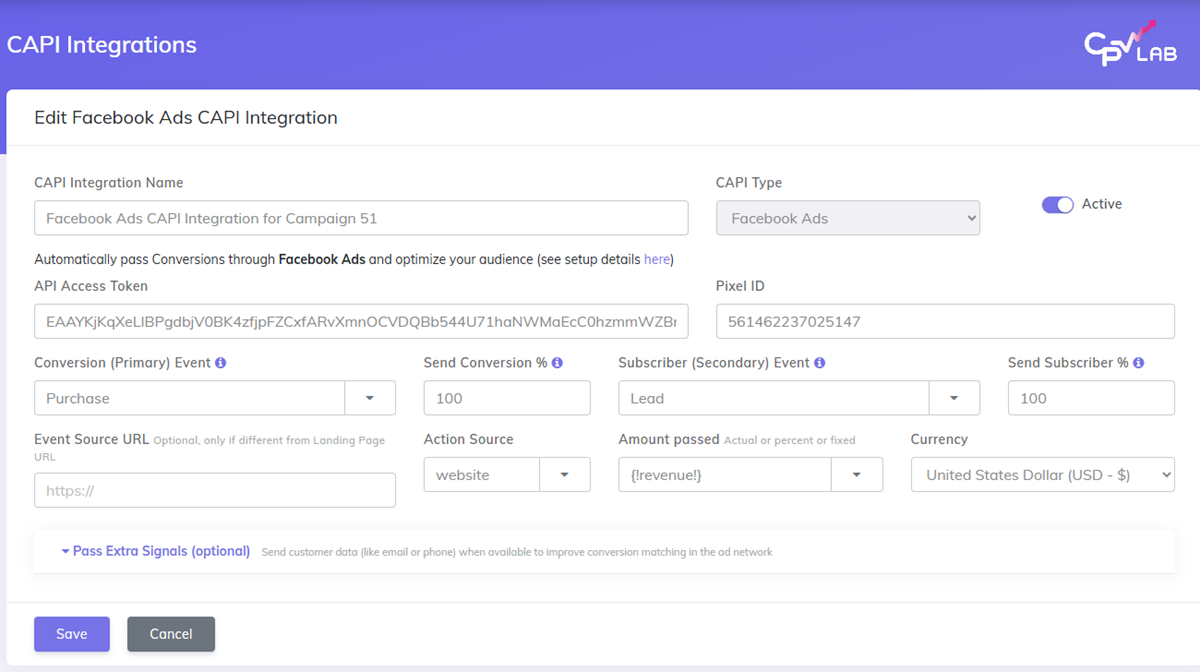
- Fill in the fields:
CAPI Integration Name - A name you will recognize in campaign setup. Examples:
- Meta CAPI - Main Pixel
- Facebook CAPI - Lead Gen Campaigns
- Meta CAPI - Ecom Purchase Events
CAPI Type - Pre-set to Facebook Ads.
Active - Toggle on.
API Access Token - Paste the token you generated in Events Manager.
Pixel ID - Paste your Meta Pixel ID.
Step 6 - Configure Events
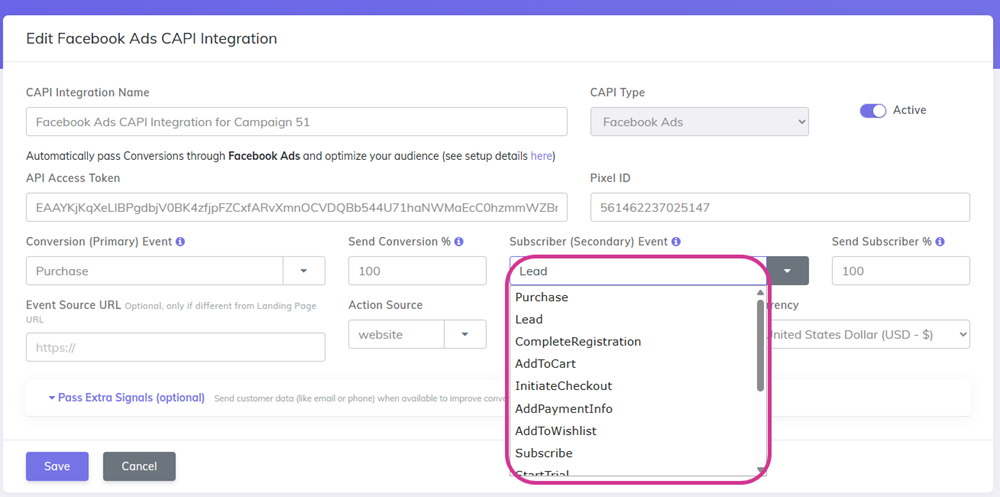
Conversion (Primary) Event
Select the Meta standard event that matches your campaign goal:
| Campaign goal | Event name |
|---|---|
| Purchase / sale | Purchase |
| Lead form submission | Lead |
| Registration | CompleteRegistration |
| Add to cart | AddToCart |
| Initiate checkout | InitiateCheckout |
| Add payment info | AddPaymentInfo |
| Add to wishlist | AddToWishlist |
| Subscribe | Subscribe |
| Start trial | StartTrial |
Send Conversion % - Default 100. If you want to fire the Traffic Source Postback URL only for part of the conversions, then enter the percentage of Postback URL fires here.
Subscriber (Secondary) Event - Optional. Use this if you want CPV One or CPV Lab to also fire a separate Meta event when a subscriber (opt-in) is recorded - useful for lead funnels where you track both the initial opt-in and the downstream purchase.
Step 7 - Set Revenue and Currency
Amount passed - Default {!revenue!} passes the actual revenue recorded for that conversion. For ecommerce this is your order value; for affiliates this is your payout.
💡 For Meta purchase optimization, always pass revenue. Meta uses the value to optimize for high-value customers, not just conversion volume.
Currency - Match your Meta ad account currency. Use the 3-letter ISO code (USD, EUR, GBP, etc.).
⚠️ For
Purchaseevents, Meta requires bothcurrencyandvalue. Make sure both fields are filled in.
Step 8 - Pass Extra Signals (Optional but Recommended)
Extra signals help Meta match your server-side conversion to a real user profile. Better matching means better campaign optimization and more accurate attribution.
Click Pass Extra Signals (optional) to expand the section.
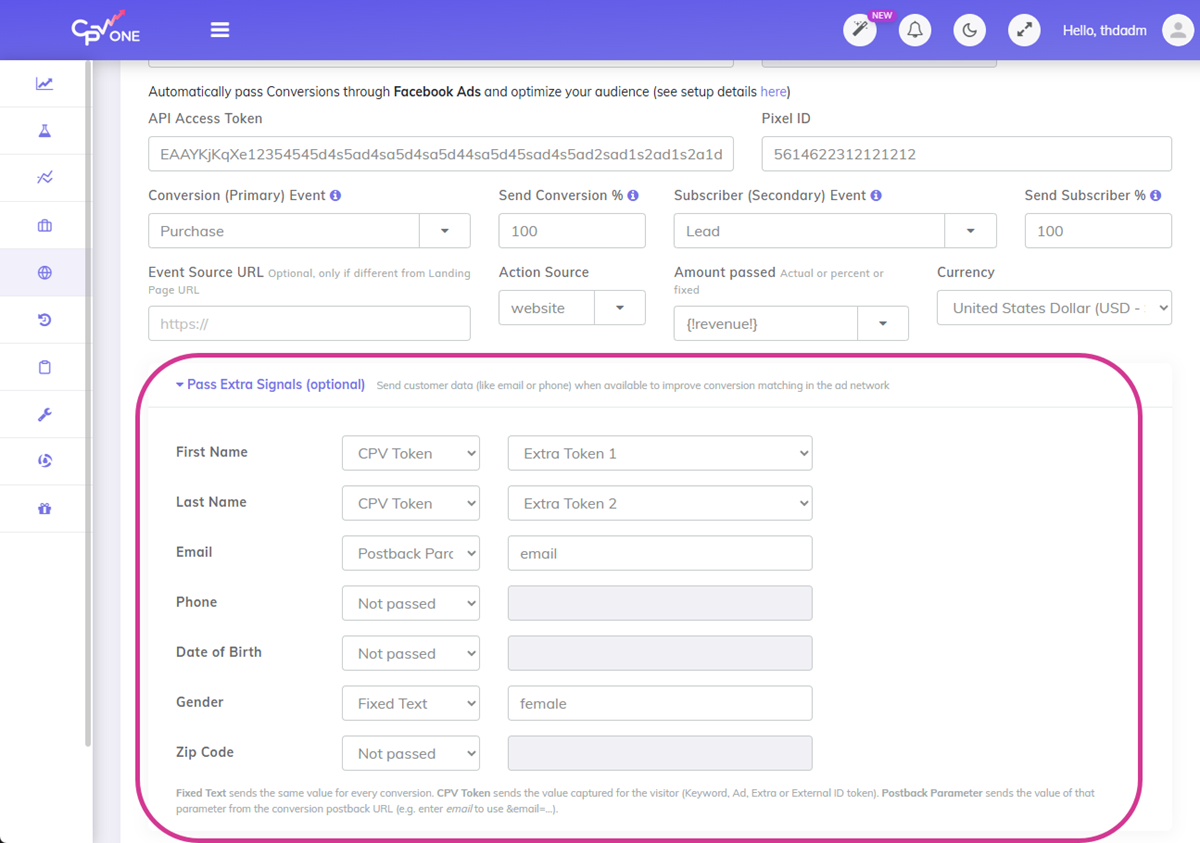
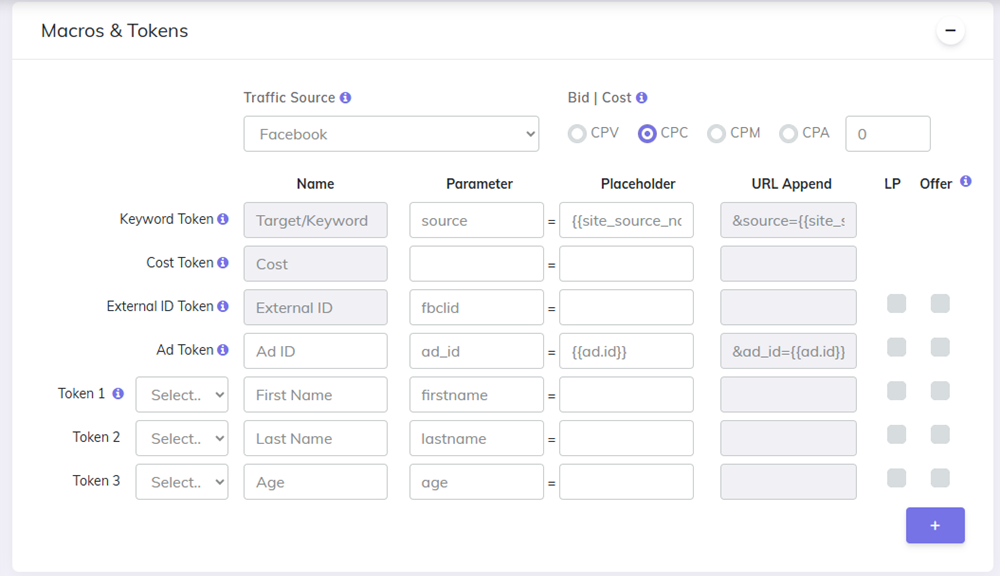
The most impactful signals are Email and Phone. Configure them using:
- CPV Token - if the email or phone is stored in a CPV One or CPV Lab Extra Token after form submission
- Postback Parameter - if your affiliate network fires the email back in the conversion postback URL
Example of how to define the extra tokens on campaign setup page:
💡 Affiliate media buyers: If your offer network passes back customer email in the postback (e.g.
&email=user@example.com), set the Email field to Postback Parameter and enter
💡 Ecommerce/DTC brands: If your checkout captures email and phone, pass these through CPV One Extra Tokens for the strongest possible match quality on Meta.
All personally identifiable data (email, phone, name) is hashed by Meta before being used for matching - it is never stored in plain text.
Click Save when done.
Step 9 - Assign the Integration to a Campaign
- Open or create a Meta Ads campaign in CPV One or CPV Lab.
- Make sure the traffic source is set to Facebook or Facebook Ads and that
fbclidis configured as the External ID Token.


- Make sure User Agents and IP Addresses are enabled in the Tracking Settings section of the campaign.

- Scroll to Pass events to the traffic source (ad network).
- Click the Dedicated Integration tab.
- Select your Meta CAPI integration from the dropdown.
- Save the campaign.
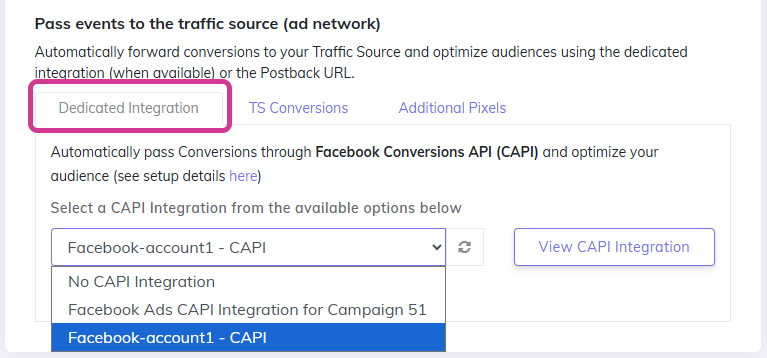
✅ CPV One or CPV Lab will now fire a Meta CAPI event for every conversion recorded in this campaign.
💡 You can assign the same integration to multiple Meta Ads campaigns. One integration per pixel is enough - no need to create separate integrations for each campaign.
Step 10 - Add the Tracking Code to Your Landing Page
Update your landing page to include the CPV Lab or CPV One tracking code for Meta.
- Use the tracking code provided in Step 2: Add Code to Landing Pages in your campaign setup.
- Place this code before the
</body>tag in your landing page.
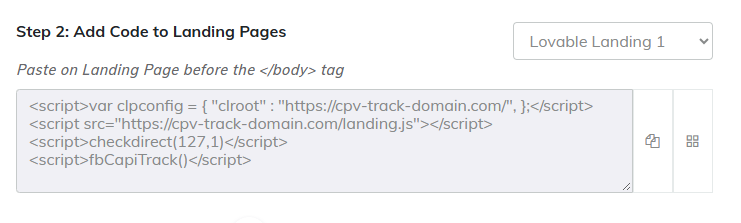
Save and upload your updated landing page. You are ready to start your campaign.
Verifying Your Setup
In CPV One or CPV Lab:
Go to the Postback Log after a test conversion. Look for entries starting with "type":"fbapi - these confirm the CAPI event was sent. You will see the details posted to Meta for each API call.

In Meta Events Manager:
Go to your Pixel - View Details - Recent Activities. You will see the latest API requests made from CPV One or CPV Lab. There may be a delay of up to 15 minutes before events appear - this is normal and does not affect tracking.


FAQ
Does this work with CPV Lab (self-hosted)? Yes. Meta Ads CAPI is available in CPV Lab Version 14 and later. The centralized CAPI Integrations menu under Sources works the same way in both CPV One and CPV Lab V14+. If you are on an older version of CPV Lab, CAPI is configured directly in the campaign setup page - upgrading to Version 14 gives you the new centralized flow and all the latest improvements.
What is fbclid and does CPV One or CPV Lab capture it automatically? fbclid is the Facebook Click ID appended to your ad URL when someone clicks a Meta ad. CPV One and CPV Lab capture it automatically when the visitor lands on your tracked URL. It is passed with every CAPI event for accurate conversion attribution back to the original ad click.
Do I need the Meta Pixel on my landing page as well? You don't have to, but Meta recommends running both the browser pixel and CAPI together for the best event match quality. If you already have the Meta Pixel on your page, running both creates deduplication - Meta uses the shared event ID to avoid counting the same conversion twice.
Why is CAPI important for Meta Ads campaigns now? iOS 14.5 and later privacy changes, browser ad blockers, and third-party cookie deprecation all reduce the number of conversions your browser pixel can capture. CAPI sends events directly from your server - these are not blocked. For affiliate campaigns with offer redirects and for ecommerce brands using multi-step funnels, CAPI typically recovers a significant percentage of conversions that the pixel misses.
Can I send different events for different campaigns from the same pixel?
Yes. Create separate integrations with different event configurations (e.g. one with Purchase as the primary event, another with Lead) and assign each to the appropriate campaigns. Each integration points to the same Pixel ID but fires different events.
Related articles: