
CAPI Integrations
Conversions API (CAPI) integrations let CPV Lab and CPV One send conversion data directly to ad networks - server to server. Your ad platform gets the signals it needs to optimize campaigns, improve audience matching, and find more people like your best converters.
CAPI integrations are managed in one dedicated place: Sources - CAPI Integrations. You create a named integration once and assign it to as many campaigns as you need.
⚙️ Important: The CAPI Integrations menu is available for CPV One and CPV Lab (V 14). Below we will use CPV One as an example, but the setup is the same for CPV Lab as well.
What Is a CAPI Integration?
A CAPI (Conversions API) integration is a server-to-server connection between CPV One | CPV Lab and an ad network. When a conversion is recorded in CPV One, the tracker automatically fires an event to the ad network via their API - no browser pixel required.
CAPI integrations are more reliable than browser-based pixels because they:
- Are not affected by ad blockers or browser privacy settings
- Work correctly on iOS devices regardless of tracking preferences
- Pass the ad network's unique click ID back with every conversion for accurate attribution
- Can include extra signals like email, phone, and name for better audience matching
Which ad networks are supported?
CPV One | CPV Lab currently supports CAPI integrations with:
- Meta Ads (Facebook and Instagram)
- TikTok Ads
- Snapchat Ads
- ChatGPT Ads (OpenAI)
- Quora Ads
How the Flow Works
CAPI integrations are now managed separately from campaign setup. Here is the full flow:
Step 1 - Create a CAPI Integration
- Go to Sources - CAPI Integrations
- enter your ad network credentials (Pixel ID and Access Token)
- configure events
- Save with a name you will recognize.
Step 2 - Assign It to a Campaign
- Open any campaign setup page
- Go to the Dedicated Integration tab
- Select your CAPI integration from the dropdown.
Step 3 - Conversions Fire Automatically
When CPV One records a conversion for that campaign, it fires the CAPI event to the ad network automatically.
Why this is better than per-campaign setup:
Previously, you entered Pixel ID and Access Token on every campaign page. Now you enter credentials once, name the integration, and reuse it across as many campaigns as you want. If your access token changes, update it in one place and all campaigns using that integration stay current.
The CAPI Integrations Page
Go to Sources - CAPI Integrations from the left sidebar.
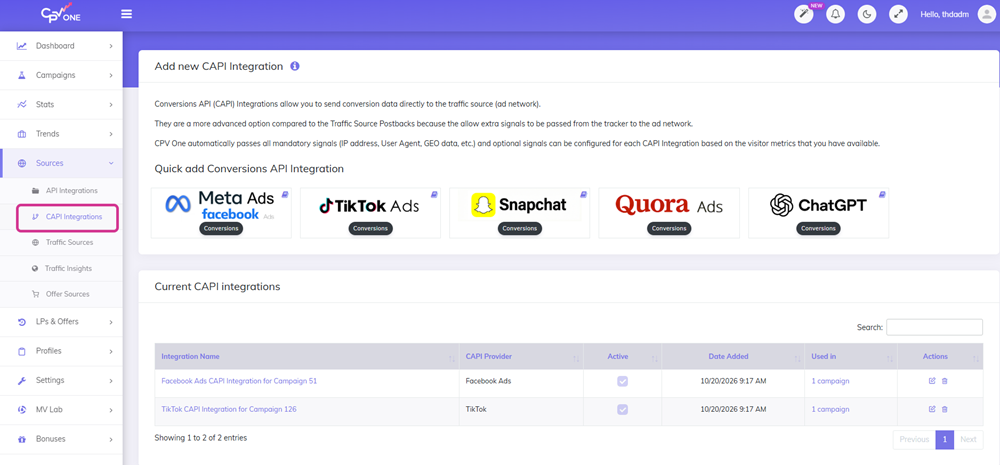
The page has two sections:
Quick Add Conversions API Integration
- Cards for each supported ad network. Click any card to open the Add Integration form for that network.
Current CAPI Integrations
- A table showing all your saved integrations with:
- Integration Name
- CAPI Provider (the ad network)
- Active status
- Date Added
- Used in (how many campaigns are using this integration)
- Actions (edit or delete)
- A table showing all your saved integrations with:
Step 1 - Create a New CAPI Integration
- Go to Sources - CAPI Integrations.
- In the Quick Add section, click the card for the ad network you want to set up.
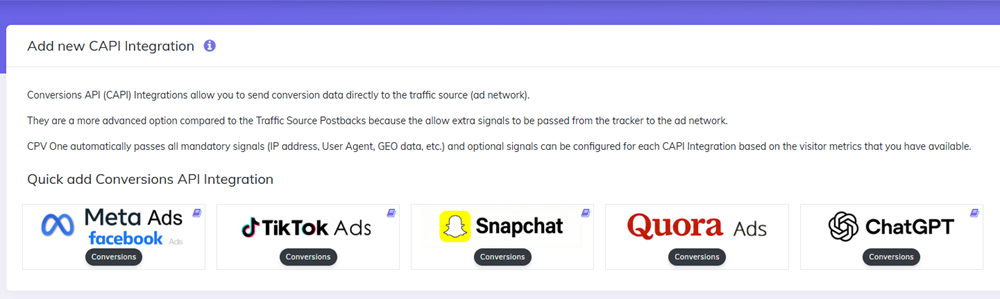
- The Add CAPI Integration form opens.
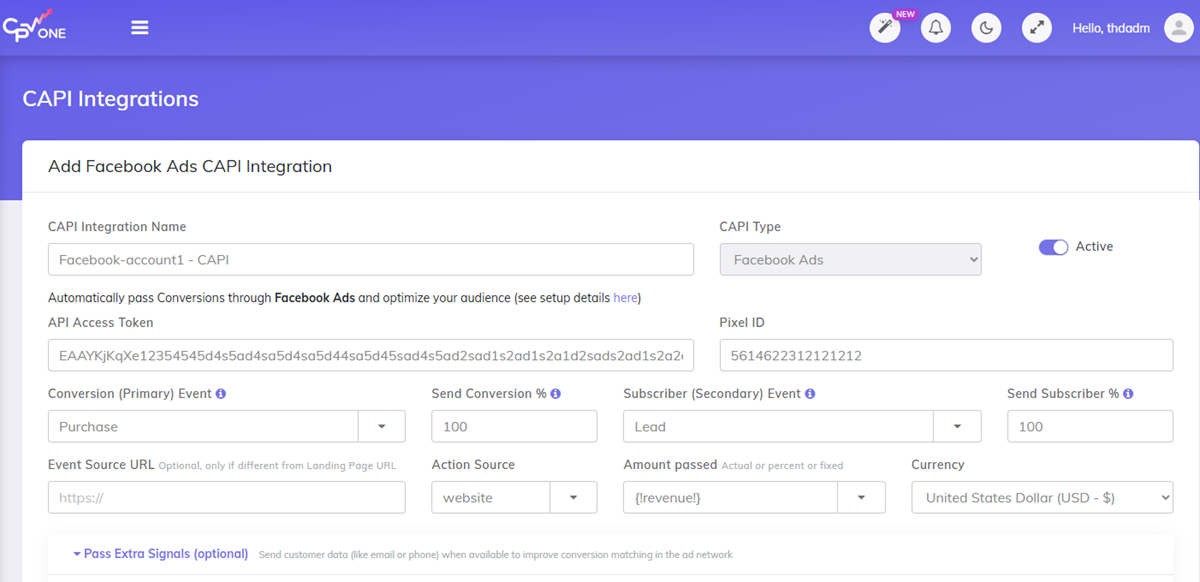
Step 2 - Fill In the Integration Fields
Every CAPI integration uses the same form, regardless of ad network.
Basic Fields
CAPI Integration Name
Give the integration a name you will recognize when selecting it in a campaign. Be specific - for example:
- Meta Ads CAPI - Brand Campaigns
- TikTok CAPI - Lead Gen US
- Snapchat CAPI - Ecom EU
CAPI Type
Pre-selected when you click a Quick Add card. You can't change it. Based on the CAPI type some fields are different in the page (like events).
Active
Toggle this on to activate the integration. Conversions are only sent to the ad network when this is enabled.
API Access Token
The authentication token from your ad network account. This is how CPV One proves to the ad network that it has permission to send conversion data. Each ad network generates this token differently - see the specific guide for each network.
Pixel ID
The identifier for your ad network pixel or dataset. This tells CPV One | CPV Lab which pixel to send events to.
⚠️ Both API Access Token and Pixel ID are required. Without them, no CAPI events will be sent.
Conversion (Primary) Event
The main event to fire when a conversion is recorded. Choose the event name that matches what your campaign is optimizing for.
Common event names across ad networks:
| Conversion type | Typical event name |
|---|---|
| Purchase or sale | Purchase |
| Lead form submission | Lead |
| Registration or sign-up | CompleteRegistration |
| Add to cart | AddToCart |
| Initiate checkout | InitiateCheckout |
| Subscribe | Subscribe |
| Start trial | StartTrial |
| Add payment info | AddPaymentInfo |
| Add to wishlist | AddToWishlist |
💡 Each ad network uses slightly different event names. See the specific CAPI guide for your network to confirm the exact supported names.
Send Conversion %
The percentage of conversions to send to the ad network. Default is 100. Lower this if you want to test with a reduced signal.
Subscriber (Secondary) Event
An optional second event fired when CPV One records a subscriber event for this campaign. This lets the ad network optimize for two goals at once - for example, both an opt-in (subscriber) and a purchase (conversion).
Send Subscriber %
The percentage of subscriber events to send. Default is 100.
Event Source URL (Optional)
The URL CPV One sends as the source of the conversion. By default CPV One uses the landing page URL. Set a custom URL here when the conversion happens on a different page - for example, a thank-you page or checkout page with a different domain.
Action Source
The source type for the conversion event. Default is website. Change this only if you are tracking app or offline events.
Amount Passed
The revenue value to send with each conversion.
Default is {!revenue!} which passes the actual revenue recorded in CPV Lab | CPV One. You can enter a fixed numeric value here if you prefer a consistent conversion value for all events.
Currency
The currency for the revenue amount. Default is USD. Use the 3-letter currency code that matches your ad account currency.
Step 3 - Pass Extra Signals (Optional)
The Pass Extra Signals section lets you send additional customer data with each CAPI event. More data means better user matching on the ad network side - which directly improves audience quality and campaign optimization.
Click Pass Extra Signals (optional) to expand the section.
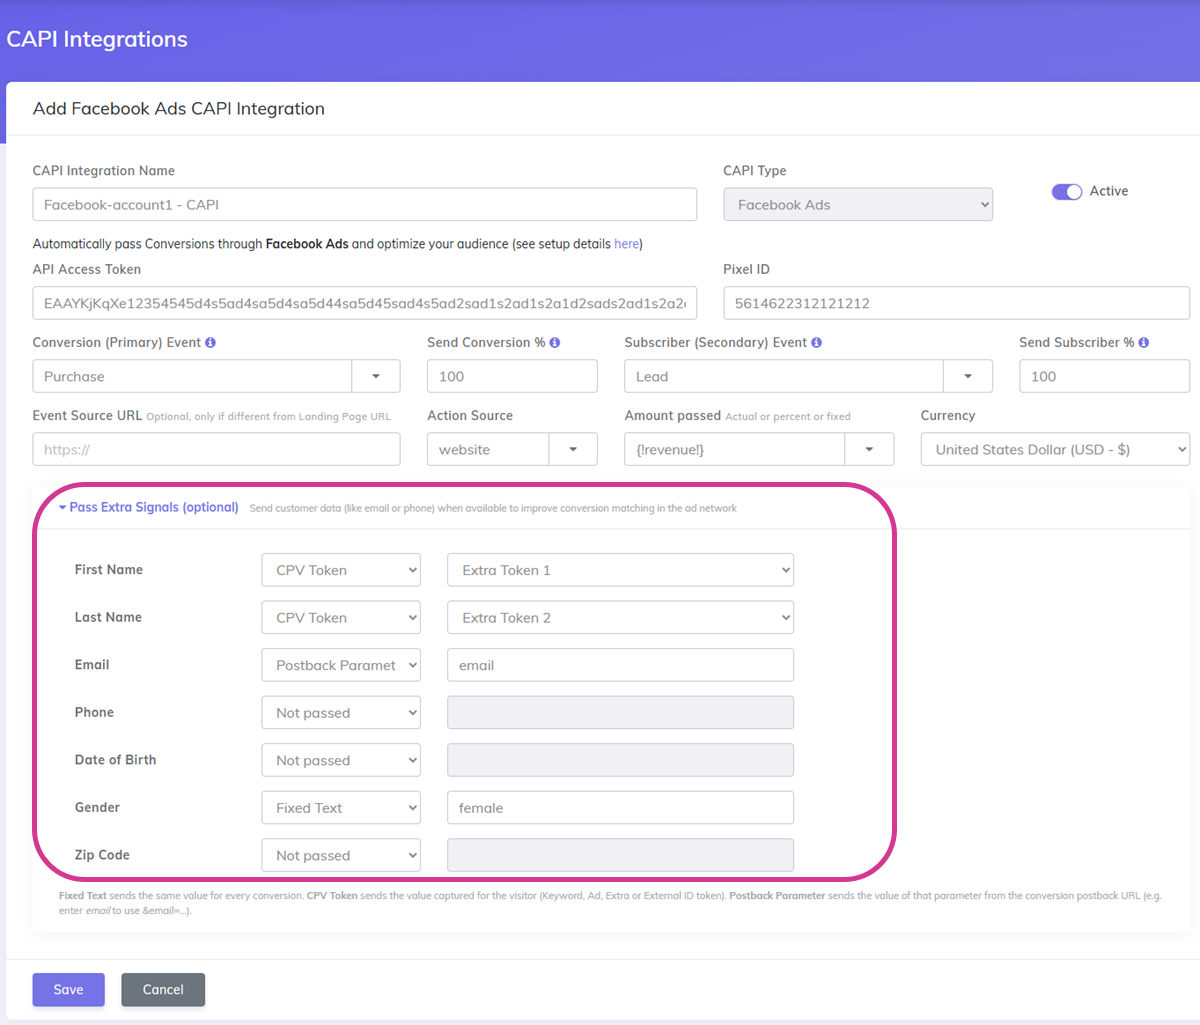
For each signal, choose a method from the dropdown:
| Method | What it does |
|---|---|
| Not passed | This signal is not included in the conversion event |
| Fixed Text | Sends the same value for every conversion - useful for a fixed country code or region |
| CPV Token | Sends the value captured from the visitor for a specific token (Keyword, Ad, Extra Token, or External ID Token) |
| Postback Parameter | Sends the value of a named parameter from the conversion postback URL your affiliate network fires back (e.g. enter email to pull the &email= value) |
Available signal fields:
- First Name
- Last Name
- Phone
- Date of Birth
- Gender
- Zip Code
💡 Which signals matter most? Email and phone give the strongest matching signal. If your funnel captures email or phone (for example, through an opt-in form) and passes it into CPV One via Extra Tokens, map those tokens here using the CPV Token method. See Extra Tokens and Prepop for details on capturing form data into tokens.
⚠️ Only pass data that your visitors have consented to share, in line with your privacy policy and applicable regulations. Ad networks hash personally identifiable data (email, phone, name) before using it for matching.
When you are done, click Save. The integration is now ready to assign to campaigns.
Step 4 - Assign a CAPI Integration to a Campaign
- Go to Campaigns and open or create a campaign.
- Scroll down to the Pass events to the traffic source (ad network) section.
- Click the Dedicated Integration tab.
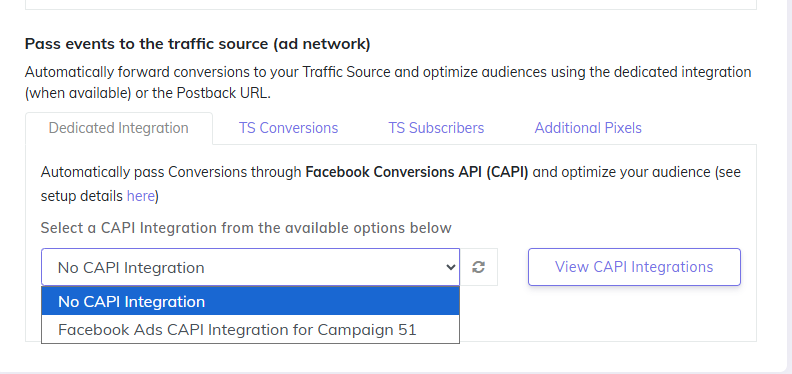
- You will see a brief description, a dropdown, a refresh icon, and a View CAPI Integrations button.
- Click the dropdown and select the integration you want to use for this campaign.
- If you don't see your integration, click the refresh icon next to the dropdown
- To create or edit an integration, click View CAPI Integrations - this opens the CAPI Integrations page.
- Save the campaign.
✅ From this point on, every conversion recorded in CPV Lab | CPV One for this campaign automatically triggers a CAPI event to the ad network.
💡 One integration, many campaigns. You can assign the same CAPI integration to multiple campaigns. If you run ten Meta Ads campaigns all sending to the same pixel, create one integration and select it across all ten.
Managing Your Integrations
Edit an integration
- Go to Sources - CAPI Integrations
- Find the integration in the table
- Click on it
- Update the fields
- Save.
Changes take effect immediately for all campaigns using that integration.
Deactivate an integration
Toggle the Active switch to off on the integration. It stays saved but stops sending CAPI events. Useful when pausing campaigns without losing your configuration.
Delete an integration
Click the Delete icon. This permanently removes the integration. Any campaigns assigned to it will show "No CAPI Integration" in their Dedicated Integration dropdown.
⚠️ Check the Used in column before deleting - it shows how many campaigns will be affected.
Verifying That CAPI Events Are Being Sent
After assigning an integration to a campaign and receiving a test conversion, check these two places:
CPV One Postback Log
- Go to Settings - Postback Log and look for CAPI entries.
- Each successful entry shows a success response from the ad network API confirming the event was accepted.

Ad Network Events Manager
Log in to your ad network account and check their Events Manager or Conversions section. The event should appear within a few minutes of being sent.
CAPI Setup Guides by Network
For step-by-step instructions to get your Pixel ID and Access Token from each ad network:
- Meta Ads CAPI Integration
- TikTok Ads CAPI Integration
- Snapchat Ads CAPI Integration
- ChatGPT Ads CAPI Integration
- Quora Ads CAPI Integration
Related articles: